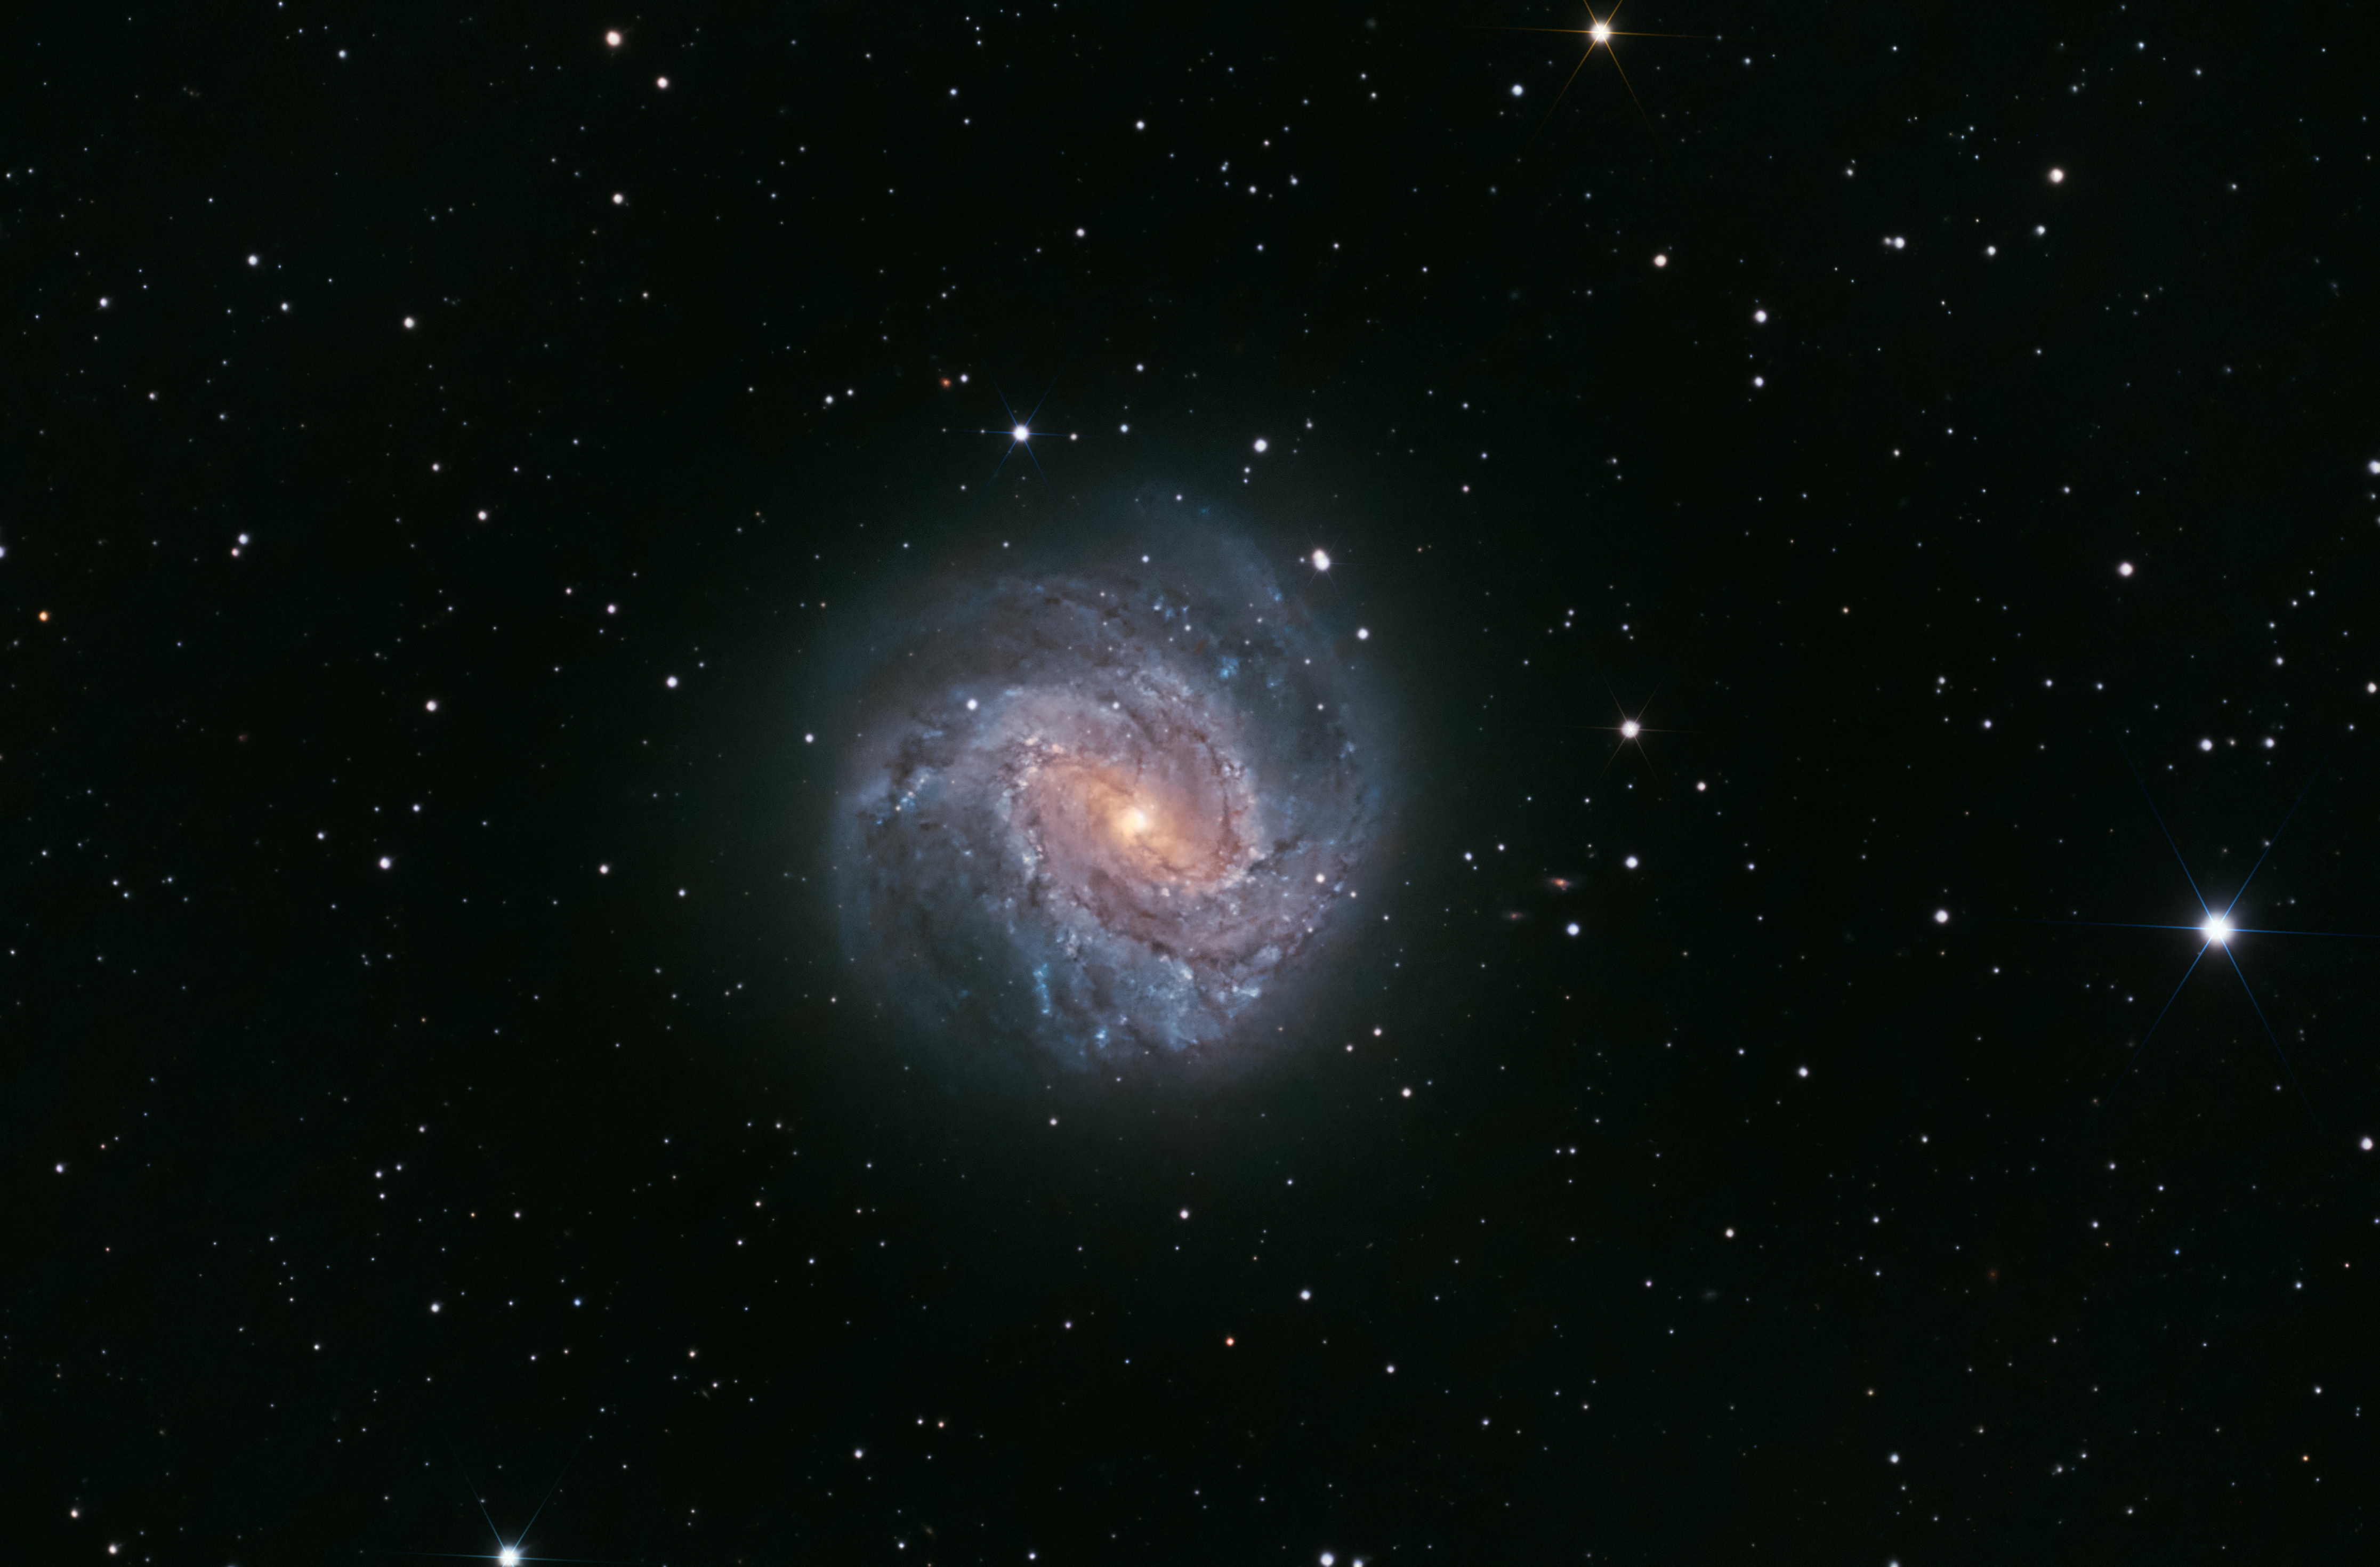
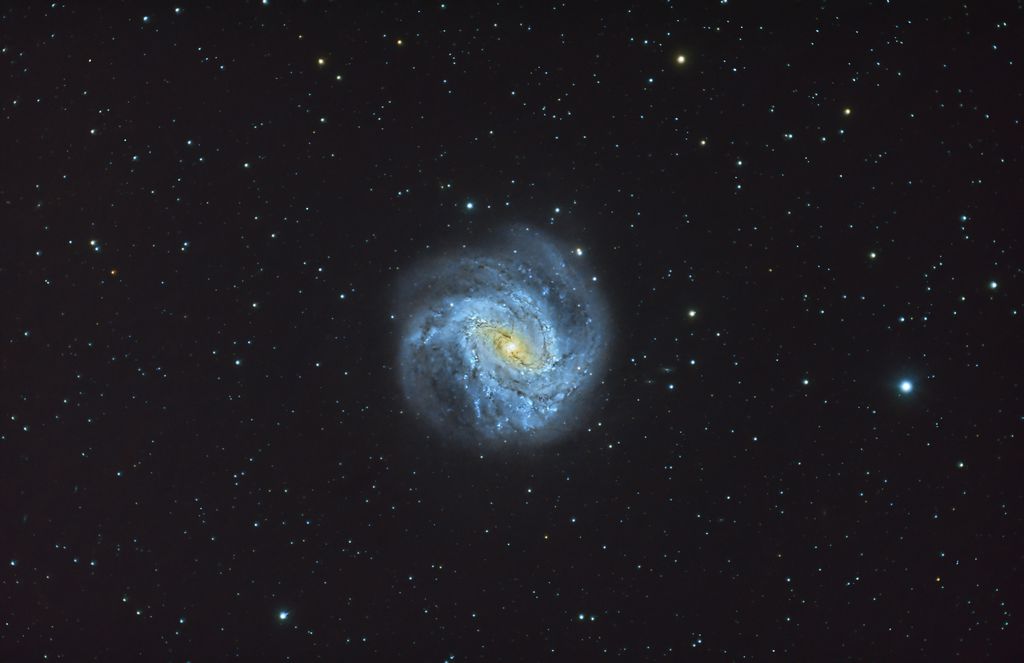
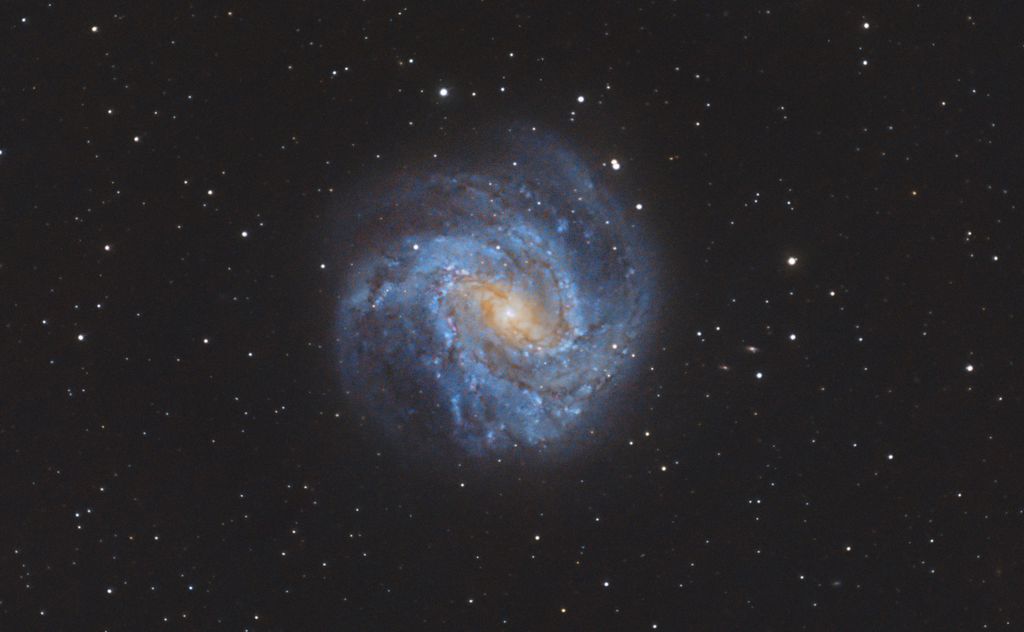
Thanks for the challenge - here's the best I could do using PI, PSCC, StarSpikes and Topaz Denoise. I think I'm on the pinkish side...
 |
You cannot like this item. Reason: "ANONYMOUS".
You cannot remove your like from this item.
Editing a post is only allowed within 24 hours after creating it.
You cannot Like this post because the topic is closed.
Leah Deckard Hallett:
I think I'm on the pinkish side
I just see some purple close to the core; otherwise, the galaxy is mostly blue, which is a nice color.
|
You cannot like this item. Reason: "ANONYMOUS".
You cannot remove your like from this item.
Editing a post is only allowed within 24 hours after creating it.
You cannot Like this post because the topic is closed.
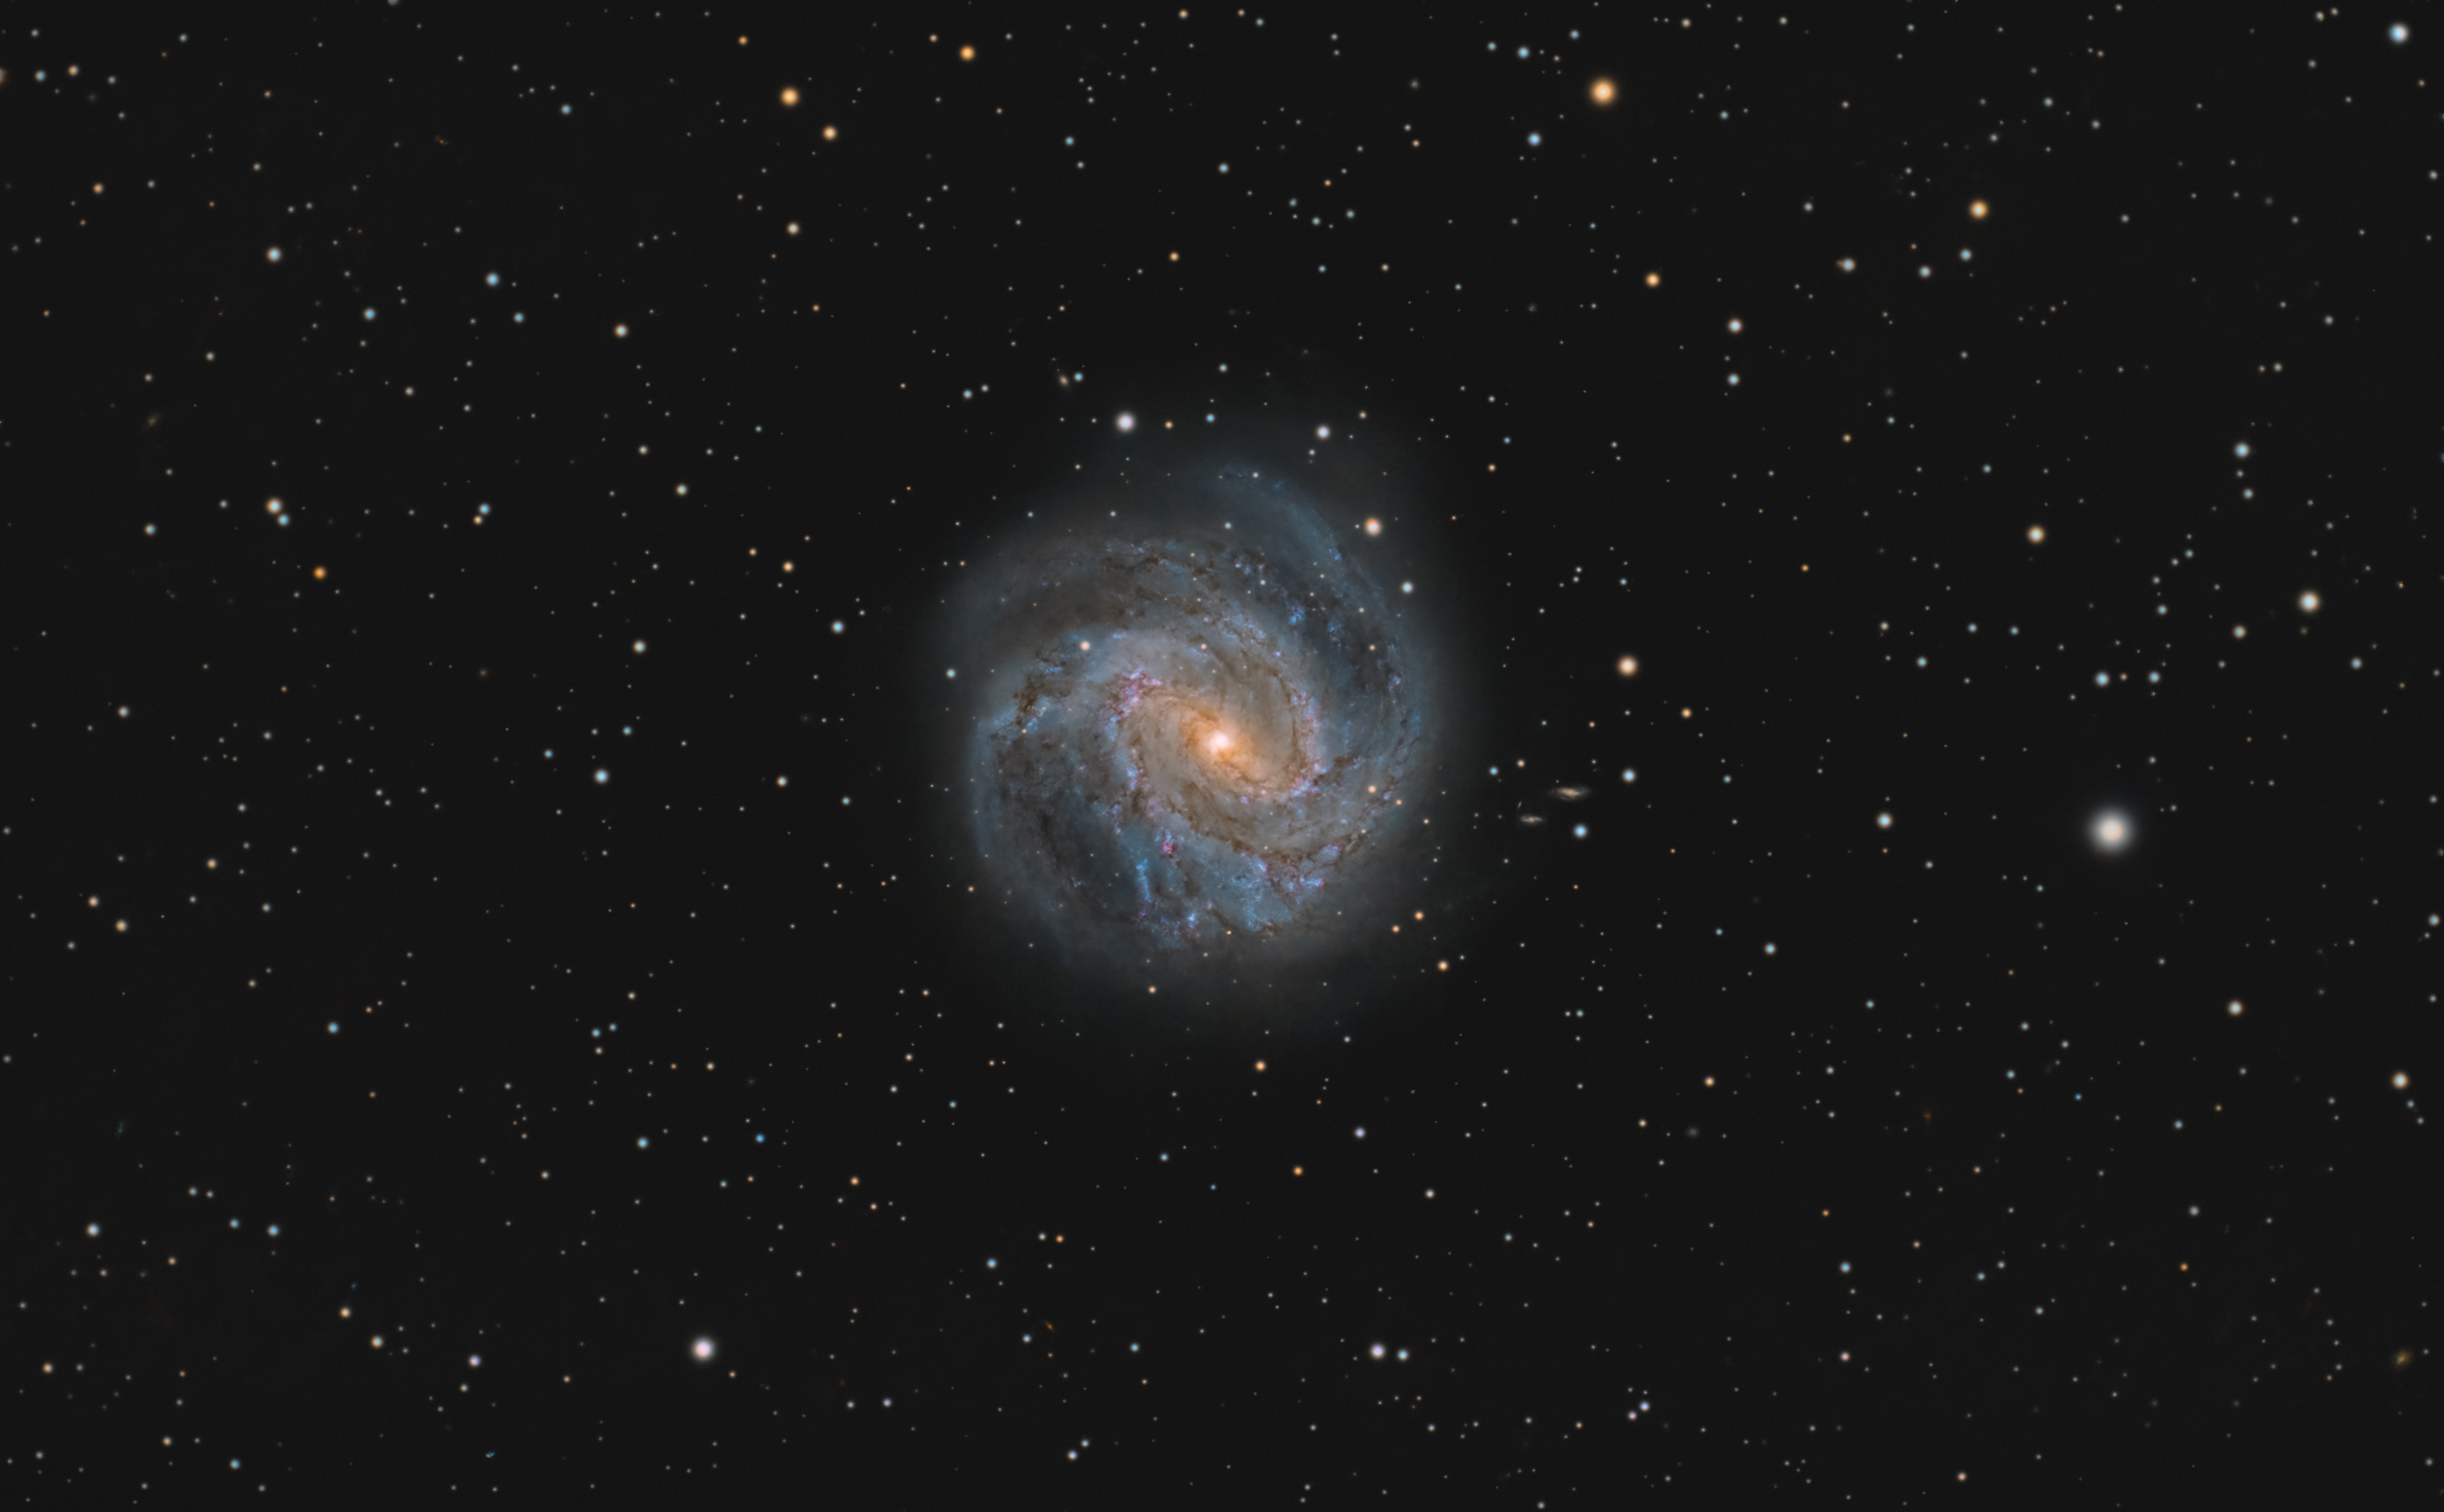
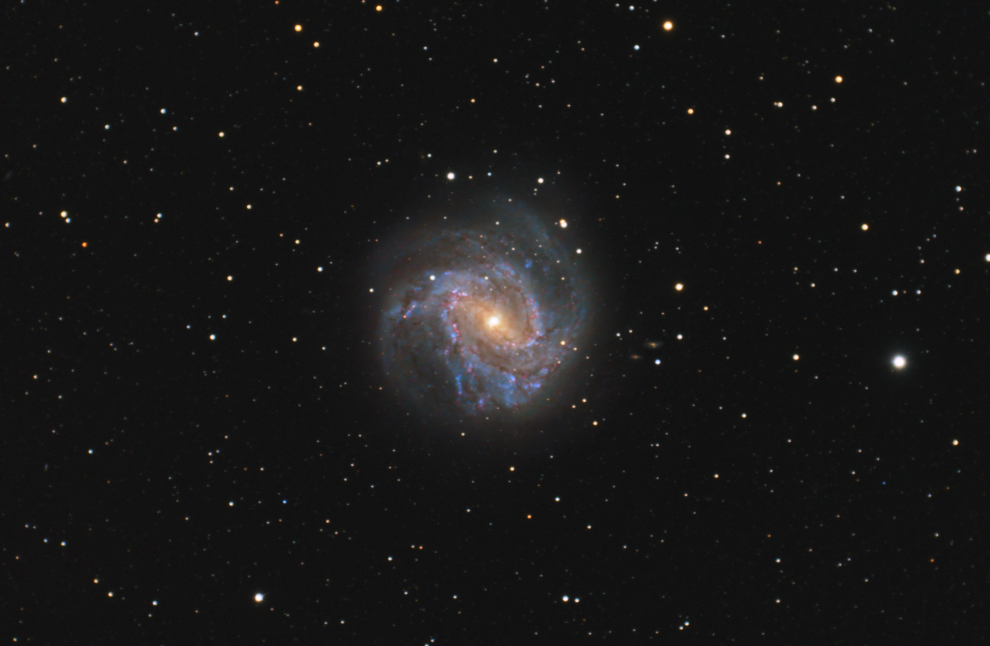
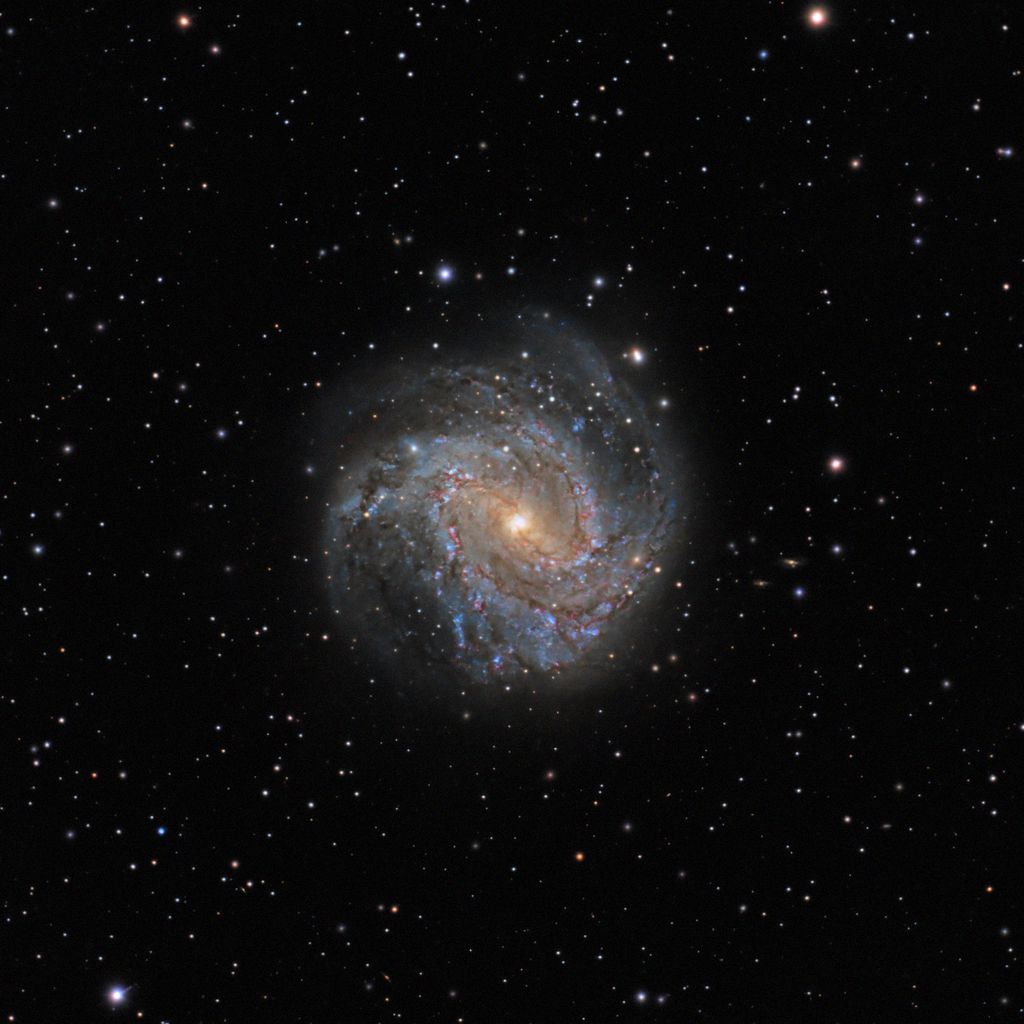
Here is my go at it  SPCC > BTX > stretch > SXT> S curve RGB/K >Mask for the galaxy > Curves > Mask for the core > HDRMT > dark structure enhance > curves saturation bump > NXT > unsharp mask > Add stars. SPCC > BTX > stretch > SXT> S curve RGB/K >Mask for the galaxy > Curves > Mask for the core > HDRMT > dark structure enhance > curves saturation bump > NXT > unsharp mask > Add stars.
 |
You cannot like this item. Reason: "ANONYMOUS".
You cannot remove your like from this item.
Editing a post is only allowed within 24 hours after creating it.
You cannot Like this post because the topic is closed.
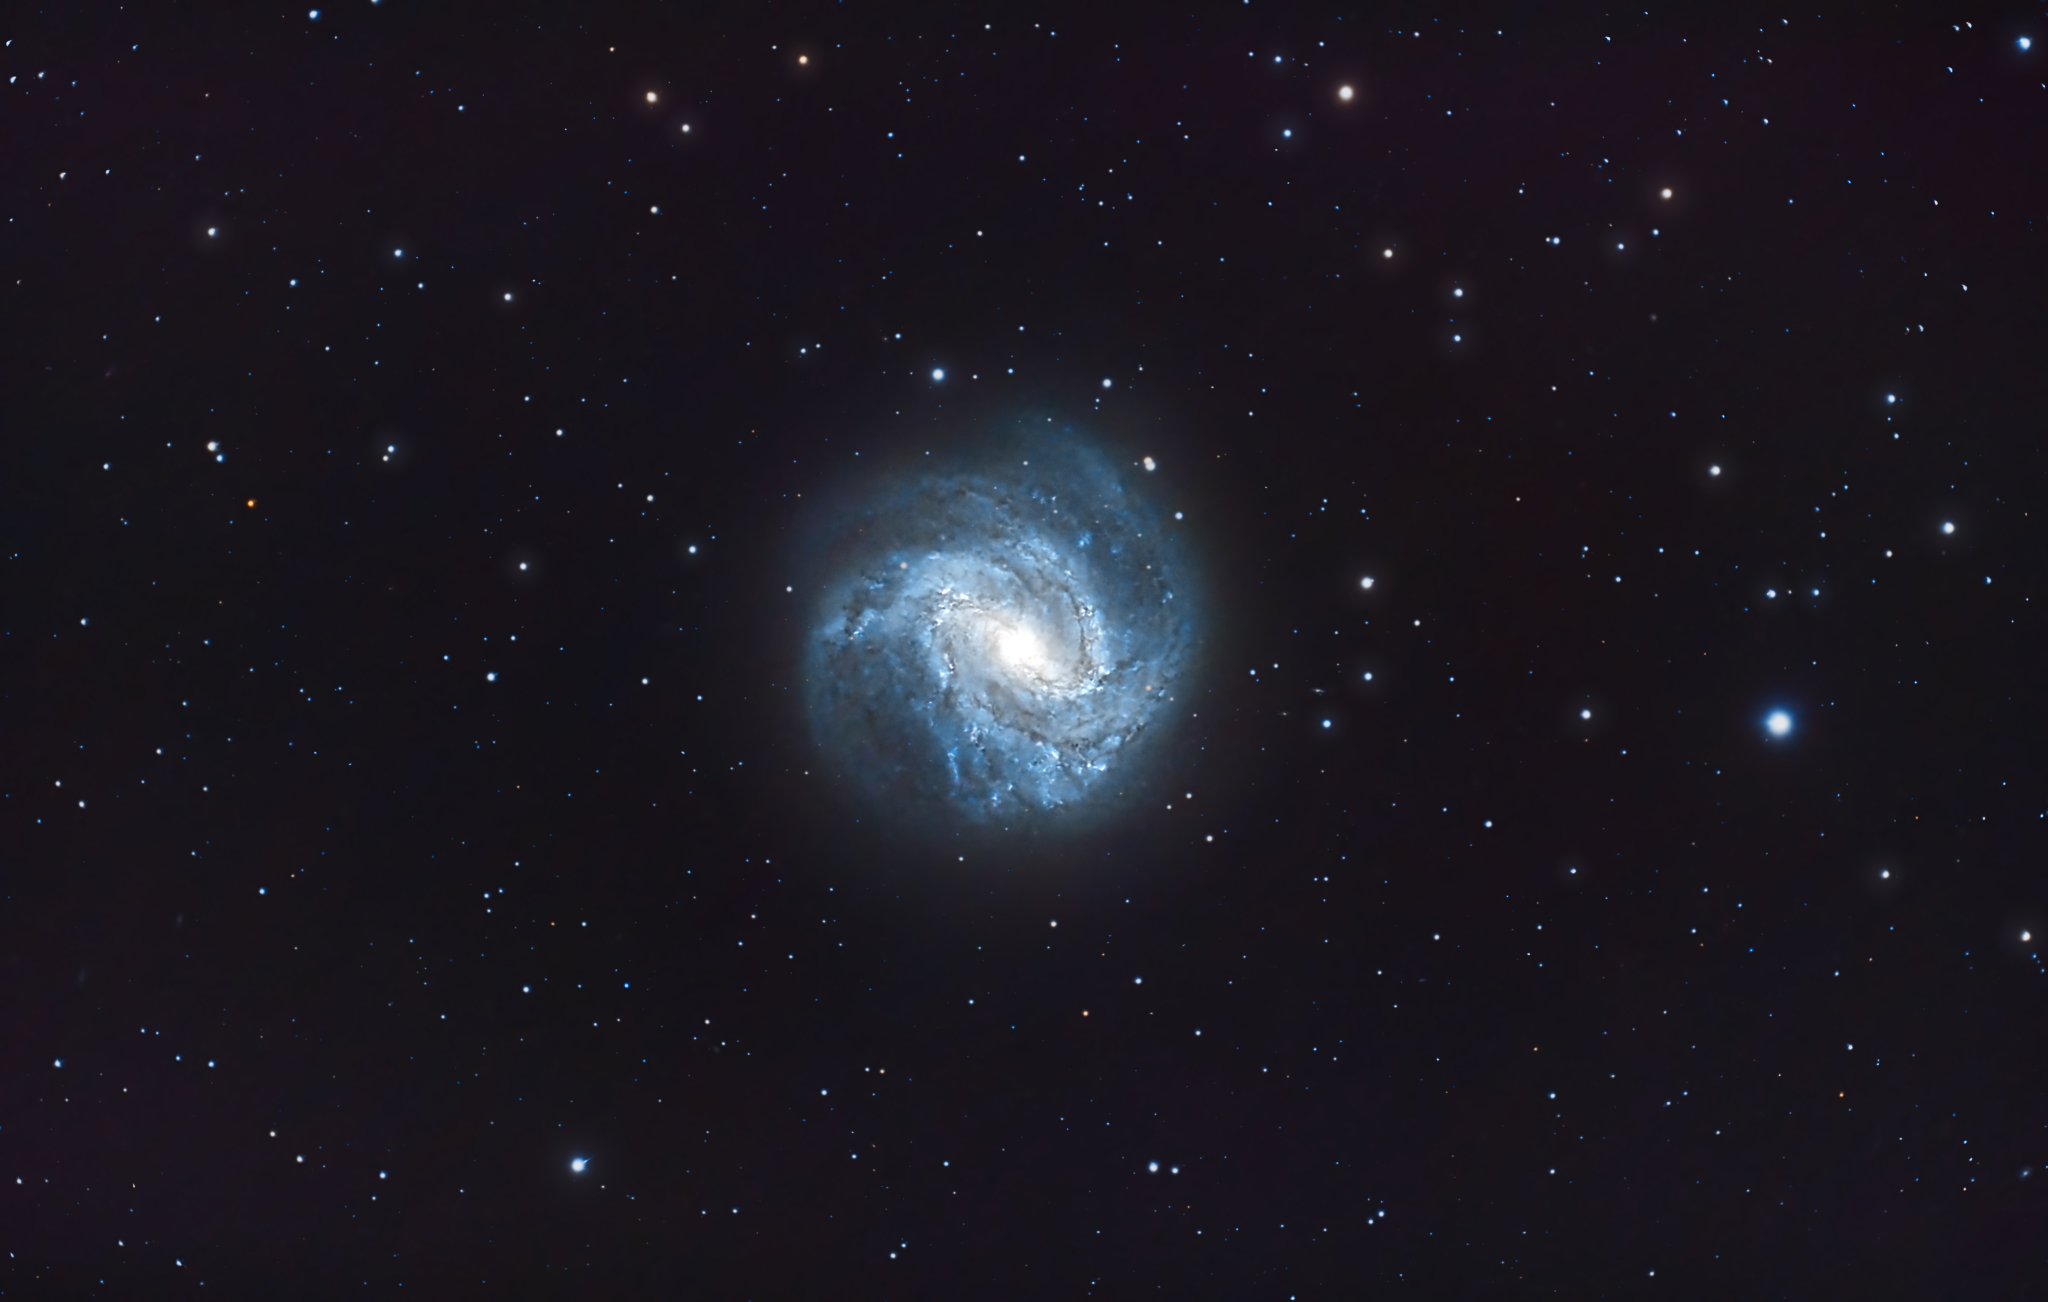
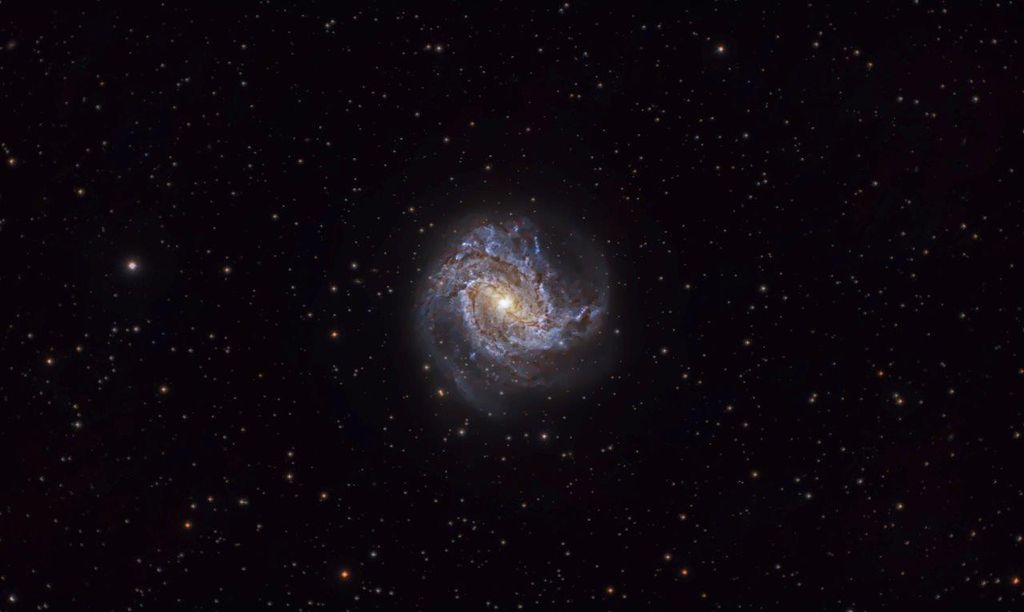
Quick go using PixInsight (plus the free plugins StarNet and DeepSNR).
Thank you so much! I think you may be the first to use Pixinsight with free plugins only. I really like the colour and core management in this version! I have never heard of DeepSNR before; do you mind giving a quick description of how it helped you in producing the image you made?
No problem Dancerfa! DeepSNR is an AI based noise reduction program which I find to be very effective. Key steps done beforehand to make sure it worked well were performing an integer downsample (not needed with drizzled or mono data) and reducing background mottle / walking noise using a masked MMT (to protect the galaxy). I ran it and made a 60/40 blend of the noise reduced and original image as some level of noise helps to keep the image looking more 'organic'.
https://www.deepsnrastro.com/ |
You cannot like this item. Reason: "ANONYMOUS".
You cannot remove your like from this item.
Editing a post is only allowed within 24 hours after creating it.
You cannot Like this post because the topic is closed.
Thank you so much for contributing! This one has a great balance between sharpening, noise reduction and colour, I really like it!
Yes, imaging on a Maksutov has been a struggle, but least to say eye-opening and enjoyable. I know it's a slow scope, I know I'm setting myself up for failure most of the time with tracking, but If anything what people are showing me through this thread is it is very possible to produce good images with the right target. I am very thankful for everyone's contributions so far!
Yep, definitely still experimenting with dithering with an unguided setup to this day, even 5 months later. It's tricky since I've swapped cameras (from the Nikon D3400 to the Canon EOS 7D), but some of my more recent data is promising.
I did use flats, but you are right, for some reason there is something going on with this one. Again, with some more recent data, I did my flats but they didn't work out at all! I'm thinking it might be incorrect exposure, but as always, I'll have to keep experimenting.
If you have the time, I would love to hear about your rough workflow, especially since I've never used Pixinsight before. Thanks again for sharing an epic processed image!
Wow okay, this is now even more impressive because it was unguided! Not easy to do with the focal length of a Maksutov. If you can find a way to guide I think that would really help.
Here is what I did:
- First thing was first, I cropped down the image. At bare minimum I had to get rid of the vignetting in the corners for the sake of a good DBE. I also got rid of as many of the poor star shapes that I could.
- The next step was resampling the image. Trying to get as much "zoom" as possible is a mistake a lot of people make. I encourage people to zoom in and out of their stacked image to see if they REALLY get anything out of max resolution. The answer is usually no, and its better to trade some resolution for a better signal to noise ratio. I resampled to 50% of the original size.
- Next came the DBE. I decided to give Graxpert a go and it did a great job! Again, it helps if you crop out serious offenders in the vignetting compartment.
- Now comes the BlurX. It really is worth the money and unless you are a true expert with older methods of decon, it does a really nice job. You just have to remember not to overdo it. Its tempting to crank it up to 100% but I think I went with something like 25%. You have to work with what the data gives you and not push it beyond its limits. Sharper is not always better and its easy to "cook" the image.
- Here comes the colour calibration! First I did a background neutralization. Remember to select a preview of empty space to use for this step. I platesolved the image and then used SPCC, again making sure I used a preview for the background. The colours came out really nice.
- I used NoiseX for noise reduction. Again, its easy to overdo denoising.
- Now comes the stretching. I used GHS to make progressive stretches to try and bring out as much dynamic range I could without blowing out the bright areas. It's a constant process of redefining where your symmetry point is and protecting the high and low areas where needed.
- StarNet2 was used to take out the stars. For them, I hit up SCNR and removed the green. Then I cranked up the saturation as much as I could without cooking it.
- On the main image, I used masks to de-saturate and darken the background. Then I used masks to adjust the saturation and colours of the galaxy. Its important to remember you can only saturate as much as the data will let you. I could apply progressively stricter masks where I could push the saturation more in the brighter areas of the galaxy, because it has the SNR to support such aggressive changes.
- Now it was just simple matter of putting the stars back in, and then running ACDNR chrominance to clean up a bit of the colour noise I introduced with the saturation.
|
You cannot like this item. Reason: "ANONYMOUS".
You cannot remove your like from this item.
Editing a post is only allowed within 24 hours after creating it.
You cannot Like this post because the topic is closed.
Leah Deckard Hallett:
Thanks for the challenge - here's the best I could do using PI, PSCC, StarSpikes and Topaz Denoise. I think I'm on the pinkish side...
Thanks so much for contributing! I really like the colour and detail!
|
You cannot like this item. Reason: "ANONYMOUS".
You cannot remove your like from this item.
Editing a post is only allowed within 24 hours after creating it.
You cannot Like this post because the topic is closed.
Ahmed Wegdan:
Here is my go at it SPCC > BTX > stretch > SXT> S curve RGB/K >Mask for the galaxy > Curves > Mask for the core > HDRMT > dark structure enhance > curves saturation bump > NXT > unsharp mask > Add stars.
Another very eye-opening demonstration of BXT and Pixinsight in general. Thanks so much for sharing!
|
You cannot like this item. Reason: "ANONYMOUS".
You cannot remove your like from this item.
Editing a post is only allowed within 24 hours after creating it.
You cannot Like this post because the topic is closed.
Quick go using PixInsight (plus the free plugins StarNet and DeepSNR).
Thank you so much! I think you may be the first to use Pixinsight with free plugins only. I really like the colour and core management in this version! I have never heard of DeepSNR before; do you mind giving a quick description of how it helped you in producing the image you made?
No problem Dancerfa! DeepSNR is an AI based noise reduction program which I find to be very effective. Key steps done beforehand to make sure it worked well were performing an integer downsample (not needed with drizzled or mono data) and reducing background mottle / walking noise using a masked MMT (to protect the galaxy). I ran it and made a 60/40 blend of the noise reduced and original image as some level of noise helps to keep the image looking more 'organic'.
https://www.deepsnrastro.com/
How interesting! I never heard of it so thank you so much for sharing, I might give it a go if I get into Pixinsight! May I ask is the reason for going for DeepSNR rather than NXT is a lack of benefit given the cost? I see a lot of people using the XTerminator suite, I'm unsure if that is because of a lack of knowledge on lesser known free programs or if their results are noticeably better.
|
You cannot like this item. Reason: "ANONYMOUS".
You cannot remove your like from this item.
Editing a post is only allowed within 24 hours after creating it.
You cannot Like this post because the topic is closed.
Wow okay, this is now even more impressive because it was unguided! Not easy to do with the focal length of a Maksutov. If you can find a way to guide I think that would really help.
Thanks! The mount has the Rowan Belt modification which does help quite a lot, but I am looking to invest in an upgrade soon, with my first guiding setup likely being apart of it (though I'm unsure if it will work with the long focal length).
Here is what I did:
Wow, thank you so much for the in-depth explanation. I love your fun approach and how you discuss your philosophy behind each of the steps, I find it super helpful to understand the reasoning behind processing steps like you've elaborated!
The next step was resampling the image. Trying to get as much "zoom" as possible is a mistake a lot of people make. I encourage people to zoom in and out of their stacked image to see if they REALLY get anything out of max resolution. The answer is usually no, and its better to trade some resolution for a better signal to noise ratio. I resampled to 50% of the original size.
I recently discovered that almost all of my images are slightly oversampled by the numbers, but subjectively they really can be down-sampled quite a bit. It certainly does help with the SNR I get in my images.
Now comes the BlurX. It really is worth the money and unless you are a true expert with older methods of decon, it does a really nice job. You just have to remember not to overdo it. Its tempting to crank it up to 100% but I think I went with something like 25%. You have to work with what the data gives you and not push it beyond its limits. Sharper is not always better and its easy to "cook" the image.
I do tend to "cook" my images, especially if I want to get into sharpening or deconvolution. The version I've posted only went through Astrosharp right at the end of my workflow just to give it a little boost. I think since looking at what other people have been doing, it should be applied before the major processing (for me, that would be before moving to GIMP for noise reduction and the rest).
It's funny, I actually find although the processing software is different, our workflows seem somewhat similar!
Also, given the amazing demonstrations from those that have contributed, I decided to give the data another go using a workflow that more closely resemble those that have been shared, albeit still using free software.
This time, the rough workflow was as follows, starting in Siril:
- Crop, factor 2 Bin and background extraction, before performing photometric colour calibration in Siril.
- Then, still in Siril, use Starnet++ on the linear image.
- Perform GHS on the starless image, twice. First time with maximum local stretch factor to bring out faint details. Second, after black point adjustment, to increase dynamic range and brightness.
- Increase saturation, adjusting background factor to only bring out colour in M83
Now, moving onto Astrosharp:
- Pretty simple, using PSF-beta model, adjust non-stellar PSF from low to high until galaxy details begin to sharpen (for this image, around 5.5 - 6.5). Strength set to about 0.5 (from what I remember).
And onto GIMP:
- Starting with Iain's noise reduction 2019 tool, found in G'MIC plugin. I maxed out the shadows and increased "Gamma" so that the bright areas of the galaxy where minimally impacted. Adjusted Fine and Medium detail denoising so that the noise pattern in the shadows was mostly gone, adjusted large detail denoising just to clear up the background.
- Adding another layer, this time for a High Pass filter. Contrast was set to maximum, and Sigma adjusted to make the dust and H-alpha regions "pop". I don't increase sigma too much, as that blows out bright regions in the galaxy, like the bulge and core, but too small a sigma, and the filter acts more as an unsharp mask. Layer mode set to 'soft light', and opacity set for personal preference (in case the filter "cooks" the image a bit).
- Decomposing the Image colours into LAB allows for using Gaussian blur on the A and B components to remove colour noise. Didn't have to do too much of a blur here. Also stretched the image a tiny bit since I didn't stretch enough in Siril.
- At this point, the image was still a little too green and red, and not too colourful. Hence, saturation time! Not too much this time. Also changed the colour temperature and balance to change the colours to a more "realistic" appearance.
- Finally, one more layer, another use of Iain's noise reduction 2019 tool, just to clear up some more fine noise patterns in the outskirts of the galaxy. A slight S-curve adjustment to bring out some contrast. To balance the brightening of the core from the S-curve, a slight highlights adjustment kept the detail in the dust lanes in the centre of the galaxy.
I didn't forget about the Stars!
- First, in Siril, performed a GHS with human weighted luminance to bring out colour in the stars (equivalent of doing a slight arcsine stretch before a GHS with independent channel luminance with saturation applied later from my experience).
- Now in GIMP, the brightest stars are quite bright. Creating a layer mask covering all but the brighter stars, a curve adjustment can bring the brighter stars back a bit, decreasing their brightness and perceived size.
- Personally, I like to do star reduction using 'Value Propagate'. It can make the stars look a little diamond shaped and distorted on close inspection, but it gives a feeling of depth to the starfield in my opinion. I applied this distortion twice this time around.
- Finally, I added the stars into the starless image in GIMP, using a 'screen' mode layer with the star layer. I also performed a curve adjustment on the stars to reduce their brightness slightly.
The main differences between this image and the original would be sharpening was applied before moving to GIMP, which helped since it was performed before the first noise reduction, and less focus on brightness and saturation in the galaxy.
When I end up getting the Pixinsight trial, this will likely be one of the images that I compare with my results from when I try it, as well as all the contributing images found here (mainly to see if I'm doing things right XD)!
Thank you to those who have contributed so far, and extra thanks to those that have shared their processing techniques and insights. I have learned so much just from this discussion, I am very thankful, and will likely be using the knowledge I've gained to start a gallery here on Astrobin! If you have the time, I'd love hear what you think of my redo of this image. Personally, I think the stars could be a little better, as well as the two distant galaxies to the left of M83, but although not perfect, I am fairly happy with the galaxy. Thanks again!
 |
You cannot like this item. Reason: "ANONYMOUS".
You cannot remove your like from this item.
Editing a post is only allowed within 24 hours after creating it.
You cannot Like this post because the topic is closed.
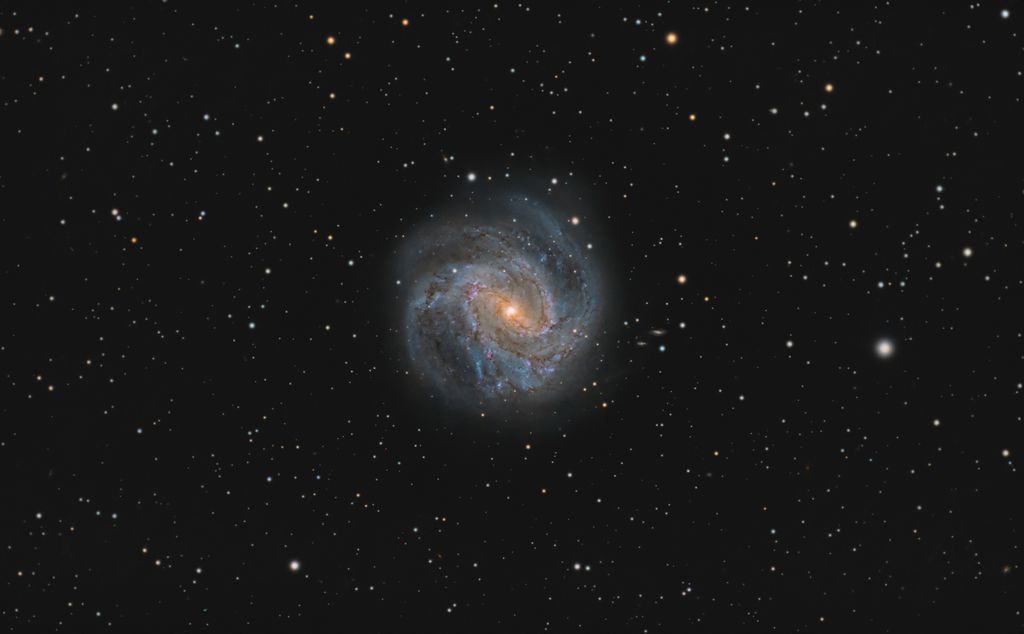
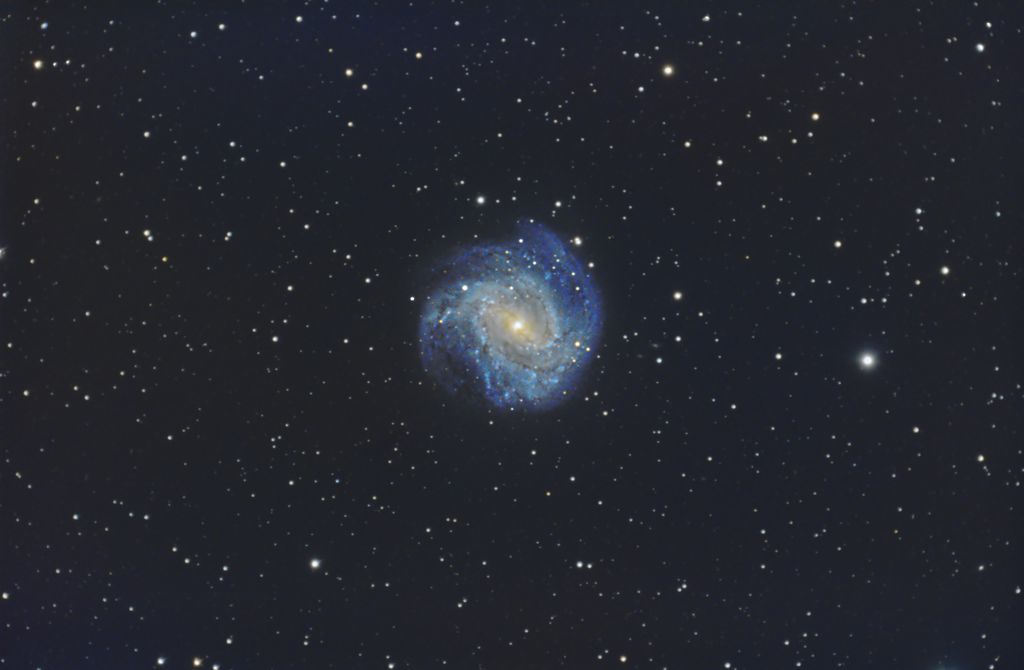
My little challenge on that one. mostly done in Photoshop with some adjustment made with Siril... The image was reduced to 50% of original size with some small crop for stacking artifacts.
 |
You cannot like this item. Reason: "ANONYMOUS".
You cannot remove your like from this item.
Editing a post is only allowed within 24 hours after creating it.
You cannot Like this post because the topic is closed.
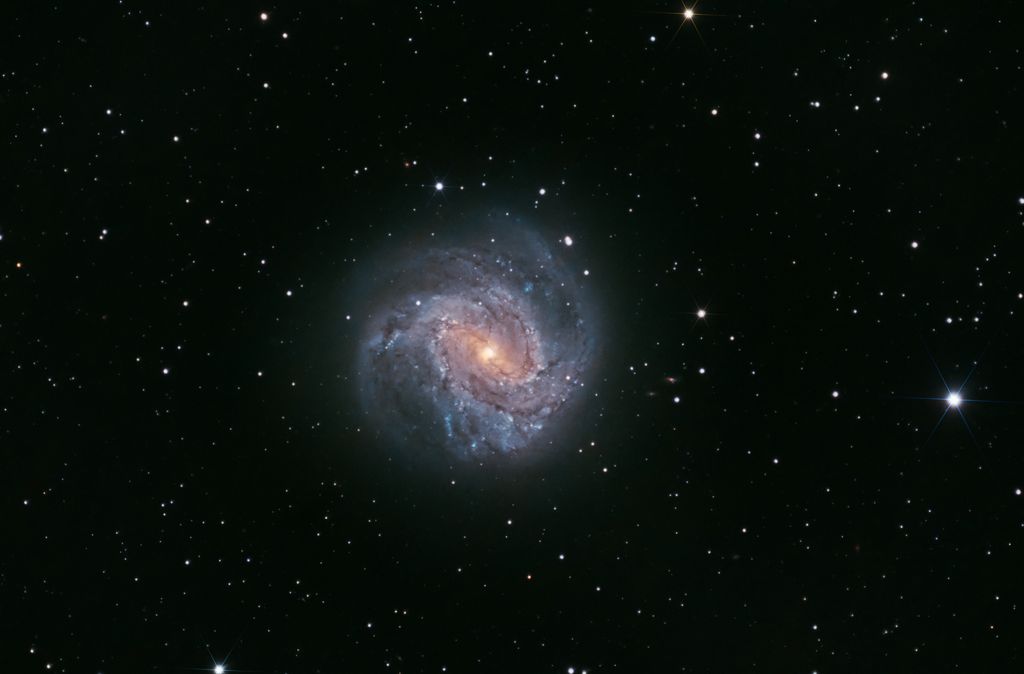
Hi, here is my interpretation of the provided data
No noise reduction was applied.
CS, Taras
By the way, if you are looking for free data, you can find many datasets for free, that have been made freely available for use by user blackrig . Just visit my profile
 |
You cannot like this item. Reason: "ANONYMOUS".
You cannot remove your like from this item.
Editing a post is only allowed within 24 hours after creating it.
You cannot Like this post because the topic is closed.
Giovanni Paglioli:
My little challenge on that one. mostly done in Photoshop with some adjustment made with Siril... The image was reduced to 50% of original size with some small crop for stacking artifacts.
Thank you so much for contributing! I noticed that you have gotten image of the day on this very target before so I am deeply honoured to have you giving it a go with difficult data!
I really like the detail and colour in this version, I think it's fantastic! If you have the time, would you mind elaborating on your rough workflow using Siril and Photoshop? I mainly use Siril and GIMP so it could be interesting to see if I can adjust my techniques to approach your results, it could be an interesting challenge! Thanks again for sharing your results!
|
You cannot like this item. Reason: "ANONYMOUS".
You cannot remove your like from this item.
Editing a post is only allowed within 24 hours after creating it.
You cannot Like this post because the topic is closed.
Hi, here is my interpretation of the provided data
No noise reduction was applied.
CS, Taras
By the way, if you are looking for free data, you can find many datasets for free, that have been made freely available for use by user blackrig . Just visit my profile
Thanks for sharing your contribution! I am surprised by the quality given no noise reduction was applied!
Thanks for also sharing the free data repository. Gave your library a quick look and they look like they distribute some amazing stuff! Very thankful for you sharing that!
|
You cannot like this item. Reason: "ANONYMOUS".
You cannot remove your like from this item.
Editing a post is only allowed within 24 hours after creating it.
You cannot Like this post because the topic is closed.
Thank you so much for contributing! I noticed that you have gotten image of the day on this very target before so I am deeply honoured to have you giving it a go with difficult data!
I really like the detail and colour in this version, I think it's fantastic! If you have the time, would you mind elaborating on your rough workflow using Siril and Photoshop? I mainly use Siril and GIMP so it could be interesting to see if I can adjust my techniques to approach your results, it could be an interesting challenge! Thanks again for sharing your results!
Thanks for Your kindness! It's been quite a fun to try to give a nice render to Your dataset.
On first I've started working the image in PS, just to know what kind of datas I'm facing, I have to say it's not bad at all for the time and equipment used. I've made an initial, very gentle stretch with hyperbolic grade 10 curves in 32bit in PS and than try to find the most suitable spot for calculating the background using an 11x11pix picker. I then used levels to neutralize the background in RGB casting away the typical green cast and saved the result. Opened the image in Siril for photometric color calibration then saved again as 32bit tif. Back to PS I've made another stretch using my inverse multiply technique with reversed image mask. At this point I've converted the image in 16bit mode and applied another calibration for the background setting it at about 26/26/26. I've applied Russel Croman StarXterminator for separating the stars from the subject and continued the work on separate layers. As I continued to make small, incremental stretches to the Galaxy layer image, many background problems and gradients shows up. I then used Russell Croman NoiseXterminator to reduce the noise, specially the red "grainy" one. I've gently used Russel Croman GradientXterminator since the field was quite empty and the main subject very well isolated at the center, it proved to be quite effective even at very low settings. For the stars I've taken a different approach, I did'nt like the shape and the rendition so I've re-opened the file in Siril and made a plate solve and color calibration for the stars only, I then saved the result and made a total re-synthesys of the stars, generating pure gaussian stars with good color index and saved this other image. Back on PS and the galaxy, I've used my technique (Man From Mars or MfM as I call it) to expand the color range and intensity without changing the luminance aspect and making a gentle stretch using the color image in screen mode at very low percentage. At this poin I've restored the intended background target of 26/26/26 and dealed with the remaining chromatic noise and shape of the noise which was very distracting and at low frequency. I've made a solid color layer with a color just above the median fluctuation of the background image that was about 28 in RGB value so I made a solid 29/29/29 color layer on top. I then applied an high frequency controlled gaussian, monochromatic noise to the layer and applied it in lighten mode, boom, the background was flat and nice but not "fake" without any noise, just with a regular, high frequency one that not disturb the brain perception. In small incremental steps I've refined my stretch and color for the image and, with the use of selective color calibration I've tried to recover the magenta, HA areas within the galaxy. I then used Hi-Passing style of wavelets in differnt kernel sizes as layers with soft-light and Overlay mode with masks for enhancing the contrsts on different scale details and structures. At this point was a matter of contrasting, denoising and microblurring iterations to get the nicest balance of percived details, contrasts and noise in the image. I've then used LR deconvolution on stars using a very old version (mabye version4) of MaximDL to enhance the shape and energy distribution. Making a blend for the stars layers, the real ones and the syntetic ones was a choice, I've used the color indexed one to enhance the colors and the shapes, the choice was not to fully saturate the max level for the stars, thus they appears not "at full brightness" but better differenciated in colors and more pleasing, less distracting for the eyes. Recompositing the image and makeing few tweaks in camera raw mode was the next step. Another passage in MaximDL for a "synthetic deconvlution" was done using a pure gaussian PSF with a 0.78 radius and LR mild decon applied for much "crispness" of the details. Final touches in PS and this is it!
Hope You can follow the workflow but, if You need to better underestand, feel free to contact me.
|
You cannot like this item. Reason: "ANONYMOUS".
You cannot remove your like from this item.
Editing a post is only allowed within 24 hours after creating it.
You cannot Like this post because the topic is closed.

Hello ! Here is my attempt with your datas. I used mostly pixinsight, exterminator suite (blur, star and noise), photoshop to tweak some details and colors, and i added the spikes with starspikes pro 4 with photoshop.
i process galaxy and stars separately.
i split the RGB chanel, and keep the red channel to enhanced the nebula and the core in linear state, then i did a mask with this layer to raise a little the color and saturation of these further in the processing.
i extract the luminance of the raw datas and work on it in pix and photoshop, then re-integrated in the starless RVB frame.
i added the stars at the final state.
the image is crop by about 40% i think.
many thanks for sharing the datas !
CS
|
You cannot like this item. Reason: "ANONYMOUS".
You cannot remove your like from this item.
Editing a post is only allowed within 24 hours after creating it.
You cannot Like this post because the topic is closed.
Giovanni Paglioli:
Thank you so much for contributing! I noticed that you have gotten image of the day on this very target before so I am deeply honoured to have you giving it a go with difficult data!
I really like the detail and colour in this version, I think it's fantastic! If you have the time, would you mind elaborating on your rough workflow using Siril and Photoshop? I mainly use Siril and GIMP so it could be interesting to see if I can adjust my techniques to approach your results, it could be an interesting challenge! Thanks again for sharing your results!
Thanks for Your kindness! It's been quite a fun to try to give a nice render to Your dataset.
On first I've started working the image in PS, just to know what kind of datas I'm facing, I have to say it's not bad at all for the time and equipment used. I've made an initial, very gentle stretch with hyperbolic grade 10 curves in 32bit in PS and than try to find the most suitable spot for calculating the background using an 11x11pix picker. I then used levels to neutralize the background in RGB casting away the typical green cast and saved the result. Opened the image in Siril for photometric color calibration then saved again as 32bit tif. Back to PS I've made another stretch using my inverse multiply technique with reversed image mask. At this point I've converted the image in 16bit mode and applied another calibration for the background setting it at about 26/26/26. I've applied Russel Croman StarXterminator for separating the stars from the subject and continued the work on separate layers. As I continued to make small, incremental stretches to the Galaxy layer image, many background problems and gradients shows up. I then used Russell Croman NoiseXterminator to reduce the noise, specially the red "grainy" one. I've gently used Russel Croman GradientXterminator since the field was quite empty and the main subject very well isolated at the center, it proved to be quite effective even at very low settings. For the stars I've taken a different approach, I did'nt like the shape and the rendition so I've re-opened the file in Siril and made a plate solve and color calibration for the stars only, I then saved the result and made a total re-synthesys of the stars, generating pure gaussian stars with good color index and saved this other image. Back on PS and the galaxy, I've used my technique (Man From Mars or MfM as I call it) to expand the color range and intensity without changing the luminance aspect and making a gentle stretch using the color image in screen mode at very low percentage. At this poin I've restored the intended background target of 26/26/26 and dealed with the remaining chromatic noise and shape of the noise which was very distracting and at low frequency. I've made a solid color layer with a color just above the median fluctuation of the background image that was about 28 in RGB value so I made a solid 29/29/29 color layer on top. I then applied an high frequency controlled gaussian, monochromatic noise to the layer and applied it in lighten mode, boom, the background was flat and nice but not "fake" without any noise, just with a regular, high frequency one that not disturb the brain perception. In small incremental steps I've refined my stretch and color for the image and, with the use of selective color calibration I've tried to recover the magenta, HA areas within the galaxy. I then used Hi-Passing style of wavelets in differnt kernel sizes as layers with soft-light and Overlay mode with masks for enhancing the contrsts on different scale details and structures. At this point was a matter of contrasting, denoising and microblurring iterations to get the nicest balance of percived details, contrasts and noise in the image. I've then used LR deconvolution on stars using a very old version (mabye version4) of MaximDL to enhance the shape and energy distribution. Making a blend for the stars layers, the real ones and the syntetic ones was a choice, I've used the color indexed one to enhance the colors and the shapes, the choice was not to fully saturate the max level for the stars, thus they appears not "at full brightness" but better differenciated in colors and more pleasing, less distracting for the eyes. Recompositing the image and makeing few tweaks in camera raw mode was the next step. Another passage in MaximDL for a "synthetic deconvlution" was done using a pure gaussian PSF with a 0.78 radius and LR mild decon applied for much "crispness" of the details. Final touches in PS and this is it!
Hope You can follow the workflow but, if You need to better underestand, feel free to contact me.
Wow, thank you so much for the in-depth description of your workflow! Reading through this was like reading a good book! If it is alright I have a few questions, mostly just in translating some more advanced terms I am not familiar with.
Giovanni Paglioli:
Back to PS I've made another stretch using my inverse multiply technique with reversed image mask.
I'm curious as to what this type of stretch technique is! My use of masks in GIMP is rather simplistic, so I'm not as versed in more advanced techniques. Given it is your technique feel free to keep it confidential, but I just wonder what your intention in this step is, how does the image benefit?
Giovanni Paglioli:
At this point I've converted the image in 16bit mode and applied another calibration for the background setting it at about 26/26/26.
I actually don't know the differences between 32, 16 and 8 bit data, what is the purpose for converting from 32bit to 16bit? If it has to do with sampling, would binning 2x2 do the same thing?
The 26/26/26 is possibly Photoshop lingo I'm not familiar with. May I ask what each number references here?
Giovanni Paglioli:
Back on PS and the galaxy, I've used my technique (Man From Mars or MfM as I call it) to expand the color range and intensity without changing the luminance aspect
I quickly looked up photoshop MfM techniques, since I'd never heard of them before, I can see how it would make a difference!
Giovanni Paglioli:
At this poin I've restored the intended background target of 26/26/26 and dealed with the remaining chromatic noise and shape of the noise which was very distracting and at low frequency. I've made a solid color layer with a color just above the median fluctuation of the background image that was about 28 in RGB value so I made a solid 29/29/29 color layer on top. I then applied an high frequency controlled gaussian, monochromatic noise to the layer and applied it in lighten mode, boom, the background was flat and nice but not "fake" without any noise, just with a regular, high frequency one that not disturb the brain perception.
I'm interested in what you did here, though I definitely don't understand it well. When you say you applied a controlled gaussian, monochromatic noise, do you mean you created a simulated noise layer, and then somehow subtracted that from the image with the lighten layer mode?
I am very thankful you gave so much detail in your workflow already, so please only reply if you have the time. Thanks again for sharing a wonderful processed image!
|
You cannot like this item. Reason: "ANONYMOUS".
You cannot remove your like from this item.
Editing a post is only allowed within 24 hours after creating it.
You cannot Like this post because the topic is closed.
Giovanni Paglioli:
I then used Hi-Passing style of wavelets in differnt kernel sizes as layers with soft-light and Overlay mode with masks for enhancing the contrsts on different scale details and structures. At this point was a matter of contrasting, denoising and microblurring iterations to get the nicest balance of percived details, contrasts and noise in the image.
Giovanni Paglioli:
Another passage in MaximDL for a "synthetic deconvlution" was done using a pure gaussian PSF with a 0.78 radius and LR mild decon applied for much "crispness" of the details
Just following up on what you said here as well, because I really love the detail in your image. I have heard of wavelet decomposition being used for noise reduction in DSO imaging and for sharpening in Planetary, though I've never used it for sharpening in DSOs, however that combined with your methods of noise reduction and deconvolution really seem to pay off. Do you mind elaborating on the use of the wavelets, why using "soft-light" and "Overlay" modes together, what is actually happening to the wavelets to increase details? I've never heard of MaximDL, after looking it up it looked like a paid software. Did the majority of your detail work come from MaximDL or the wavelet manipulation? Sorry if I'm asking too many questions, only answer what you're comfortable with in your own time .
|
You cannot like this item. Reason: "ANONYMOUS".
You cannot remove your like from this item.
Editing a post is only allowed within 24 hours after creating it.
You cannot Like this post because the topic is closed.
Pixinsight:
DynamicCrop
ColorCalibration
BackgroundNeutralization
DynamicBackgroundExtraction
Resample
DeepSNR
BlurXTerminator
ArcsinhStretch
Photoshop:
curve
saturation
smart sharpen
blur big star
Some advice for you. This image is way oversampled. Try using a reducer or a camera with bigger pixels. Use PixInsight for calibration and stacking. Also, Bayer Drizzle is a must.
 |
You cannot like this item. Reason: "ANONYMOUS".
You cannot remove your like from this item.
Editing a post is only allowed within 24 hours after creating it.
You cannot Like this post because the topic is closed.
Here my version: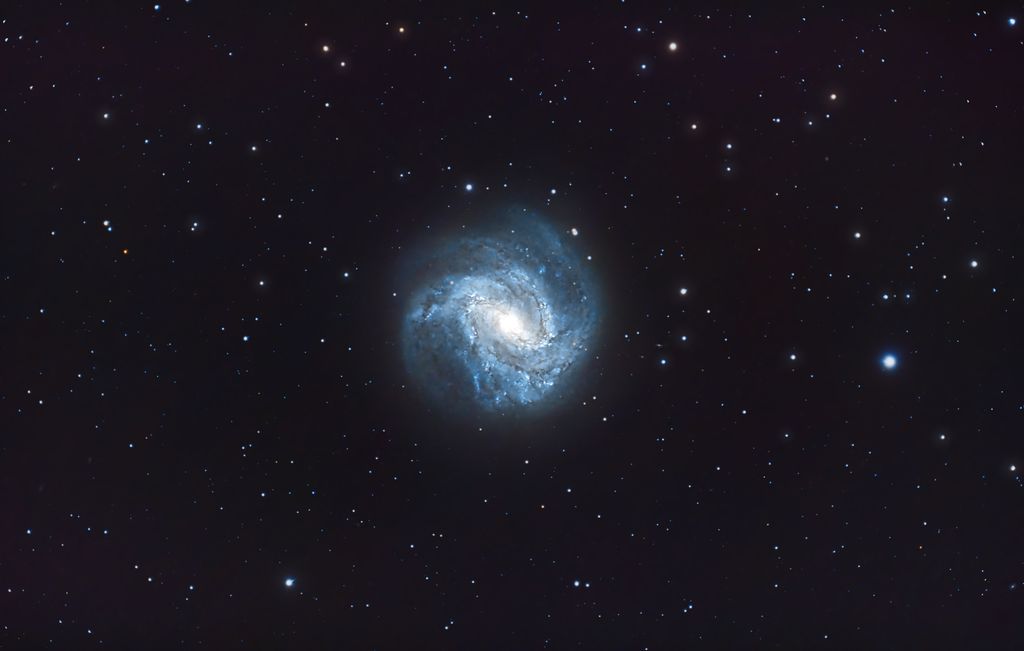 |
You cannot like this item. Reason: "ANONYMOUS".
You cannot remove your like from this item.
Editing a post is only allowed within 24 hours after creating it.
You cannot Like this post because the topic is closed.
Wow, thank you so much for the in-depth description of your workflow! Reading through this was like reading a good book! If it is alright I have a few questions, mostly just in translating some more advanced terms I am not familiar with.
Thanks, I will try to answer to Your questions...
I'm curious as to what this type of stretch technique is! My use of masks in GIMP is rather simplistic, so I'm not as versed in more advanced techniques. Given it is your technique feel free to keep it confidential, but I just wonder what your intention in this step is, how does the image benefit?
Invere multiply masked is a way to make a non linear stretch using the datas in the image as a reference for the stretching. It is quite simple to do in PS or Gimp. It uses multiply on two layers, in fact multiplication is a way to exponentially icrease a value and it depends of the value to be multiplied. In this case You use the values of every single pixel in the image as a reference. This kind of operation increase the "density" su, normally, darken the image that is exactly what we don't want, in fact we need to rise the low levels pixels more than the high level ones. For to do this You simply invert the layer You want to stretch so everything that is "black" becomes "white" (it is true also for the color channels since they are monocromatic values rapresented in rgb intensities). Whan You have the layer inverted, You simply duplicate it and then make a mask channel for the top layer using the image itself. In PS You do this going to the channel tab and CTRL+Click on the RGB channel (this extract the luminosity of all the rgb channel) then You create a mask for the top layer using this exctracted luminosity. At this poin you change the blend mode of the top layer to multiply, the image darkens getting more density in a non linear way, evrything that is pure black can't go blacker but the lower is the number the more it darkens but only in the darker areas imposed by the mask. at this point You simply merge the two layers and invert the result again. There You have it, inverse multiply masked non linear stretch.
I actually don't know the differences between 32, 16 and 8 bit data, what is the purpose for converting from 32bit to 16bit? If it has to do with sampling, would binning 2x2 do the same thing?
The 26/26/26 is possibly Photoshop lingo I'm not familiar with. May I ask what each number references here?
32/16/8bits per channel indicates how many steps You can have in the data to go from a value 0 to the maximum allowed value. Imagine you divide an intensity level from 0 (black or no light emitted) to 1 (white or maximum light emitted). 8 bit allows for 256 discrete levels from 0 to 1, 16bit allows for 65535 discrete levels from 0 to 1 while 32 bits means 4.294.967.296 discrete levels form black to white. In the end is all about precison of the measurement, when You take a digital image, in reality, You're not taking an "image" instead You take a measure of intensity of light hitting every single pixel, this is photometry which is a measure of the photon flux per second on a given area. Then You choose to rapresent this numeric value as an intensity of light emitted by a computer monitor and the variance of these intensities between a pixel or another is interpreted as an "image" by our brain. The digital datas can be also played as "music" if You want, it will be a variant noise with no sense for us humans, neverthless is exactly the exact rapresentation of the same datas! In programs like PS or Gimp You can do only few operations in 32bit mode and, generally speaking, when You finalize an image it is completely useless to use a 32bit resolution, 16bits is more than enough for visual editing. A good monito can't rapresent more than 256 levels of light intensity and the brain don't percive more than 40 levels of gray normally. Changingh bit depths doesn't change the pixel resolution (so it is not binning), just change the amount of gray levels that can be rapresented on every single pixels.
The 26/26/26 numbers reffers to the RGB value of a pixel, since we are working in RGB we can have a different value for each channel readed as a number. A value of 0/0/0 is pure black since no light is emitted in r/g/b while a 0/255/0 is pure green since the value can be addressed from 0 (no light, to 255 which is maximum emitted light in that channel). So a value that is equal in all r/g/b channel rapresent a gray scale becouse the RGB color space is an addictive space and the sum of all colors is white. A pure gray in this case is a 128/128/128, while 26/26/26 is a very dark pure gray (also bleck is to be considered a grey level of 0 intensity right?). In this way I've given a neutral, no color cast background making a start point for the light to grow equally in a linear way for all the channels.
I quickly looked up photoshop MfM techniques, since I'd never heard of them before, I can see how it would make a difference!
Imagine a color rapresented on a screen, saturation means how pure is a color and the maximum saturation is also the maximum allowed intensity emission or, simply, the maximum numeric value for that color. Pure red is 255/0/0 right? when You work whit astronomical datas You use the "luminance" of a subject to rapresent the light variation from pixel to pixel to give the best rendering. When You increase saturation You are, de facto, changing Your luminance! So the work You've spent hours to render is destroyed in few seconds 'cos increasing saturation means to rise every single pixel rgb value to the maximum which means "more light) in luminance terms. Our brain percive colors in a very different way, it considers the stimulus toward a "color" which has is own opposite, i.e. The opposite of BLUE is YELLOW (which is the sum of RED and GREEN that are not present in the pure BLUE), so if a stimulus to the brain arrives toward blue, it automatically discard the YELLOW since the BLUE and YELLOW can't co-exist at the same time. The MfM technique is done in a different color space which is the Lab mode in which the L channel is the total intensity percived by the brain respect to each color and is calle Lightness (which is the percived luminous intensity given by a color). Try to render 3 different squares in PS or Gimp, one is 128 blue, one is 128 red and 128 green, look at these squares and, even if they are exactly the same as light emitted, we percive the blu one as darker than the others, followed by the red and the green the most luminous. The human vision is based on evolution and perception is highly deformed by that! A measure is different, it doesn't relate to the perception is a data value of the measure! Back to Lab, the a channel is the difference from magentish and cyanish color and b channel is a difference from blue to yellow. The brain works in a very similar way to render the idea of colors using these 2 scales to rapresent how much is the stimulus thoward a color vs the other. Using this method of Lab color space is possible to enhance the stimulus of each color WITHOUT changing the luminance of the subject. You simply apply a curve on the a and b channel only without touching the L. In my case I change mode from RGB to Lab color space, duplicate the layer, apply curves on that layer in this way: a channel place a point in the middle of the histogram at 0,0 the drag the upper right corner to the right i.e. from 128 to 85 and do the exact same on the b channel. apply the curves. Re open the curves and do the same for the left low corner of a and b channel this time dragging to the right of the same amount (in this case is a negative number but should be the same of before, in this case -85). Voilat! You've expanded the color stimulus and intensity! I then duplicate this layer and use the middle one in screen mode at very low value (5%/8%) while I use the top one as COLOR blend (I normally apply a small gaussian blur of 1 pix to the color to minimize color variation noise). At this point merge all layers and get back to RGB mode and You're good to go.
I'm interested in what you did here, though I definitely don't understand it well. When you say you applied a controlled gaussian, monochromatic noise, do you mean you created a simulated noise layer, and then somehow subtracted that from the image with the lighten layer mode?
Hope is clear the intent of using a 1 level higher than the background color in lighten mode... It means You fill everything that is less luminous of i.e. 27 with an even grey of 28, the rest of the image which has higher values is completely untoutched since is already lighter than the value of 28, this give the image a regulare, flat background but, evrything that ha a value less than 28 it' substitued by a gray pixel of intensity 28. Since we've already established that our background (or the value under nothing is certain and so it is only noise), there is no risk. A completely flat color with no noise at all it is very distracting and looks very artificial in which the main subject contains noise, simply does'nt work well. When the "noise" is blotchy whith large scale variation it is cinsidered a low frequency one. This is the most annoying one becouse the brain continusly try to identify "borders and shapes" to recognize. When You have a very even, high frequency (means it veries from pixel to pixel of a certain small quantity), the brain simply ignore it since there are no shapes or borders to identify! In the end I've not subtracted the noise, I've done the exhact opposite, I've added noise! But an high frequency even one that does not looks fake and disturbimg.
Hope everything is muche clearer now... But I'm not shure about it |
You cannot like this item. Reason: "ANONYMOUS".
You cannot remove your like from this item.
Editing a post is only allowed within 24 hours after creating it.
You cannot Like this post because the topic is closed.
Hello ! Here is my attempt with your datas. I used mostly pixinsight, exterminator suite (blur, star and noise), photoshop to tweak some details and colors, and i added the spikes with starspikes pro 4 with photoshop.
i process galaxy and stars separately.
i split the RGB chanel, and keep the red channel to enhanced the nebula and the core in linear state, then i did a mask with this layer to raise a little the color and saturation of these further in the processing.
i extract the luminance of the raw datas and work on it in pix and photoshop, then re-integrated in the starless RVB frame.
i added the stars at the final state.
the image is crop by about 40% i think.
many thanks for sharing the datas !
CS
Thank you very much for giving the data a go, and thanks for sharing your rough workflow! Looks awesome!
|
You cannot like this item. Reason: "ANONYMOUS".
You cannot remove your like from this item.
Editing a post is only allowed within 24 hours after creating it.
You cannot Like this post because the topic is closed.
Shun-Chia yang:
Pixinsight:
DynamicCrop
ColorCalibration
BackgroundNeutralization
DynamicBackgroundExtraction
Resample
DeepSNR
BlurXTerminator
ArcsinhStretch
Photoshop:
curve
saturation
smart sharpen
blur big star
Some advice for you. This image is way oversampled. Try using a reducer or a camera with bigger pixels. Use PixInsight for calibration and stacking. Also, Bayer Drizzle is a must.
Hi, and thanks for contributing, and sharing your insights! Really awesome detail and colour separation!
Shun-Chia yang:
Some advice for you. This image is way oversampled. Try using a reducer or a camera with bigger pixels. Use PixInsight for calibration and stacking. Also, Bayer Drizzle is a must.
Thanks for the advice! Unfortunately neither the reducer or camera is possible at this stage, since I can't find reducers compatible with Skywatchers 127 mak, and Dedicated Astro Cameras are out of my budget at the moment. Same issue with Pixinsight, although this thread has been convincing!
When you say Bayer Drizzle, does that mean drizzling as what most software regard it as, which is upscaling? As far as I'm aware, an oversampled image would not benefit from that. According to this calculator my images are oversampled by a factor of about 1.54, which I only just recently discovered, so I've since been binning / downsampling my images in Siril which helps the SNR a little bit. Is Drizzle necessary even with oversampling, assuming I'm understanding what you mean by drizzling correctly? Thanks again for the feedback and contribution!
|
You cannot like this item. Reason: "ANONYMOUS".
You cannot remove your like from this item.
Editing a post is only allowed within 24 hours after creating it.
You cannot Like this post because the topic is closed.
Hi there. Here is my attempt at your interesting data. Apologies for not working on the stars but I've suddenly become busy.
Pixinsight workflow was:
DynamicCrop to remove vignetting
DBE with division for more vignetting and removal of colour from backgropund
BNE
ColorCalibration
SCNR
mask galaxy and invert
Repeated ColorSaturation + GHS stretch
ChannelExtraction – obtain Luminance of galaxy
2xColorSaturation + 3xChannelCombination add extra luminance to galaxy
MultiscaleMedianTransformation to enhance structures
Invert mask and Reduce background noise using
CS desaturate then TGVDenoise CIE Luminance
Thanks for the data to play with. Nothing but cloud here in the UK for months now!
|
You cannot like this item. Reason: "ANONYMOUS".
You cannot remove your like from this item.
Editing a post is only allowed within 24 hours after creating it.
You cannot Like this post because the topic is closed.
to create to post a reply.