Ani Shastry:
Thanks so much for the clarity on that @John. Not all CDK14s seem to have the wedge shaped vane but mine definitely does; I can see that @Ruediger's CDK14 also has the same vane structure for the wire carrying vane, and this looks exactly like the underside of mine with a groove running down the middle and I assume there is a bump like in mine on the opposite side of that vane.

@Bill Long, would be interesting to see if yours does as well since you get the dual spikes.
@John, what are your thoughts around @Willem's description about the 1/4" screw holes on the front rim, or the wobbly aperture gasket by the mirror, potentially causing the lopsided star halos that I described in problem #2?
Thanks,
Ani
I can have the guys in NM go snap a photo of the 14. What specifically do I need to obtain?
|
You cannot like this item. Reason: "ANONYMOUS".
You cannot remove your like from this item.
Editing a post is only allowed within 24 hours after creating it.
You cannot Like this post because the topic is closed.
Ani,
How are you running the fans? I saw a similar problem last year after I got setup where stars would take on a strange shape with a similar lopsided bulge result. Previously I had been running the fans at 100% so I turned them off and after awhile it came back. So I set the fans to run at 6V and haven't seen the problem since.
Bill
|
You cannot like this item. Reason: "ANONYMOUS".
You cannot remove your like from this item.
Editing a post is only allowed within 24 hours after creating it.
You cannot Like this post because the topic is closed.
I have just searched for some images showing this vane and found two, but not perfect (one unsharp - therefore not submitted for IOTD 🤣) but it shows clearly how the wire is attached. There were taken bevor painting them with Musou.

 |
You cannot like this item. Reason: "ANONYMOUS".
You cannot remove your like from this item.
Editing a post is only allowed within 24 hours after creating it.
You cannot Like this post because the topic is closed.
So @John Hayes pointed out the shroud obstruction issue years ago and they are still shipping the 14s that way?
I talked to them last week about any hardware tweaks or revisions made in the last 2-3 years and they said nothing was changed. Sounds like there was either an ill-informed revision on the vane, or someone used the wrong parts bin on some scopes…
I’m buying one that was purchased a couple years ago by someone who has since passed, and wanted to make sure I take care of any known issues that have been worked out before I send it very far away to a remote site. I’ve been combing through these threads to get a sense of what to expect, and their QC is a little less than I’d hoped.
They also didn’t seem to be aware of the reducer baffle obstructing off-axis stars that @Rouz Astro has shown (if that is the cause, not sure if you guys ever worked that out) with defocused stars looking like a donut that someone took a bite out of.
Come on Planewave, for the prices you charge…
|
You cannot like this item. Reason: "ANONYMOUS".
You cannot remove your like from this item.
Editing a post is only allowed within 24 hours after creating it.
You cannot Like this post because the topic is closed.
Bill Long - Dark Matters Astrophotography:
Ani Shastry:
Thanks so much for the clarity on that @John. Not all CDK14s seem to have the wedge shaped vane but mine definitely does; I can see that @Ruediger's CDK14 also has the same vane structure for the wire carrying vane, and this looks exactly like the underside of mine with a groove running down the middle and I assume there is a bump like in mine on the opposite side of that vane.
@Bill Long, would be interesting to see if yours does as well since you get the dual spikes.
@John, what are your thoughts around @Willem's description about the 1/4" screw holes on the front rim, or the wobbly aperture gasket by the mirror, potentially causing the lopsided star halos that I described in problem #2?
Thanks,
Ani
I can have the guys in NM go snap a photo of the 14. What specifically do I need to obtain?
@Bill Long -- what Ruediger did below; take a snapshot of the vane that carries the dew heater wiring (typically to the left of the scope when looking from the front) on both sides. One side would have a channel / groove, the other side will have a wedge.
|
You cannot like this item. Reason: "ANONYMOUS".
You cannot remove your like from this item.
Editing a post is only allowed within 24 hours after creating it.
You cannot Like this post because the topic is closed.
Bill Long - Dark Matters Astrophotography:
Ani,
How are you running the fans? I saw a similar problem last year after I got setup where stars would take on a strange shape with a similar lopsided bulge result. Previously I had been running the fans at 100% so I turned them off and after awhile it came back. So I set the fans to run at 6V and haven't seen the problem since.
Bill
Hi @Bill Long, this is super interesting data, thank you. I am just setting the fans to "Turn ON" in PWI4 via the EFA Kit, and leave them that way. When you turned off the fans, did the lopsided issue disappear? I am not sure if there is a way in PWI4 to set the fans to 50%, but I can check.
Thanks,
Ani
|
You cannot like this item. Reason: "ANONYMOUS".
You cannot remove your like from this item.
Editing a post is only allowed within 24 hours after creating it.
You cannot Like this post because the topic is closed.
They also didn’t seem to be aware of the reducer baffle obstructing off-axis stars that @Rouz Astro has shown (if that is the cause, not sure if you guys ever worked that out) with defocused stars looking like a donut that someone took a bite out of.
I did see that issue when I ran with the reducer, but now that I am imaging native, haven't seen this issue. The shroud however pulling into the aperture definitely makes star donuts look eaten.
Ani
|
You cannot like this item. Reason: "ANONYMOUS".
You cannot remove your like from this item.
Editing a post is only allowed within 24 hours after creating it.
You cannot Like this post because the topic is closed.
Ani Shastry:
Bill Long - Dark Matters Astrophotography:
Ani,
How are you running the fans? I saw a similar problem last year after I got setup where stars would take on a strange shape with a similar lopsided bulge result. Previously I had been running the fans at 100% so I turned them off and after awhile it came back. So I set the fans to run at 6V and haven't seen the problem since.
Bill
Hi @Bill Long, this is super interesting data, thank you. I am just setting the fans to "Turn ON" in PWI4 via the EFA Kit, and leave them that way. When you turned off the fans, did the lopsided issue disappear? I am not sure if there is a way in PWI4 to set the fans to 50%, but I can check.
Thanks,
Ani
It would go away for a short period of time, then it would come back. With the fans off, you will see FWHM start to drift as well. With them on at 50% (this is an assumption on my part, as I change them to 6V power and not 50% precisely) all of those problems disappeared for me.
-Bill
|
You cannot like this item. Reason: "ANONYMOUS".
You cannot remove your like from this item.
Editing a post is only allowed within 24 hours after creating it.
You cannot Like this post because the topic is closed.
Come on Planewave, for the prices you charge…
Here in Europe the pain is even much bigger, since you pay much more them. Also there are many more glitches. Some only annoying (e.g. non stainless screws, bad color coating, epoxy drops on the truss,...) to some really 😡 (e.g. Hedrick focuser unscrewing itself and sounding like a strangled cat, ridiculous dew control concept,...). Quality control is certainly at a level which makes me scratching my head.
|
You cannot like this item. Reason: "ANONYMOUS".
You cannot remove your like from this item.
Editing a post is only allowed within 24 hours after creating it.
You cannot Like this post because the topic is closed.
Ani Shastry:
They also didn’t seem to be aware of the reducer baffle obstructing off-axis stars that @Rouz Astro has shown (if that is the cause, not sure if you guys ever worked that out) with defocused stars looking like a donut that someone took a bite out of.
I did see that issue when I ran with the reducer, but now that I am imaging native, haven't seen this issue. The shroud however pulling into the aperture definitely makes star donuts look eaten.
Ani
Did you get a pic showing the issue by any chance? I want to gather samples to send them, because they claim they haven’t heard of it, and I don’t think I have the seeing for native to make sense.
|
You cannot like this item. Reason: "ANONYMOUS".
You cannot remove your like from this item.
Editing a post is only allowed within 24 hours after creating it.
You cannot Like this post because the topic is closed.
Ruediger:
Come on Planewave, for the prices you charge…
Here in Europe the pain is even much bigger, since you pay much more them. Also there are many more glitches. Some only annoying (e.g. non stainless screws, bad color coating, epoxy drops on the truss,...) to some really 😡 (e.g. Hedrick focuser unscrewing itself and sounding like a strangled cat, ridiculous dew control concept,...). Quality control is certainly at a level which makes me scratching my head.
Hmm, good to know. Maybe we should start a list in another thread so newer owners or prospective buyers don’t have to suffer as much (and existing owners can benefit from what has already been found).
Unfortunately it seems there are not really any other realistic options for this particular segment of the market, especially with AG Optical shutting down. I’d guess that Planewave probably focuses more attention on those really big spenders/government contracts.
|
You cannot like this item. Reason: "ANONYMOUS".
You cannot remove your like from this item.
Editing a post is only allowed within 24 hours after creating it.
You cannot Like this post because the topic is closed.
Unfortunately it seems there are not really any other realistic options for this particular segment of the market,
I am not aware of any serious alternative for non-comercials.
Rouz, John and many more shared already a lot about their experience.
Would I buy it again? Yes, since I know that other brands suffer from even worse problems. Once you aware of the things you have to take care, they are good tools. But we needed 3 years and a 3 digit count of mails to sort all the things out. Probably worth to collect the experience. Could save a lot of pain.
|
You cannot like this item. Reason: "ANONYMOUS".
You cannot remove your like from this item.
Editing a post is only allowed within 24 hours after creating it.
You cannot Like this post because the topic is closed.
Ani Shastry:
Bill Long - Dark Matters Astrophotography:
Ani Shastry:
Thanks so much for the clarity on that @John. Not all CDK14s seem to have the wedge shaped vane but mine definitely does; I can see that @Ruediger's CDK14 also has the same vane structure for the wire carrying vane, and this looks exactly like the underside of mine with a groove running down the middle and I assume there is a bump like in mine on the opposite side of that vane.
@Bill Long, would be interesting to see if yours does as well since you get the dual spikes.
@John, what are your thoughts around @Willem's description about the 1/4" screw holes on the front rim, or the wobbly aperture gasket by the mirror, potentially causing the lopsided star halos that I described in problem #2?
Thanks,
Ani
I can have the guys in NM go snap a photo of the 14. What specifically do I need to obtain?
@Bill Long -- what Ruediger did below; take a snapshot of the vane that carries the dew heater wiring (typically to the left of the scope when looking from the front) on both sides. One side would have a channel / groove, the other side will have a wedge.
Okay, I've asked the folks on site if they can get images of the CDK14.
I am doing troubleshooting of a thermal related issue on the CDK20 tonight. The thought did cross my mind about testing the scope without the shroud on, but that's something I'll look at later after seeing the samples here from the 14.
Bill
|
You cannot like this item. Reason: "ANONYMOUS".
You cannot remove your like from this item.
Editing a post is only allowed within 24 hours after creating it.
You cannot Like this post because the topic is closed.
@Willem I am definitely seeing the bulging aperture ring on my CDK14 (thanks to @Samuel A Miller for capturing photos). It’s actually quite ginormously bulgy and not uniformly either.
However, I wonder if those gaps are simply to let the air from the fans at the back flow over the mirrors to prevent the boundary layers, as opposed to a defect of some kind.


I will see if I can test Bill’s idea around the fans being the issue and your idea around the screw holes being the issue and report back what I find.
Ani
|
You cannot like this item. Reason: "ANONYMOUS".
You cannot remove your like from this item.
Editing a post is only allowed within 24 hours after creating it.
You cannot Like this post because the topic is closed.
Ani Shastry:
@John, what are your thoughts around @Willem's description about the 1/4" screw holes on the front rim, or the wobbly aperture gasket by the mirror, potentially causing the lopsided star halos that I described in problem #2?
First, the easy one: The aperture ring (it's not a gasket) has nothing to do with the effects that are shown. That ring is at the aperture stop and it is highly unlikely (read virtually impossible) for that ring itself to have any effect on star size or shape. BTW, that ring is there because of the computer controlled optical figuring process that PW uses. It's a process that cannot control the optical figure all the way out to the edge of the glass. So they make the mirror bigger than it needs to be and then mask off the outer region where the figure is terrible. Sometimes, those rings don't completely block the poor edge figure and that can result in either slightly wonky looking stars, or worse, terrible imaging over the field. I had a set of spare aperture rings of different sizes to fit the CDK20 and we used them on a brand new scope to learn that by simply blocking about 1/8" around the perimeter made the scope go from completely unusable to acceptable.
Second, Willem showed images with and without the shroud but were those support rods also removed? The data clearly shows that the shroud on it's own is not being held completely out of the way. Even with the shroud removed, it looks as if those rods might not be not completely clear of the off-axis marginal ray bundles. You'd have to do a simple vignetting analysis to check that design. Either way, something with a straight edge is still blocking parts of the beam with the shroud removed.
Finally, if there are 1/4" holes in the aperture ring that light can get through, you definitely want to put black tape over them. Yes, they would be adding just a little bit of very aberrated light from the edge zone into the system. Given their locations, I don't think that you would see them on-axis. Light from those holes will only get past the edge of the secondary mirror at off-axis field positions.
John
|
You cannot like this item. Reason: "ANONYMOUS".
You cannot remove your like from this item.
Editing a post is only allowed within 24 hours after creating it.
You cannot Like this post because the topic is closed.
Thank you for your feedback @John, really appreciate it.
Following up on tests for @Bill Long and @Willem, note these tests were done without the shroud:
1. Putting black tape to seal off all the 1/4" holes on the front aperture ring per @John seemed to have made the most amount of difference. It's not completely resolved, but definitely seemed to help the worst off-axis stars.
2. The fans on and off (alternating every 5-10 minutes) seemed to not typically make much of a difference in my case; fans off seemed marginally better, but since my test cycle was not across hours, perhaps there wasn't sufficient time to manifest / address the issue.
Off-axis stars with above changes (and the shroud off):

Edit to update the below: Turns out it indeed was dew on the sensor for the finding below wrt to central dark halo. It just took well over an hour of the 6200MM dew heater to begin making a dent. Please ignore the text below; the learnings above are still valid however.
However, the most interesting thing I found today without the shroud, was that if any moonlight is present, even if the scope is pointing quite a bit away from the moon, I see these two odd issues (note that this isn't dew, blasting the heaters for M1, M2 and the camera didn't make a difference):
1. When pointing at any part of the sky, there is a super dark oval halo on-axis; rotating the entire imaging train doesn't seem to have any impact on it.

In fact, taking a snapshot while the rotator is rotating again shows no impact to the orientation of the halo:

And the stars within the halo look weird, whereas just outside the halo, they look fine:

2. When pointing at a really bright star on-axis, there is an unnaturally huge halo around the star (still overshadowing the darker halo behind it):

Now this makes no sense to me at all. Would love to hear people's thoughts; @John Hayes particularly you if you have seen anything like this before...
Thanks,
Ani
|
You cannot like this item. Reason: "ANONYMOUS".
You cannot remove your like from this item.
Editing a post is only allowed within 24 hours after creating it.
You cannot Like this post because the topic is closed.
John Hayes:
First, the easy one: The aperture ring (it's not a gasket) has nothing to do with the effects that are shown. That ring is at the aperture stop and it is highly unlikely (read virtually impossible) for that ring itself to have any effect on star size or shape. BTW, that ring is there because of the computer controlled optical figuring process that PW uses. It's a process that cannot control the optical figure all the way out to the edge of the glass. So they make the mirror bigger than it needs to be and then mask off the outer region where the figure is terrible. Sometimes, those rings don't completely block the poor edge figure and that can result in either slightly wonky looking stars, or worse, terrible imaging over the field. I had a set of spare aperture rings of different sizes to fit the CDK20 and we used them on a brand new scope to learn that by simply blocking about 1/8" around the perimeter made the scope go from completely unusable to acceptable.
@John Hayes Good to hear that the bulging of the aperture ring cannot lead to issues with star size/shape. So that makes it a cosmetic aspect only, which PW has claimed before. Still a bit strange that they don't make the holes in the ring fit the OTA connection points properly, resulting in the bulging, which seems to be common in the CDK14's. But I'll stop worrying about this . .
I've no reason to believe that the aperture ring on my scope is not wide enough, exposing any potential poor edge figure. Stars generally are nice and round, eccentricity values most often in the 0.45-0.5 range. It's only the spiking at the very bright ones that is a bit strange.
@Ani Shastry Yes, indeed, that is also my understanding, that the aperture ring also doubles as a means to get the air-flow from the fans over the mirror to get rid of the boundary layer. But it's hard to see that this purpose would require a bulging ring. The more laminar the airflow is, the better it would work, probably?
|
You cannot like this item. Reason: "ANONYMOUS".
You cannot remove your like from this item.
Editing a post is only allowed within 24 hours after creating it.
You cannot Like this post because the topic is closed.
John Hayes:
Second, Willem showed images with and without the shroud but were those support rods also removed? The data clearly shows that the shroud on it's own is not being held completely out of the way. Even with the shroud removed, it looks as if those rods might not be not completely clear of the off-axis marginal ray bundles. You'd have to do a simple vignetting analysis to check that design. Either way, something with a straight edge is still blocking parts of the beam with the shroud removed.
In my images, 'shroud on' means shroud and vertical Rouz-Astro rods in place. 'Shroud off' means both shroud and rods removed. So it looks like the shroud nor the rods are causing the 45° spikes.
|
You cannot like this item. Reason: "ANONYMOUS".
You cannot remove your like from this item.
Editing a post is only allowed within 24 hours after creating it.
You cannot Like this post because the topic is closed.
John Hayes:
Finally, if there are 1/4" holes in the aperture ring that light can get through, you definitely want to put black tape over them. Yes, they would be adding just a little bit of very aberrated light from the edge zone into the system. Given their locations, I don't think that you would see them on-axis. Light from those holes will only get past the edge of the secondary mirror at off-axis field positions.
John
To be honest, when I came up with the suggestion, I assumed that somehow I had overlooked something very obvious. But your confirmation @John Hayes of the potential of aberrations able to make their way past the secondary mirror baffle, and @Ani Shastry , your confirmation of tightening up off-axis star-shape when taping off the holes, makes it a no-brainer to ensure these 1/4" holes get blocked, with or without shroud. Thank you both very much!
|
You cannot like this item. Reason: "ANONYMOUS".
You cannot remove your like from this item.
Editing a post is only allowed within 24 hours after creating it.
You cannot Like this post because the topic is closed.
|
Thank you @Ani Shastry for your super-fast testing of all the theory that we expose here in this thread. Definitely some improvements to make right off the bat. I guess the temperature and fan settings like also suggested by @Bill Long - Dark Matters Astrophotography is something to further experiment with. The next two days appear to be cloudy, but as soon as I have more info, I'll share it here.
|
You cannot like this item. Reason: "ANONYMOUS".
You cannot remove your like from this item.
Editing a post is only allowed within 24 hours after creating it.
You cannot Like this post because the topic is closed.
If I understand the piece we're talking about correctly, it's not exactly a wedge, but a groove that is indented on one side and protrudes on the other side, correct? (Not to nitpick semantics, but to make sure I understand what we're pointing at).
So when you look at the vane head on (thin side), you've got something that looks like this:
Flat on 3 of the vanes:____________________________
and on the problem vane (exaggerated):__________/##########\_______
So when the incoming light moves from left to right over this small bump, instead of acting like a thicker vane and resulting in a slightly wider but shorter spike, the light is first contacting the front of the vane, diffracting, then hitting the hump in the middle and diffracting off of that, creating a second spike and/or interfering with the first one to create a split wave effect?
If having that bump slightly back from the edge is the issue, it should be easy to solve by running a flat strip along the front edge for the length of the vane that is equal to or thicker than the bulge, like so, correct?[####]____/##########\_______
For a better picture, taken from Rouz's review, we are talking about the bump on the opposite side of the groove pictured here at the bottom left, running the length of the vane (equalling the radius of the aperture, minus the part terminating at the mirror):

Or do I have that completely wrong, and we are talking about an apparent wedge caused by the cable bundle itself?
I took a look at @Rouz Astro's images and even though he has a groove in that picture, he doesn't seem to have the double spikes. Example: https://www.astrobin.com/full/j9sy33/0/ (nice image btw!)
|
You cannot like this item. Reason: "ANONYMOUS".
You cannot remove your like from this item.
Editing a post is only allowed within 24 hours after creating it.
You cannot Like this post because the topic is closed.
@jego Oddly enough I never saw dual spikes with my reducer on, either, like Rouz’s case. Plus it’s less that groove IMO and possibly more likely the bulgy part where the wires run (on the opposite side of the groove).
Ani
|
You cannot like this item. Reason: "ANONYMOUS".
You cannot remove your like from this item.
Editing a post is only allowed within 24 hours after creating it.
You cannot Like this post because the topic is closed.
Ani Shastry:
@jego Oddly enough I never saw dual spikes with my reducer on, either, like Rouz’s case. Plus it’s less that groove IMO and possibly more likely the bulgy part where the wires run (on the opposite side of the groove).
Ani
Huh, well I’m no optical engineer, but it seems odd to me that the results would be different with and without the reducer (unless it’s still technically present but below what we can notice)
It also still seems odd to me that the artifact is only on 1 of the spikes, as far as we can see.
My very limited understanding of point spread functions and diffraction patterns is that a single vane segment causing the issue would produce artifacts on both spikes symmetrically.
Maybe a larger/brighter example would be more conclusive. Would also be curious if it’s the same across multiple filters. I do feel like I can see a wave in that example as opposed to just a dual spike.
|
You cannot like this item. Reason: "ANONYMOUS".
You cannot remove your like from this item.
Editing a post is only allowed within 24 hours after creating it.
You cannot Like this post because the topic is closed.
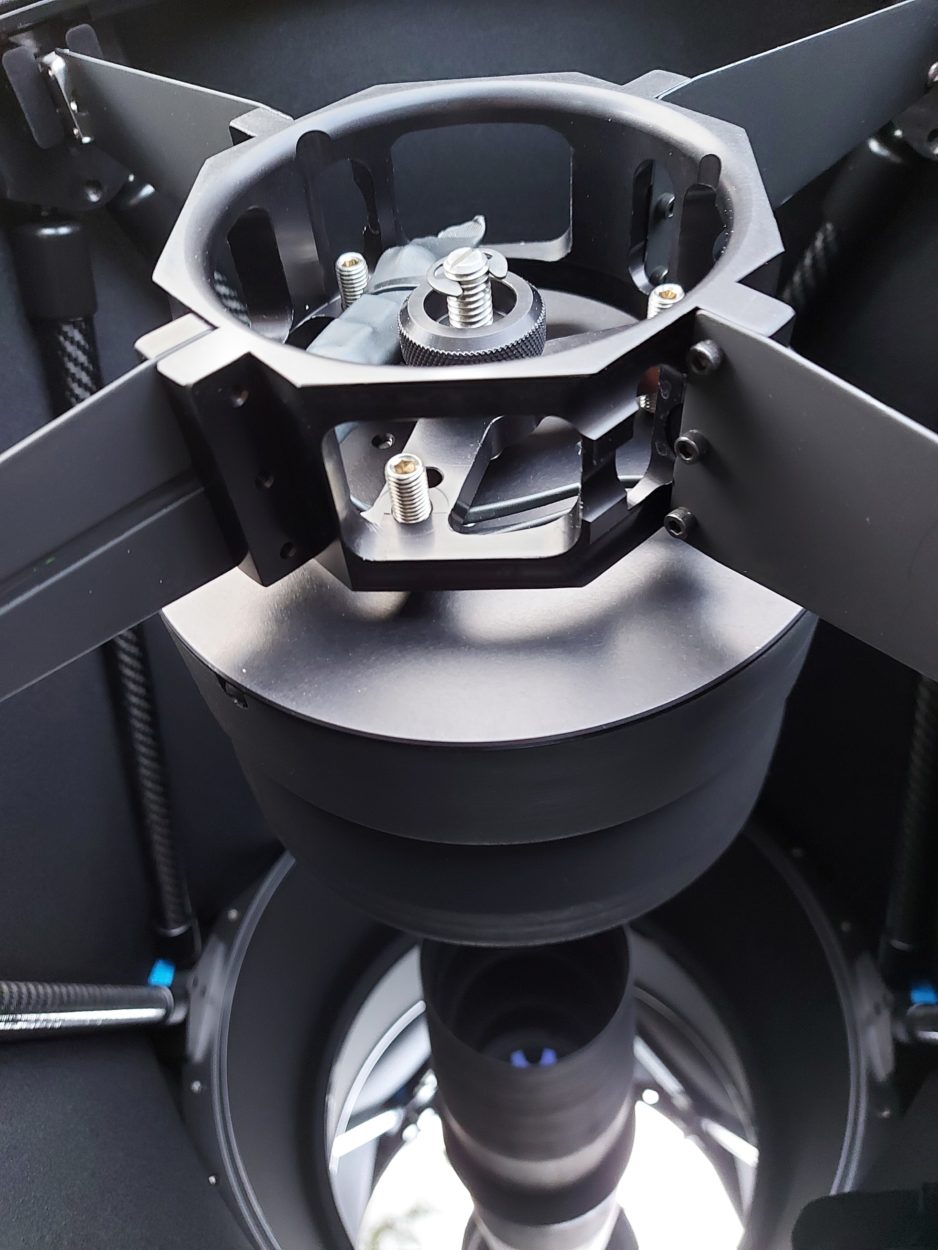
I got a picture from the unit I just bought, I see what you mean now. Still unclear to me why the artifacts wouldn’t be on both spikes, but I see the bulge. I wonder why they didn’t run the wires down the other side in the groove where it’s already recessed. Almost looks like it was designed to allow just that for that reason, but they ran them along the back instead?

 |
You cannot like this item. Reason: "ANONYMOUS".
You cannot remove your like from this item.
Editing a post is only allowed within 24 hours after creating it.
You cannot Like this post because the topic is closed.
|
I have to wonder if one could not fabricate a whole set of thicker vanes as aftermarket (assuming this is the issue) that could contain the wires while maintaining all the vanes the same thickness. They don't actually have to be that thin, as I recall. Really just aluminum plate with holes and one groove, not rocket science.....
|
You cannot like this item. Reason: "ANONYMOUS".
You cannot remove your like from this item.
Editing a post is only allowed within 24 hours after creating it.
You cannot Like this post because the topic is closed.
to create to post a reply.