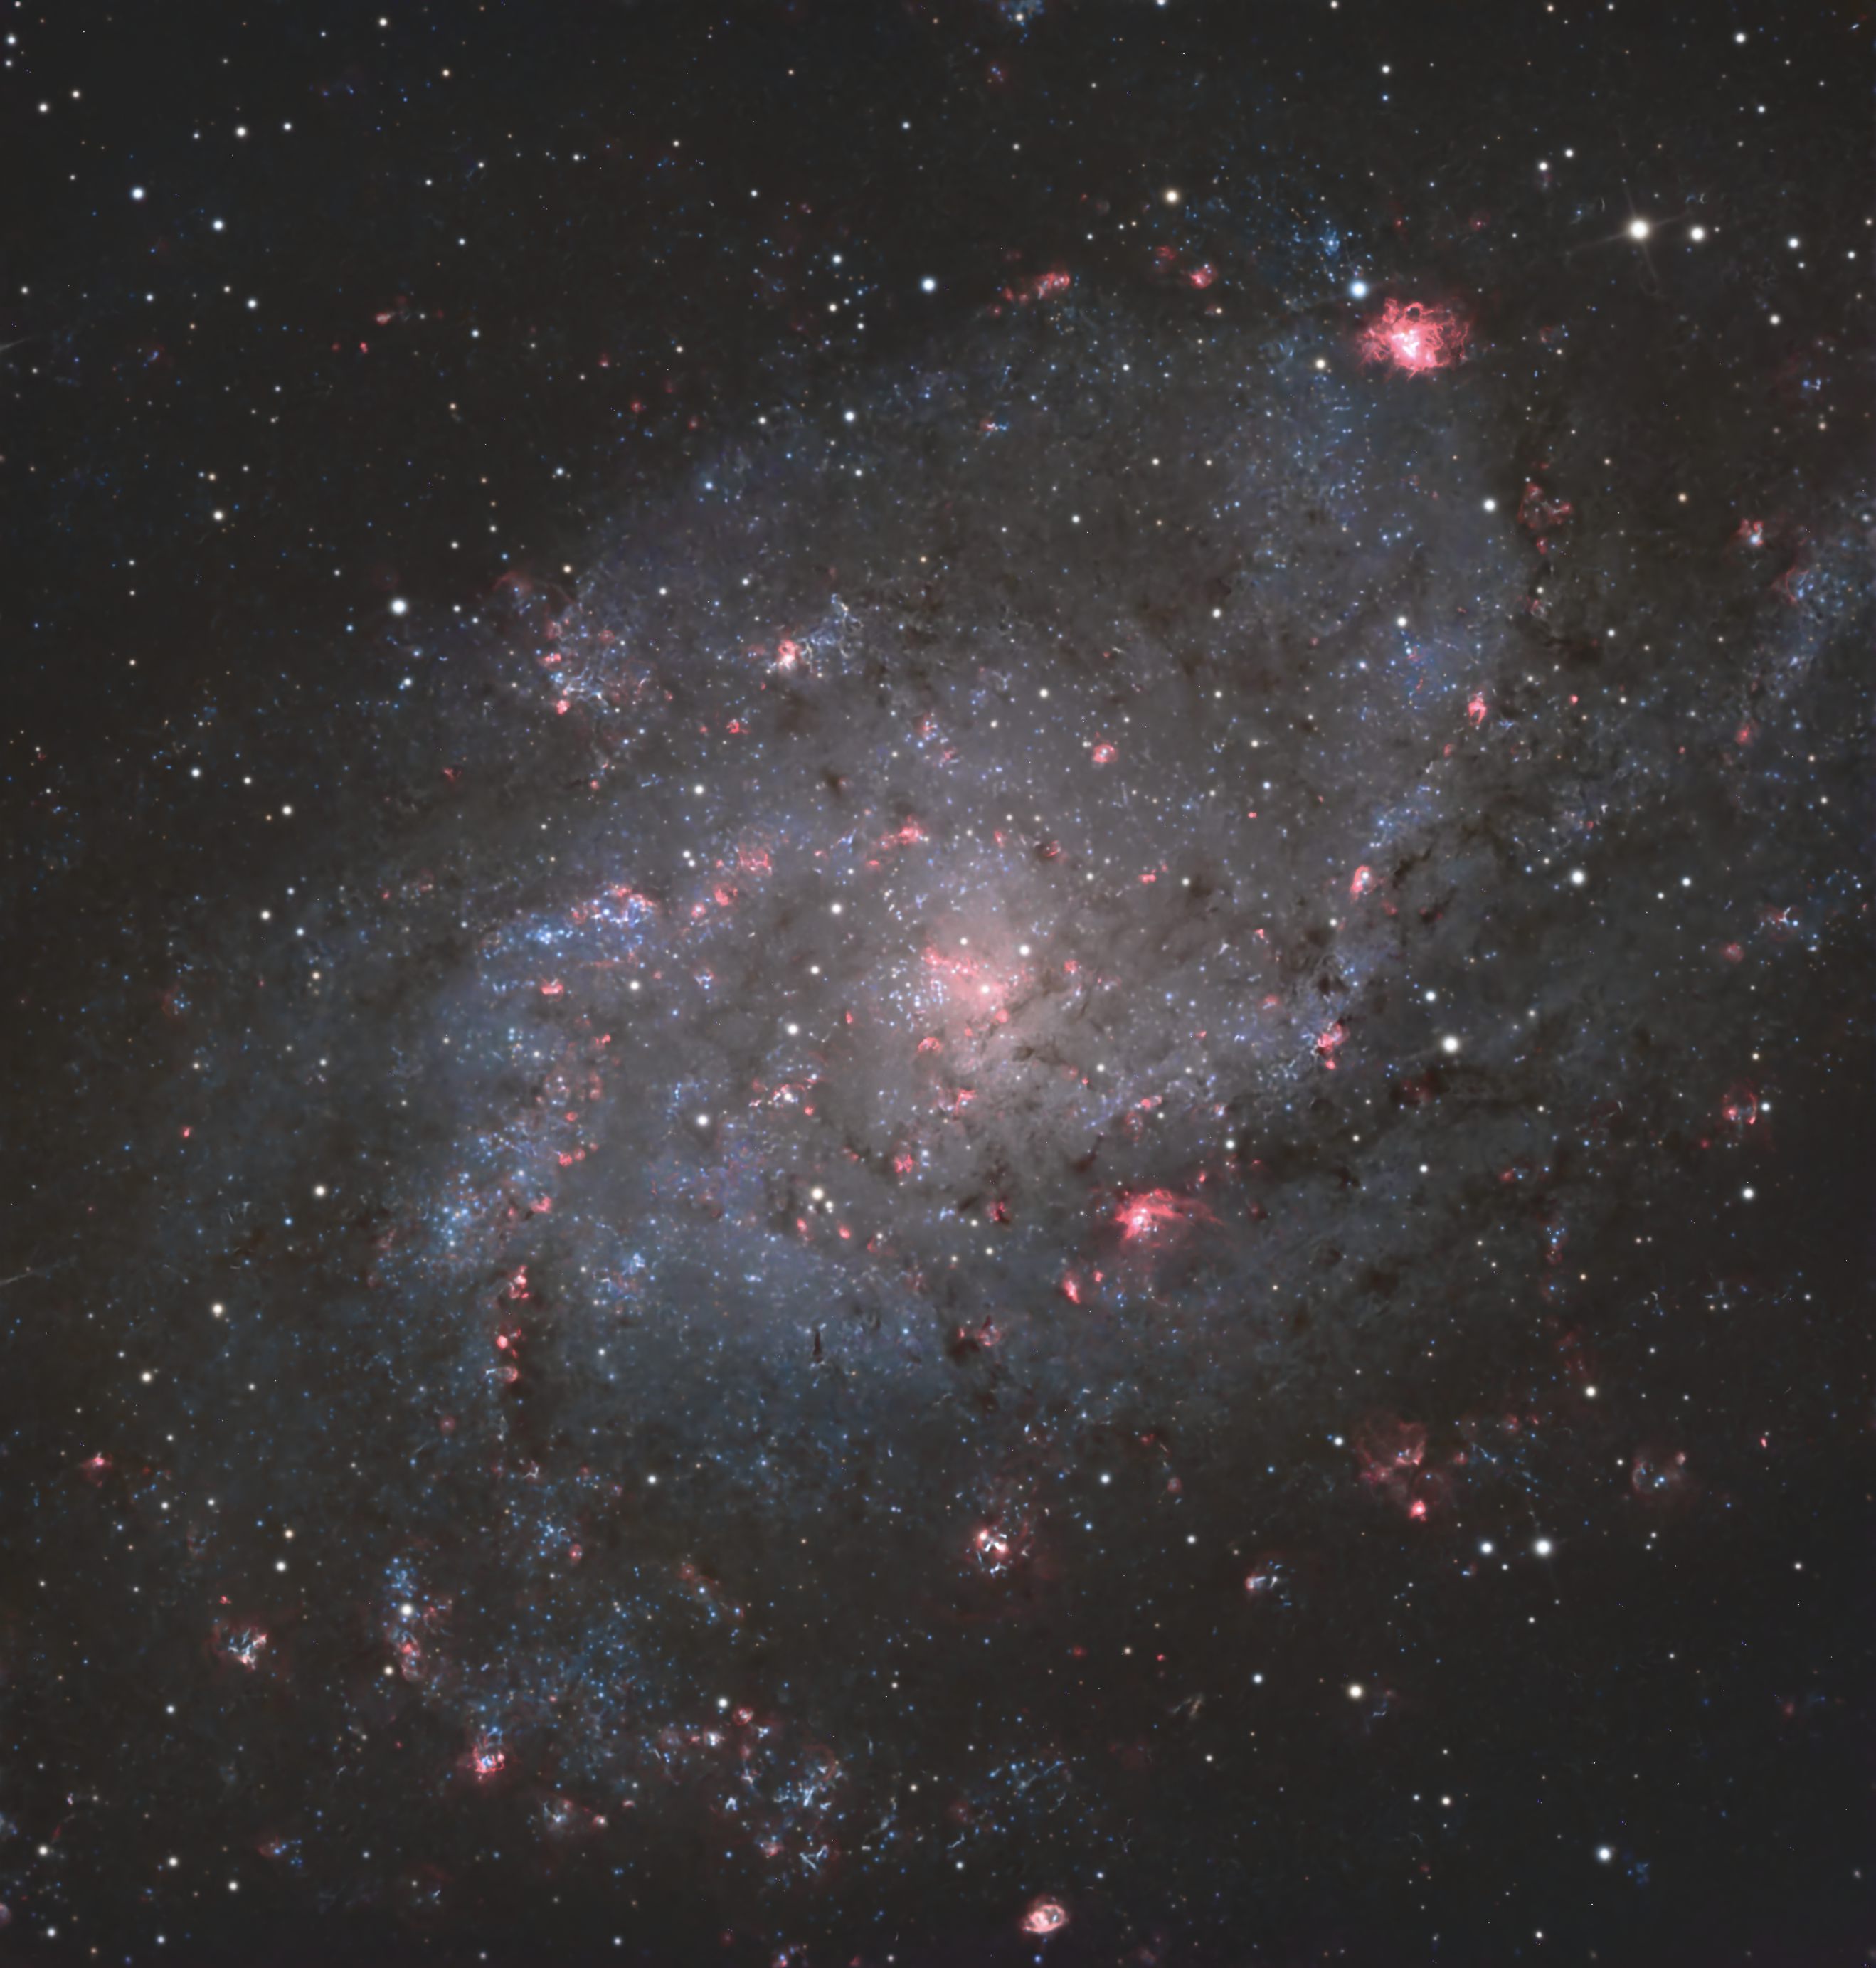
Hello everyone! I have captured some data of the Triangulum and would like for you guys to give it a shot processing, or at least assessing if anything is possible as I'm not really sure how to do it good enough.
I have tried doing it myself, but I'm not able to get it sharp enough while also keeping it from becoming too "spotty" from all the dim and unexposed stars as well as too "smooth" from too much noise reduction. I posted my result on my astrobin profile so you can check out what I got there.
In my opinion it's a bit too smooth and unnatural (I am using blurx and noisex), but I wish you guys would be able to give me some info on how to control this beast... I'm also aware that the resolution I was shooting at (0.65") might be a bit too much for my location (65m above sea in rural Croatia) and would be open to getting a smaller scope or a quicker one with less focal length.
The equipment I used was a 250pds and a PlayerOne Ares-M camera, HaLRGB.
You can find the stacked files here:
https://drive.google.com/drive/folders/1Ns7Ol2cZ2Ik31wlP2Ma0sEnIi9AFCS5g?usp=sharing
My result:
https://www.astrobin.com/s7dpva/E/
Oh and keep in mind that I'm more focused on getting the luminance to a point where it's natural and sharp so you don't have to focus much on color (not much RGB time on it anyways).
Thank you for your help and clear skies!
Matija
|
You cannot like this item. Reason: "ANONYMOUS".
You cannot remove your like from this item.
Editing a post is only allowed within 24 hours after creating it.
You cannot Like this post because the topic is closed.
HI Matija
first of all I strongly advise you to use a setup suitable for the seeing of the place you are shooting from.
your sampling of 0.65 must also be supported by your guide. if you have a guide with an error greater than 0.65 then you will never appreciate the optical quality of your instrument.
For example: I have a sampling of 0.79 arc sec and my average driving error is 0.3 arc sec.
POST PROCESSING: I advise you on RGB not to use excessive sharp blur but you could use greater noise reduction.
use the psf image script to calculate the psf of your photo to be able to put in the blur x terminator tool.
Luminance : use a greater sharp blur but do not perform excessive noise reduction otherwise you will reduce the visible subtle details. Also remember that RGB values greater than 0.8 lead to you losing color in the image, so during the RGB stretch try to maintain values within 0.8.
remember that the details come from luminance so apply an HDR on the nucleus and also use a local histogram equalization to increase the contrast
|
You cannot like this item. Reason: "ANONYMOUS".
You cannot remove your like from this item.
Editing a post is only allowed within 24 hours after creating it.
You cannot Like this post because the topic is closed.
So here's what I came up with using your data using Pixinsight.
For processing I opened them all. Flipped the L and the Ha 180 degrees to match the R,G,B images. Then used DynamicAlignment to register the L and Ha images. Combined RGB. Ran GraXpert on L, RGB, and Ha images. SPCC on the RGB image. Then I used DynamicCrop to crop all the images the same. BlurX, NoiseX, and StarX on all. I only kept the stars from the RGB image.
After that I used GHS to stretch the RGB and the L images. Then histogram transformation to tweak the L image a bit. LRGB combination to add the L to the RGB image. I used unsharp mask to sharpen the LRGB image a bit. Then I stretched the stars in HistogramTransformation until I liked it. Added the stars back in.
Next I stretched the Ha image a bit. Used NBRGBCombination script to add the Ha. From there I used curves to tweak things a bit. Then I used ColorSaturation and dropped the saturation of the reds because they were overpowering, and I added saturation to the blues and yellows. Then used SCNR to take out all the green.
I think that's about it. There's more tweaking in curves I could probably do. I'm really not all that good at galaxy images (hope to improve this winter), and I usually struggle pretty badly adding Ha in to images, but I liked the way it came out with your data. With how much clouds, and then tweaking with a new set up I have it was fun having some data to play around with!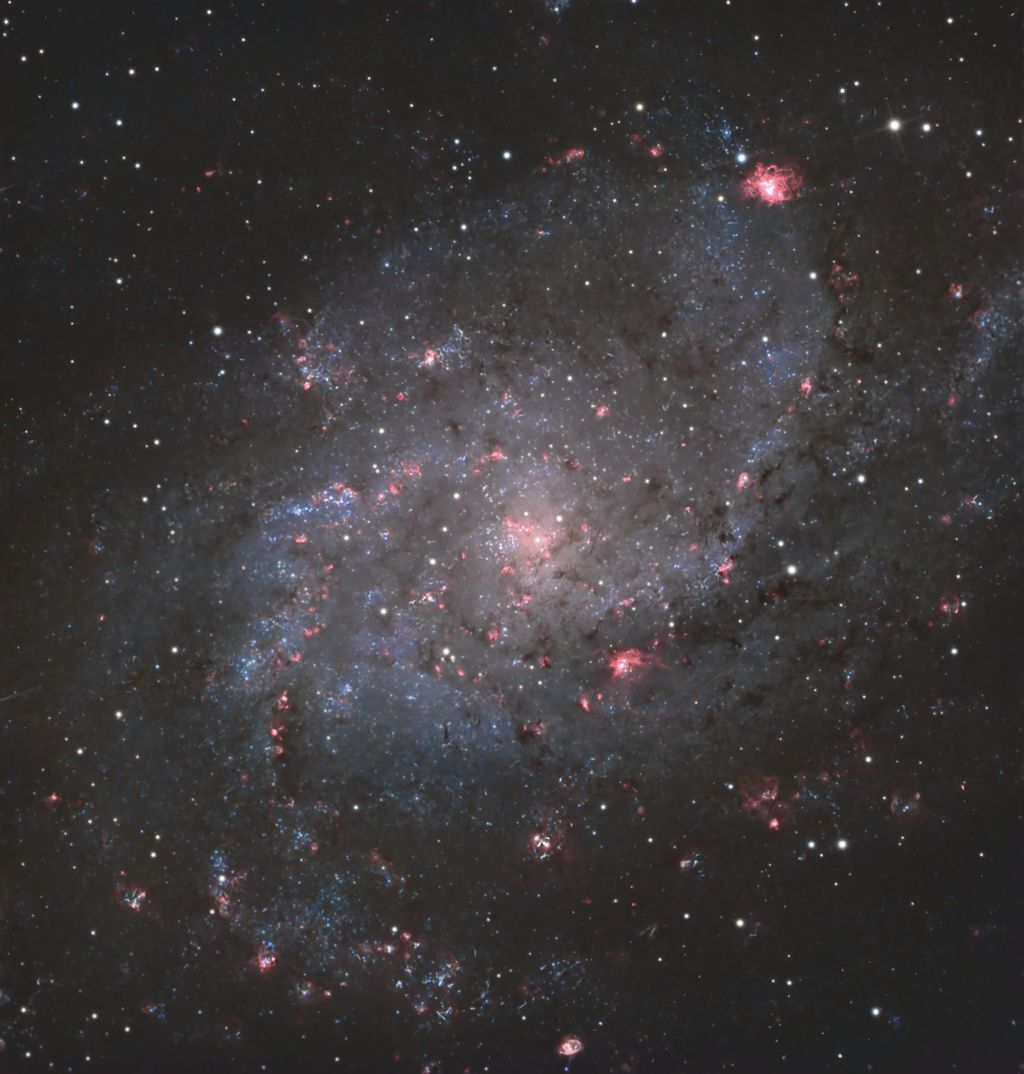 |
You cannot like this item. Reason: "ANONYMOUS".
You cannot remove your like from this item.
Editing a post is only allowed within 24 hours after creating it.
You cannot Like this post because the topic is closed.
Riccardo Civati:
use the psf image script to calculate the psf of your photo to be able to put in the blur x terminator tool.
Ooooh gotta try this one out especially. Thank you for all the tips!
|
You cannot like this item. Reason: "ANONYMOUS".
You cannot remove your like from this item.
Editing a post is only allowed within 24 hours after creating it.
You cannot Like this post because the topic is closed.
Quinn Groessl:
So here's what I came up with using your data using Pixinsight.
For processing I opened them all. Flipped the L and the Ha 180 degrees to match the R,G,B images. Then used DynamicAlignment to register the L and Ha images. Combined RGB. Ran GraXpert on L, RGB, and Ha images. SPCC on the RGB image. Then I used DynamicCrop to crop all the images the same. BlurX, NoiseX, and StarX on all. I only kept the stars from the RGB image.
After that I used GHS to stretch the RGB and the L images. Then histogram transformation to tweak the L image a bit. LRGB combination to add the L to the RGB image. I used unsharp mask to sharpen the LRGB image a bit. Then I stretched the stars in HistogramTransformation until I liked it. Added the stars back in.
Next I stretched the Ha image a bit. Used NBRGBCombination script to add the Ha. From there I used curves to tweak things a bit. Then I used ColorSaturation and dropped the saturation of the reds because they were overpowering, and I added saturation to the blues and yellows. Then used SCNR to take out all the green.
I think that's about it. There's more tweaking in curves I could probably do. I'm really not all that good at galaxy images (hope to improve this winter), and I usually struggle pretty badly adding Ha in to images, but I liked the way it came out with your data. With how much clouds, and then tweaking with a new set up I have it was fun having some data to play around with!
Thank you for the quick response! You did an awesome job with the data, but there's a lot of "wormyness" when not even too much, just a bit of nonstellar sharpening is aplied. This is what I'm trying to avoid from happening. :c
|
You cannot like this item. Reason: "ANONYMOUS".
You cannot remove your like from this item.
Editing a post is only allowed within 24 hours after creating it.
You cannot Like this post because the topic is closed.
Matija Jakičević:
Hello everyone! I have captured some data of the Triangulum and would like for you guys to give it a shot processing, or at least assessing if anything is possible as I'm not really sure how to do it good enough.
I have tried doing it myself, but I'm not able to get it sharp enough while also keeping it from becoming too "spotty" from all the dim and unexposed stars as well as too "smooth" from too much noise reduction. I posted my result on my astrobin profile so you can check out what I got there.
In my opinion it's a bit too smooth and unnatural (I am using blurx and noisex), but I wish you guys would be able to give me some info on how to control this beast... I'm also aware that the resolution I was shooting at (0.65") might be a bit too much for my location (65m above sea in rural Croatia) and would be open to getting a smaller scope or a quicker one with less focal length.
The equipment I used was a 250pds and a PlayerOne Ares-M camera, HaLRGB.
You can find the stacked files here:
https://drive.google.com/drive/folders/1Ns7Ol2cZ2Ik31wlP2Ma0sEnIi9AFCS5g?usp=sharing
My result:
https://www.astrobin.com/s7dpva/E/
Oh and keep in mind that I'm more focused on getting the luminance to a point where it's natural and sharp so you don't have to focus much on color (not much RGB time on it anyways).
Thank you for your help and clear skies!
Matija
Dowenloading RAW files...let me try..Thanks!
|
You cannot like this item. Reason: "ANONYMOUS".
You cannot remove your like from this item.
Editing a post is only allowed within 24 hours after creating it.
You cannot Like this post because the topic is closed.
Fabio Acquarone:
Dowenloading RAW files...let me try..Thanks!
Good luck!
|
You cannot like this item. Reason: "ANONYMOUS".
You cannot remove your like from this item.
Editing a post is only allowed within 24 hours after creating it.
You cannot Like this post because the topic is closed.
Are the master files calibrated? I found there was a lot of weird pixels in there:
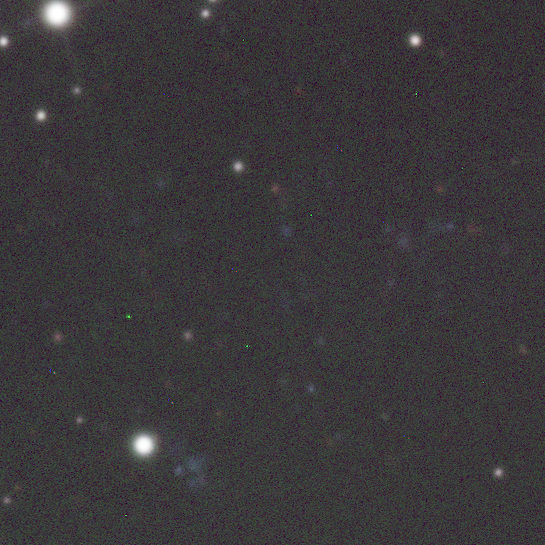
Edit: Also some vignetting in the corners.
|
You cannot like this item. Reason: "ANONYMOUS".
You cannot remove your like from this item.
Editing a post is only allowed within 24 hours after creating it.
You cannot Like this post because the topic is closed.
Jan Erik Vallestad:
Are the master files calibrated? I found there was a lot of weird pixels in there:
Edit: Also some vignetting in the corners.
Had some issues with the RGB calibration but fixed it manually later during processing. Woops D:
|
You cannot like this item. Reason: "ANONYMOUS".
You cannot remove your like from this item.
Editing a post is only allowed within 24 hours after creating it.
You cannot Like this post because the topic is closed.
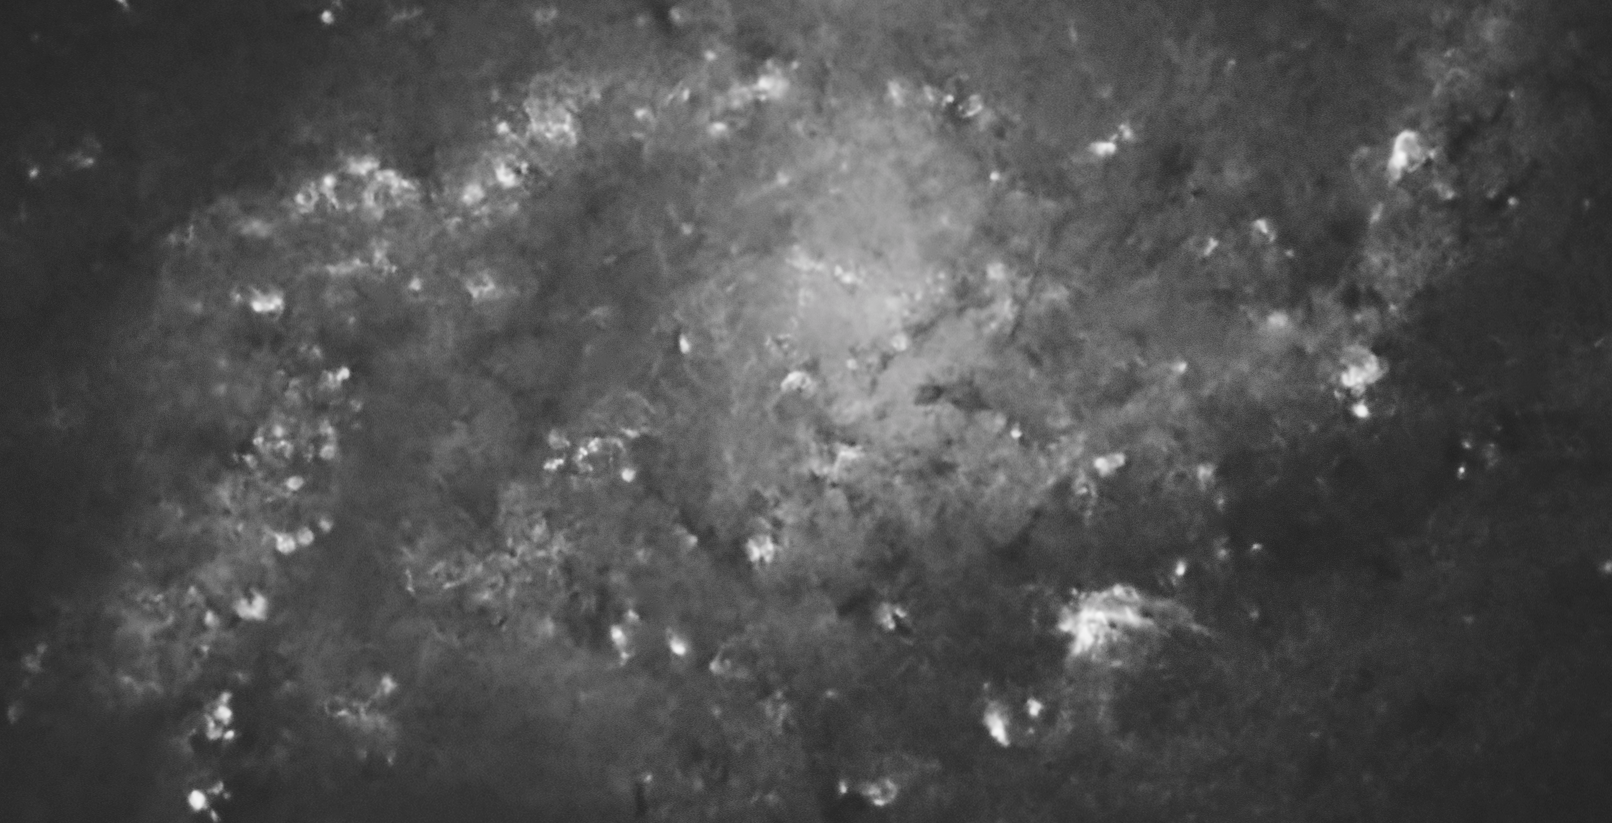
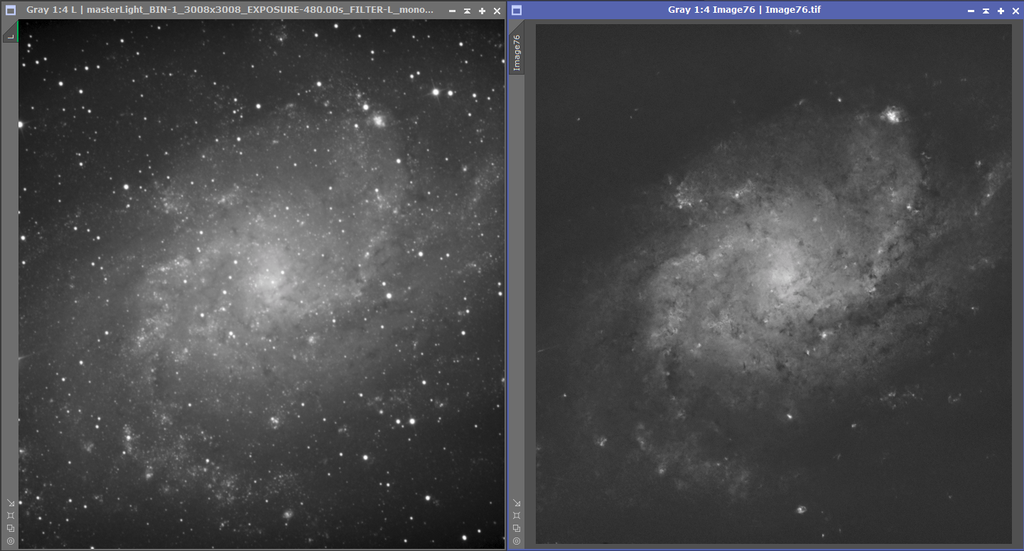
I'm trying to work a bit on the LUM channel, but it is quite blurry. I think I'm getting close to my end result though:
 |
You cannot like this item. Reason: "ANONYMOUS".
You cannot remove your like from this item.
Editing a post is only allowed within 24 hours after creating it.
You cannot Like this post because the topic is closed.
|
Any chance of sending out fits or tiffs, not sure you can open a XIFS file without PI, which I don't use.
|
You cannot like this item. Reason: "ANONYMOUS".
You cannot remove your like from this item.
Editing a post is only allowed within 24 hours after creating it.
You cannot Like this post because the topic is closed.
Bob Lockwood:
Any chance of sending out fits or tiffs, not sure you can open a XIFS file without PI, which I don't use.
I'll add them to the drive folder c:
|
You cannot like this item. Reason: "ANONYMOUS".
You cannot remove your like from this item.
Editing a post is only allowed within 24 hours after creating it.
You cannot Like this post because the topic is closed.
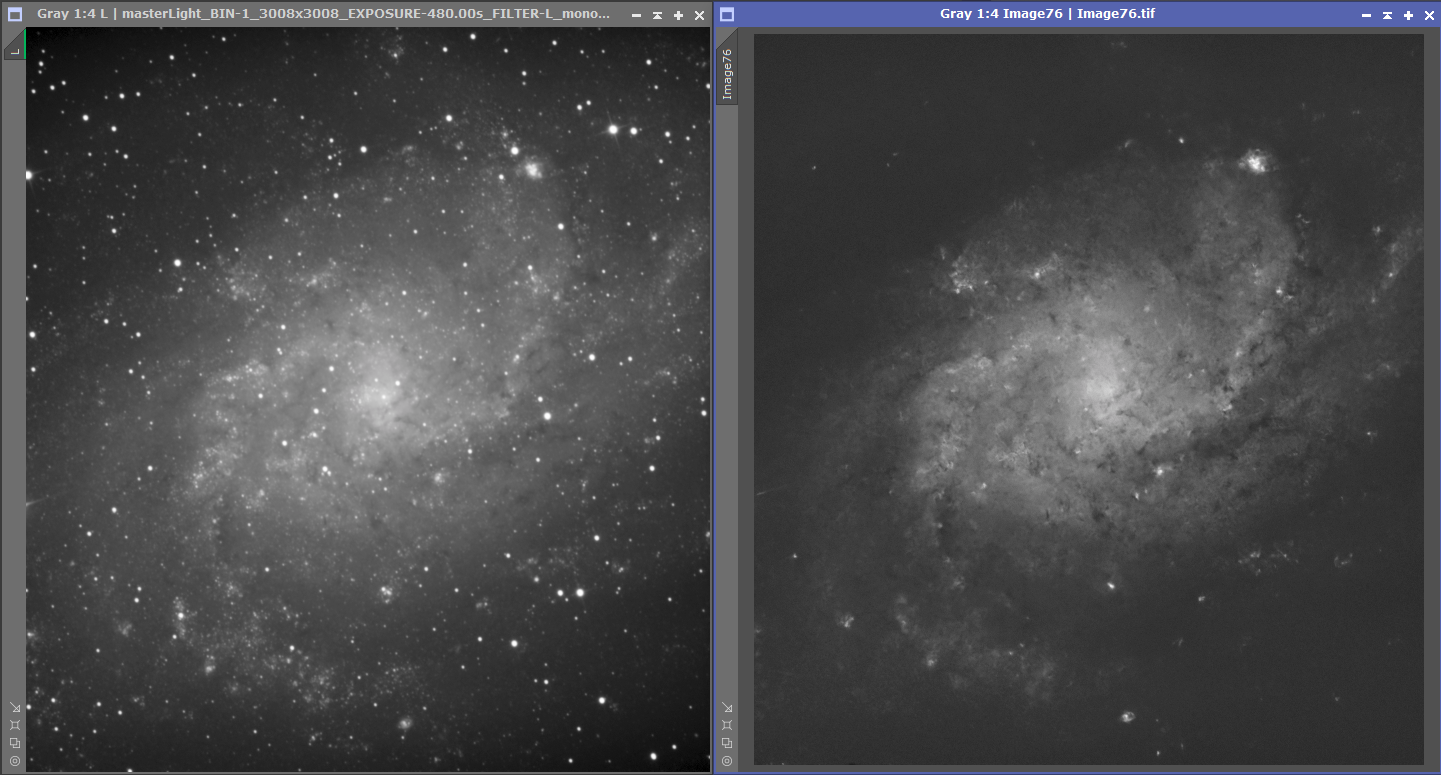
I don't know, maybe I need a pair of rested eyes on this. I find it a bit challenging to remedy the blurriness. I did some testing though, but not sure this is what you're looking for. I didn't do any hot pixel removal nor any fine cropping etc. Comparing to yours I probably did hold back a lot more while stretching as well while trying not to blow out the cores in different nebulas. I'm not sure how much can be done given the starting point.
First a comparison between the original L and processed L
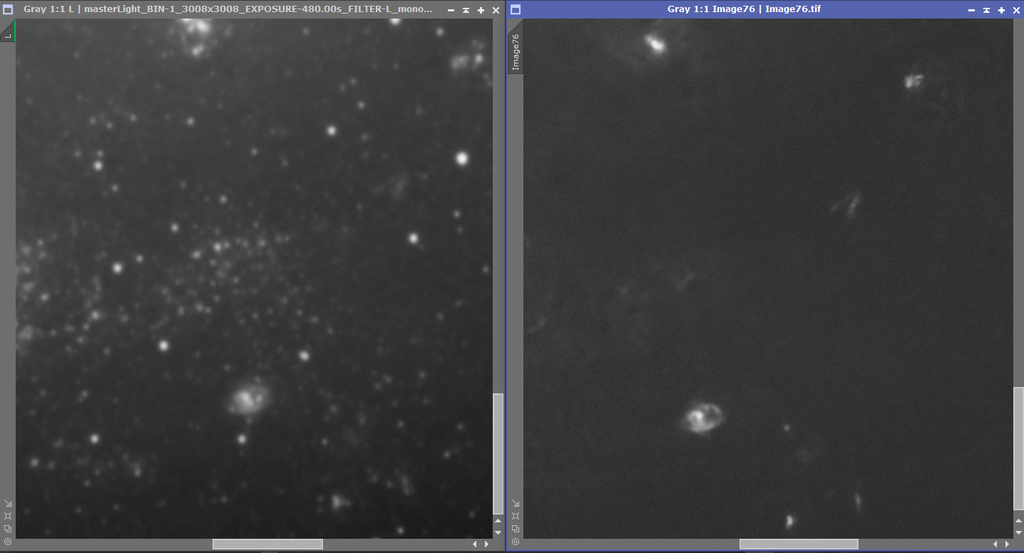
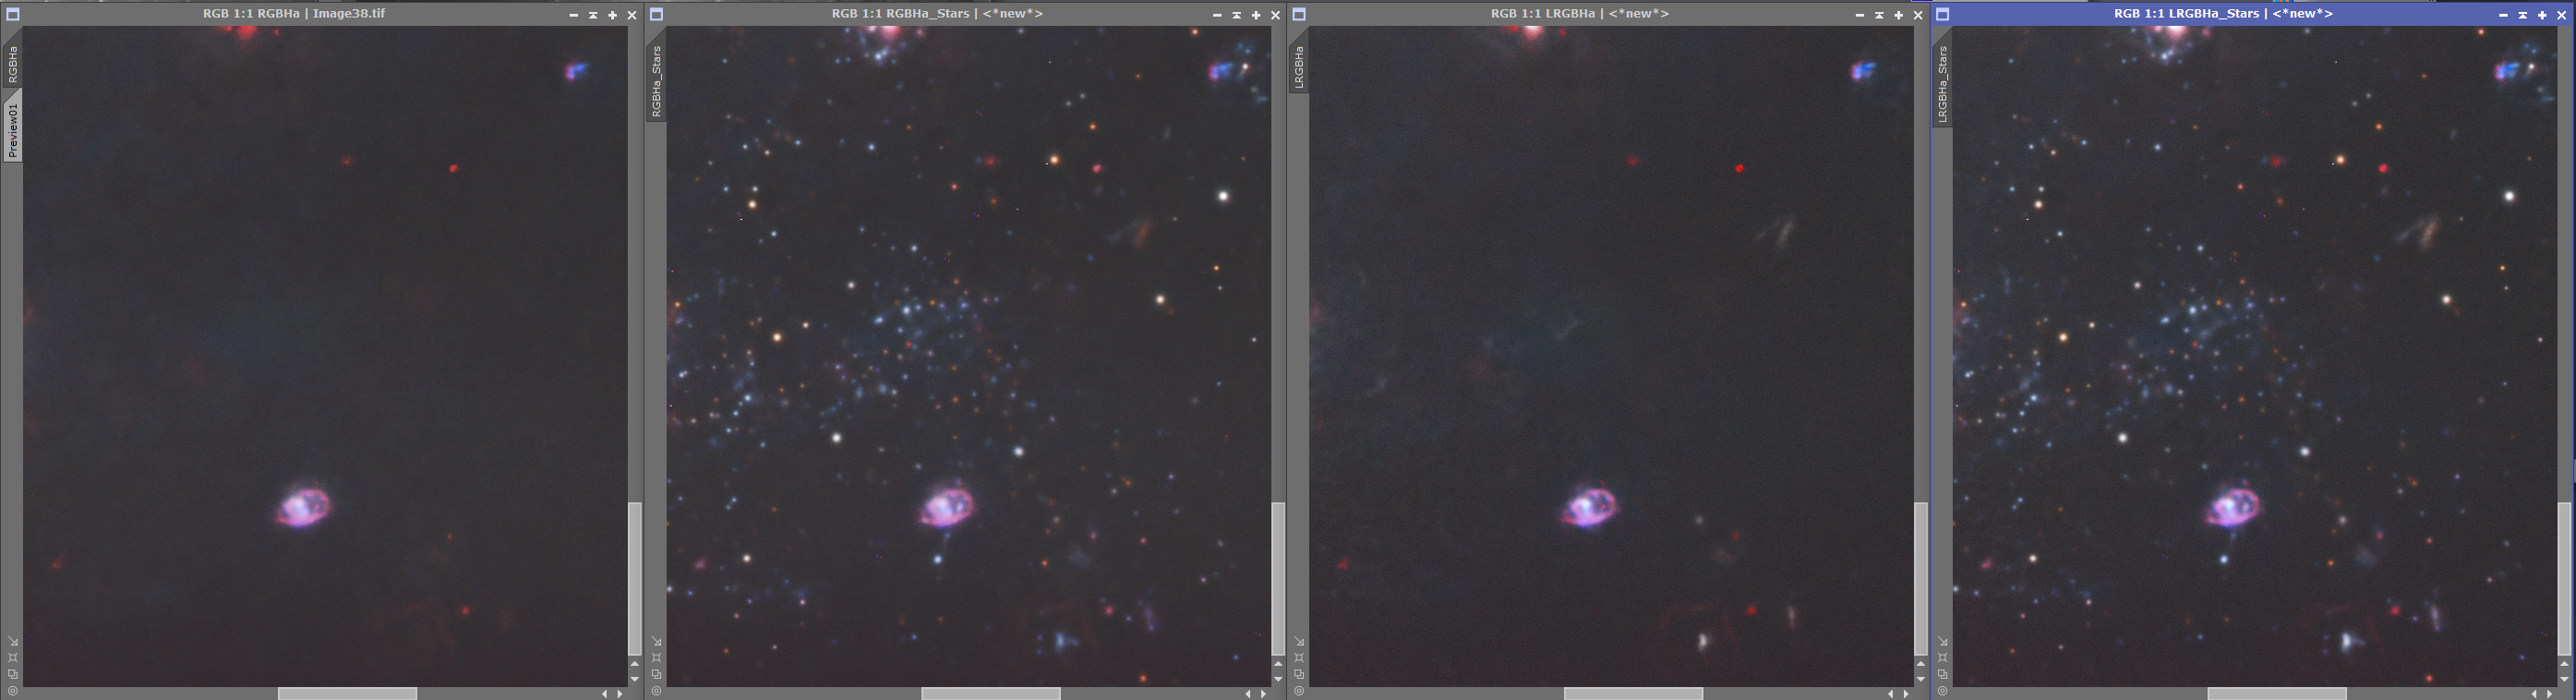
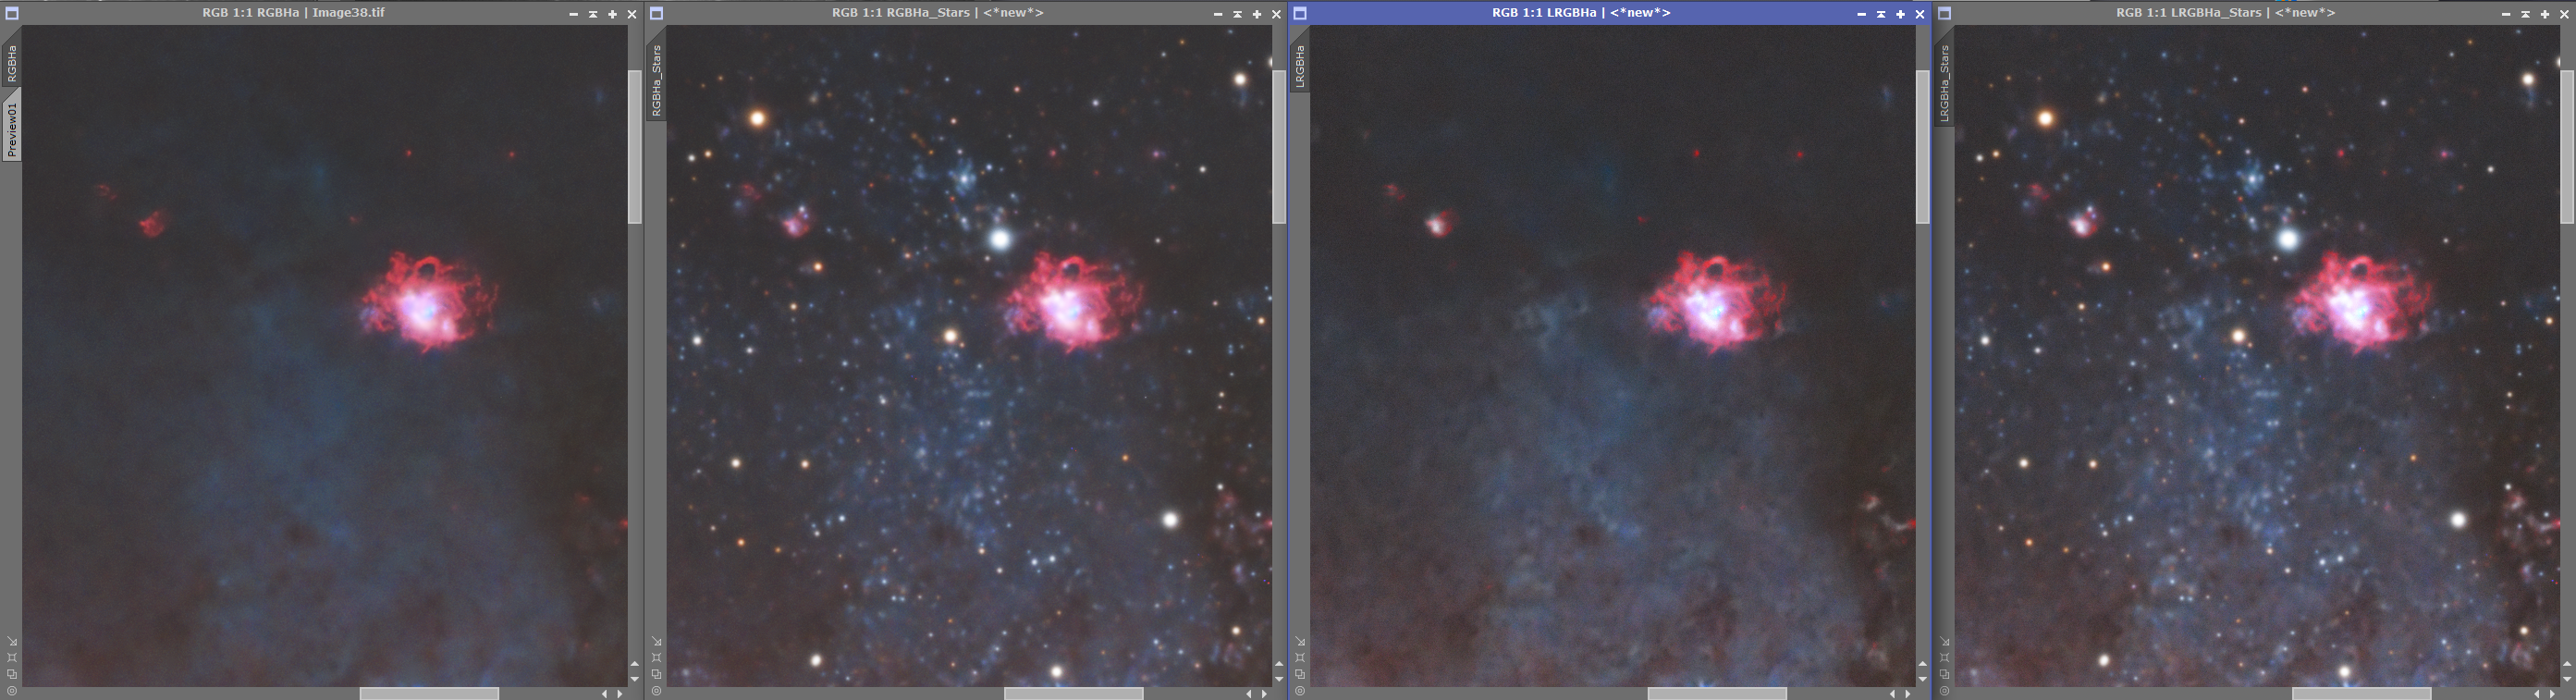
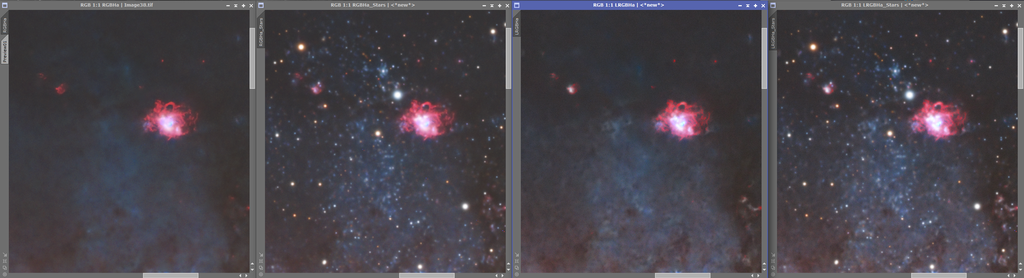
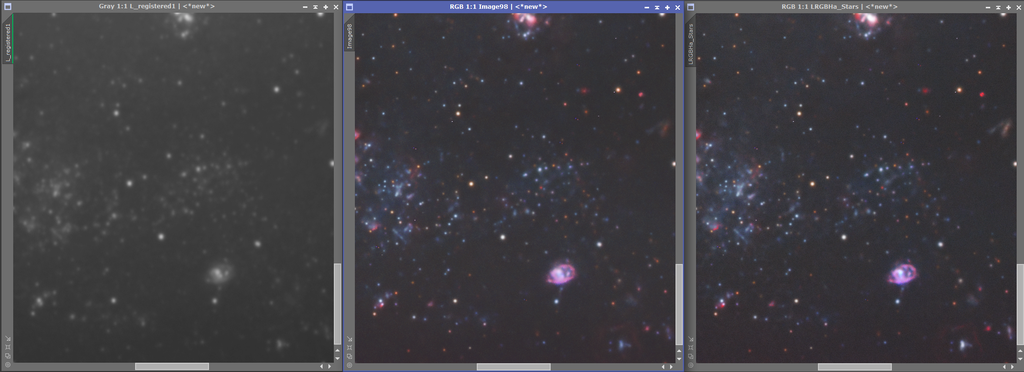
Then RGBHa vs LRGBHa. Subtle details come with the L channel, also some stuff seem to be removed along with the stars from RGB but not from L:


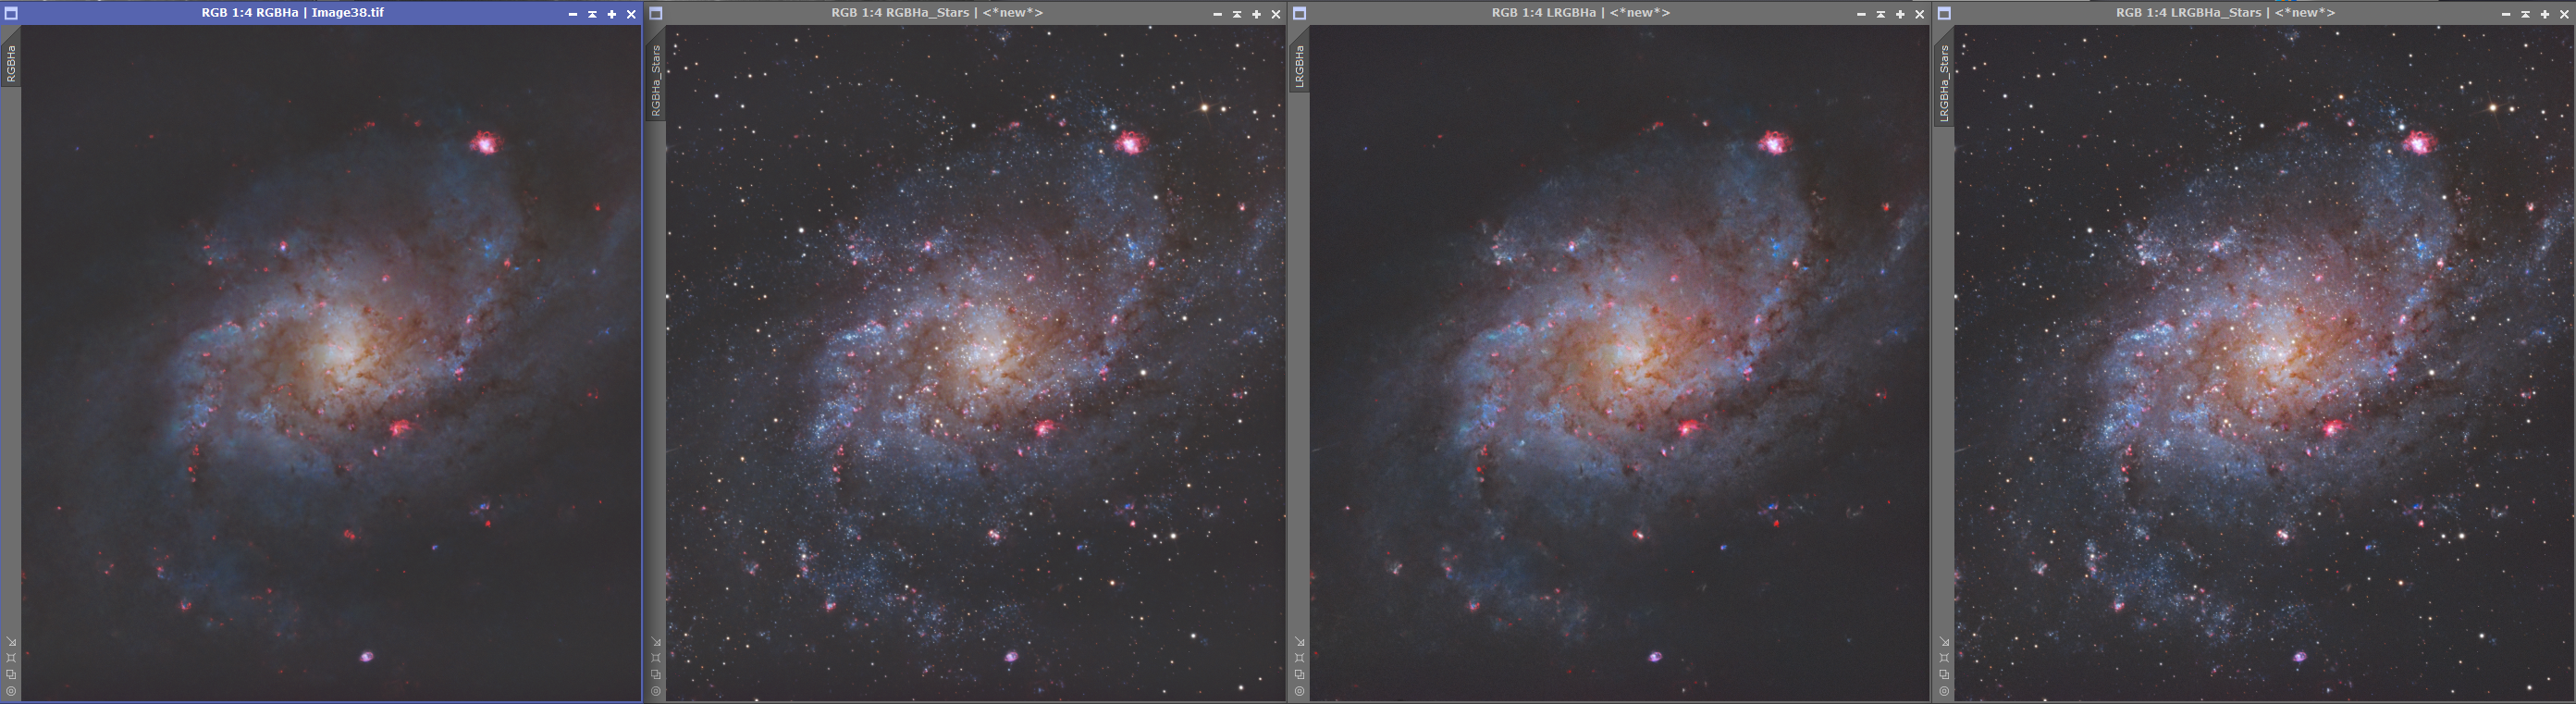
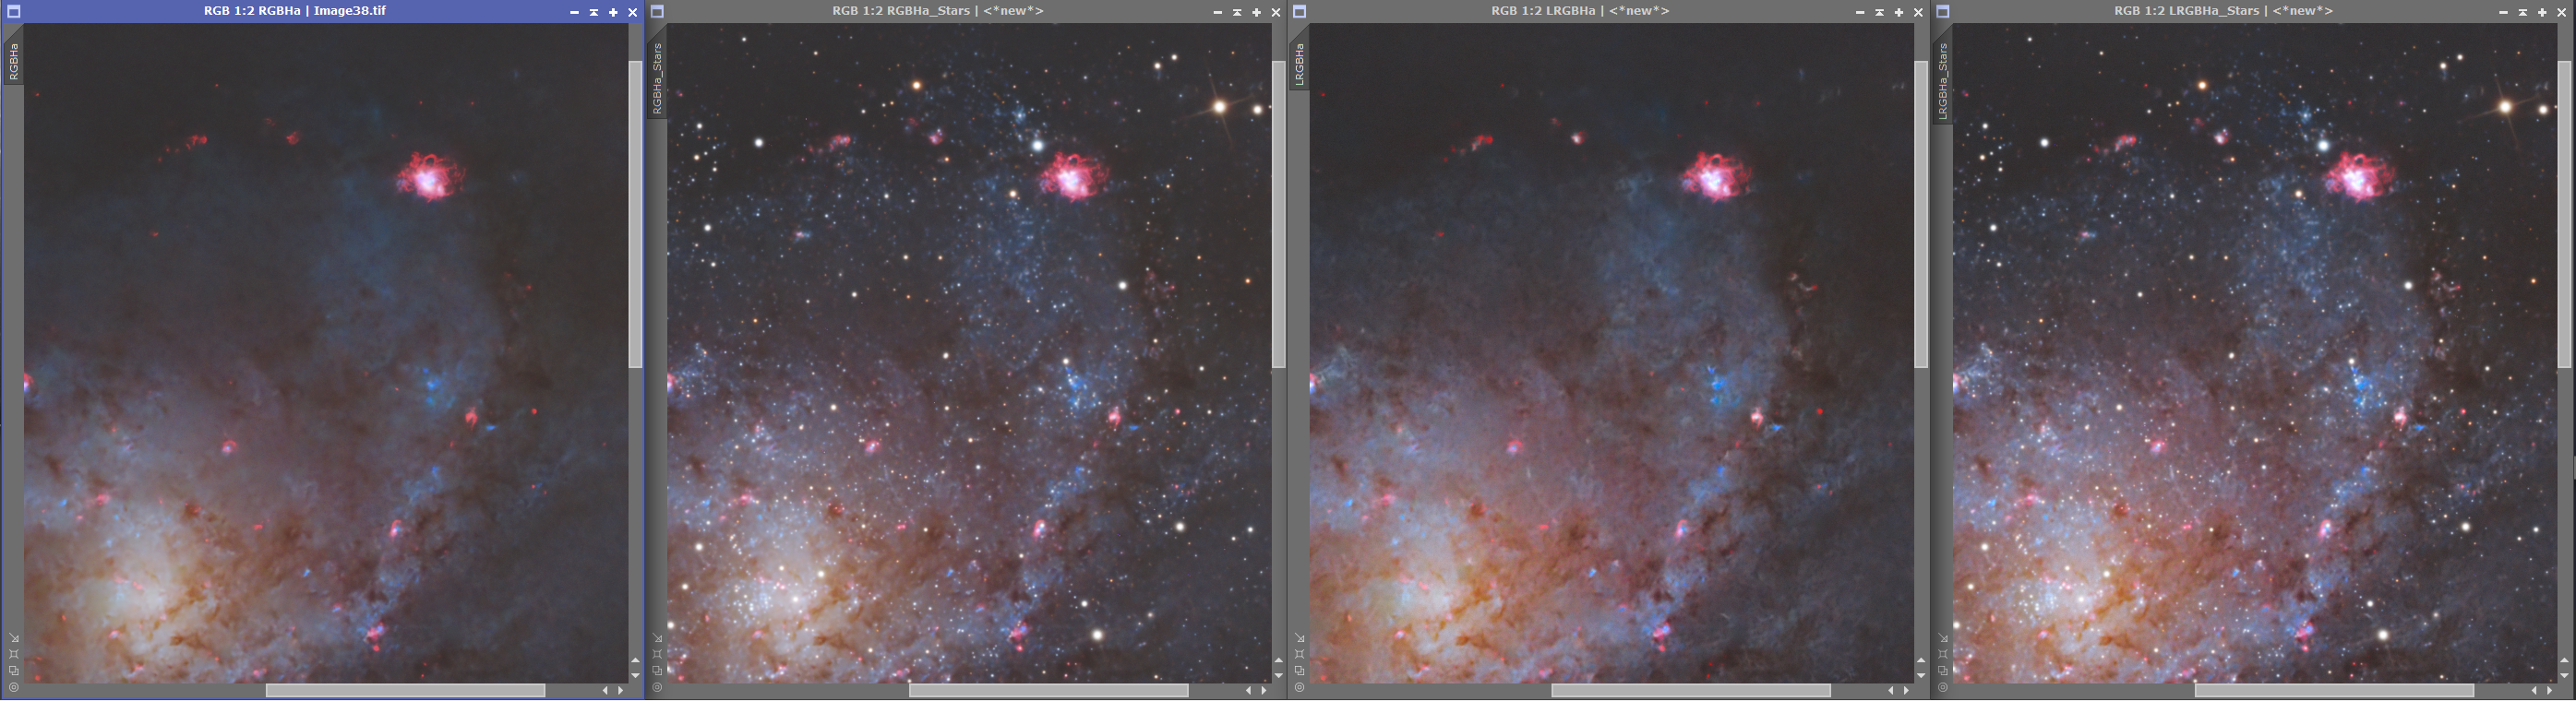
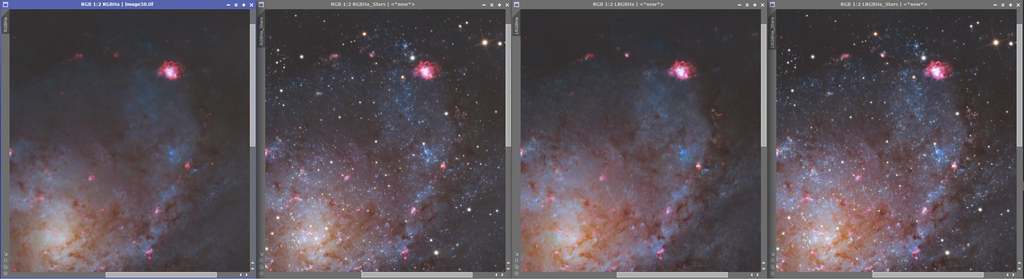
Personally I found it looked a bit better 1:2 than 1:1 though, so if it were me I would probably resample it:
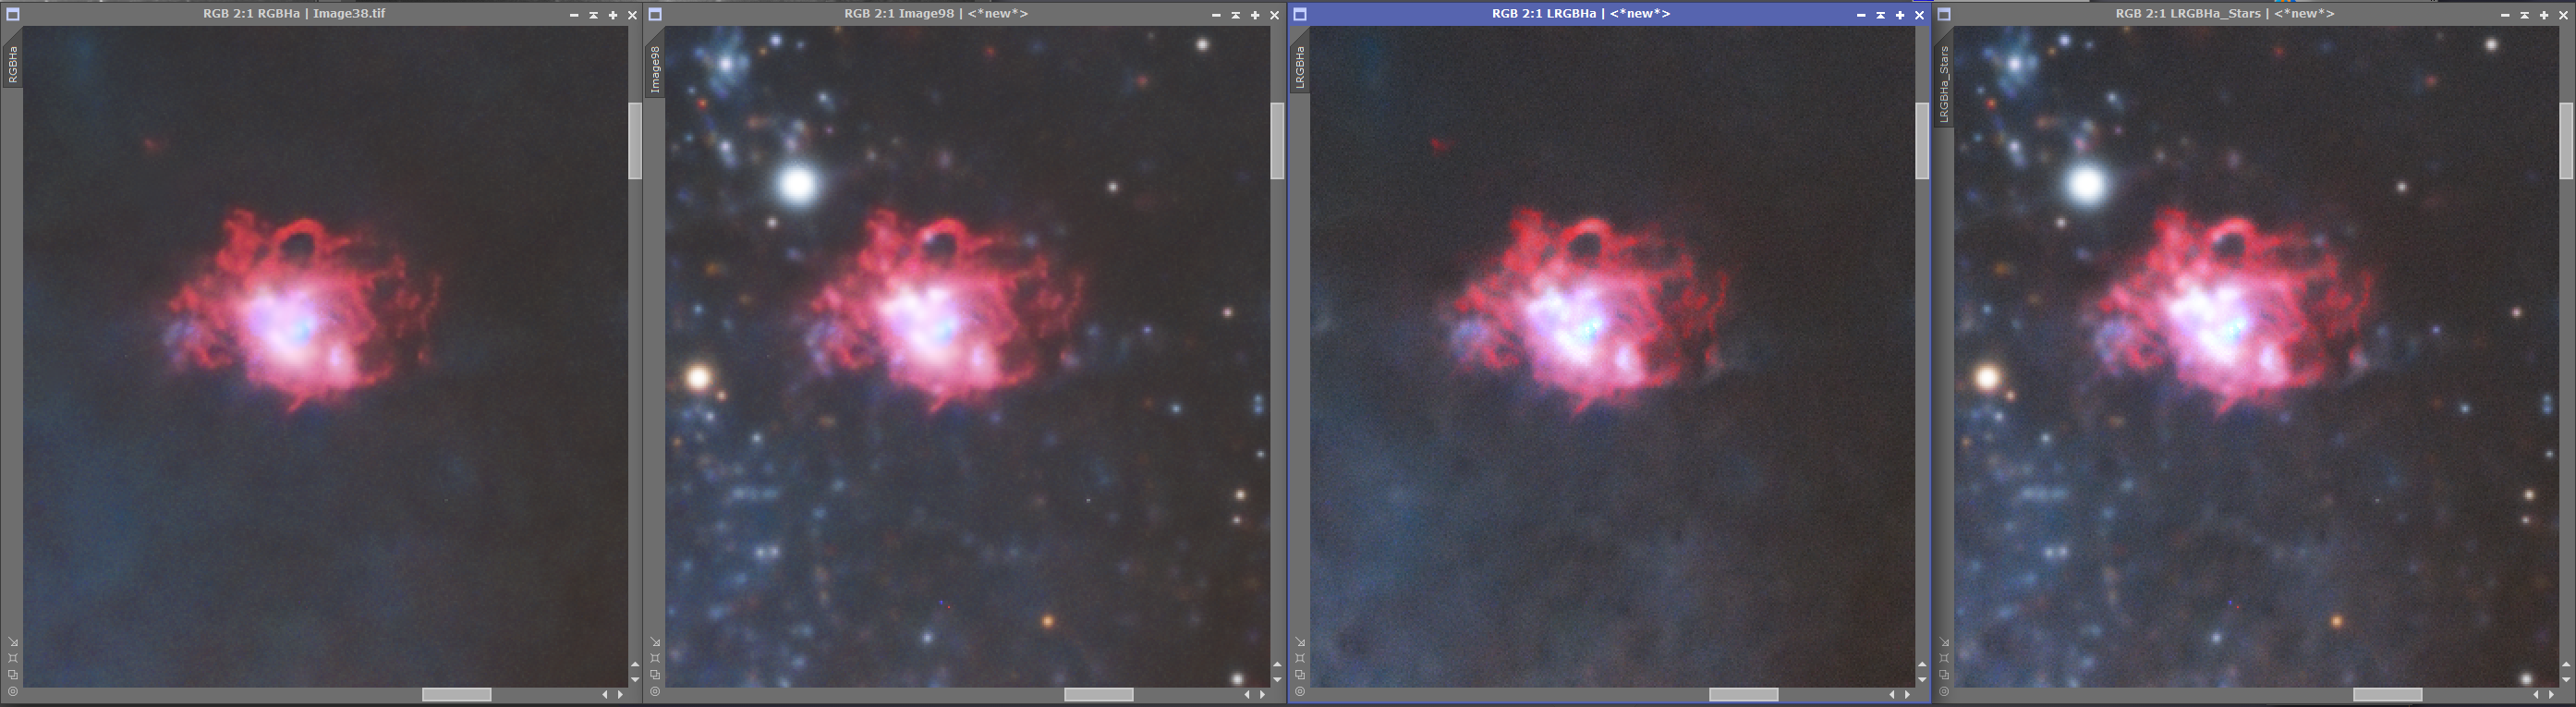
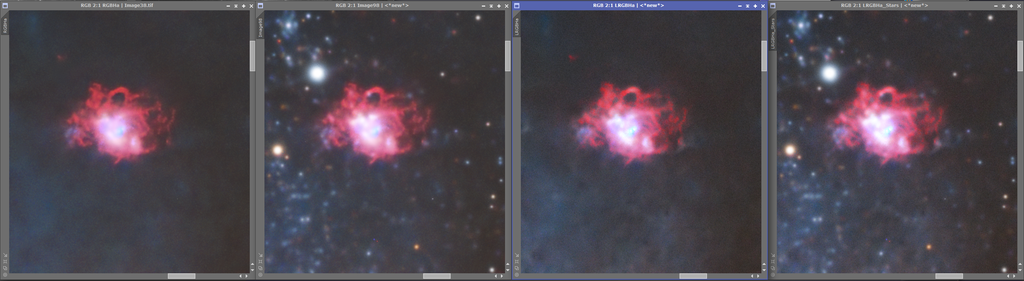
It seems I might have left a bit more grain/had a touch less denoise on the L images as can be seen in 2:1
 |
You cannot like this item. Reason: "ANONYMOUS".
You cannot remove your like from this item.
Editing a post is only allowed within 24 hours after creating it.
You cannot Like this post because the topic is closed.
Bob Lockwood:
Any chance of sending out fits or tiffs, not sure you can open a XIFS file without PI, which I don't use.
Lemme tell you a little secret.
Graxpert can open XISF files and you can save them as TIFFs or FITs. You don't have to do any background extraction to save them; so basically, you could use Graxpert as a very useful file converter.
|
You cannot like this item. Reason: "ANONYMOUS".
You cannot remove your like from this item.
Editing a post is only allowed within 24 hours after creating it.
You cannot Like this post because the topic is closed.
Jan Erik Vallestad:
I'm trying to work a bit on the LUM channel, but it is quite blurry. I think I'm getting close to my end result though:
*** Attention!!
processing the image without the stars is convenient but be careful that star x terminator also eliminates structures similar to stars (therefore parts of the galaxy such as hydrogen zones or similar).
an alternative is to apply a well-designed mask so as not to remove these parts otherwise I think it is preferable not to remove the stars when processing galaxies.
I have seen images online that had these defects, so you need to use this tool but with moderation ***
|
You cannot like this item. Reason: "ANONYMOUS".
You cannot remove your like from this item.
Editing a post is only allowed within 24 hours after creating it.
You cannot Like this post because the topic is closed.
Riccardo Civati:
*** Attention!!
processing the image without the stars is convenient but be careful that star x terminator also eliminates structures similar to stars (therefore parts of the galaxy such as hydrogen zones or similar).
an alternative is to apply a well-designed mask so as not to remove these parts otherwise I think it is preferable not to remove the stars when processing galaxies.
I have seen images online that had these defects, so you need to use this tool but with moderation ***
Attention?
I don't mean to come off as rude, but I tried pointing this out in the post above:

Which is why you can see that the screenshot from the initial L channel is very different from the one actually used. I prefer to work with duplicates to test various solutions to solve a problem (if there is one), before I land on a workflow. Initially I was working on a sort of superlum idea, which I then scrapped. Ideally you should work with a good mask as you say, but I think the point of the post was mostly regarding if it's possible to get a decent level of sharpness.
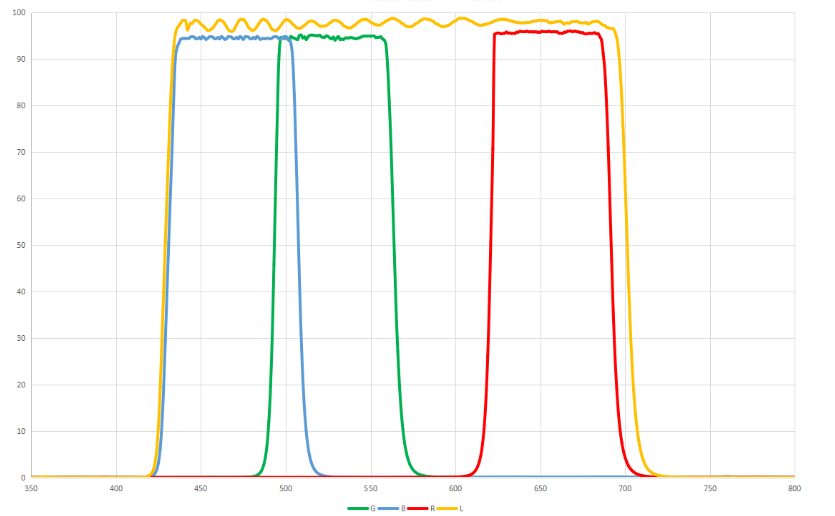
The reason certain details come with the L filter but not with RGB could have a simple explanation, the L filter has a broader spectrum than the RGB filters combined. For example (This is just to illustrate. the actual filters used might be different):

So it is very plausible that certain subtle details only lies within the L filter in such cases. Usually Luminance will have more detail, and as I read OP's comments the L channel also has 4-5 times the integration which is another reason.
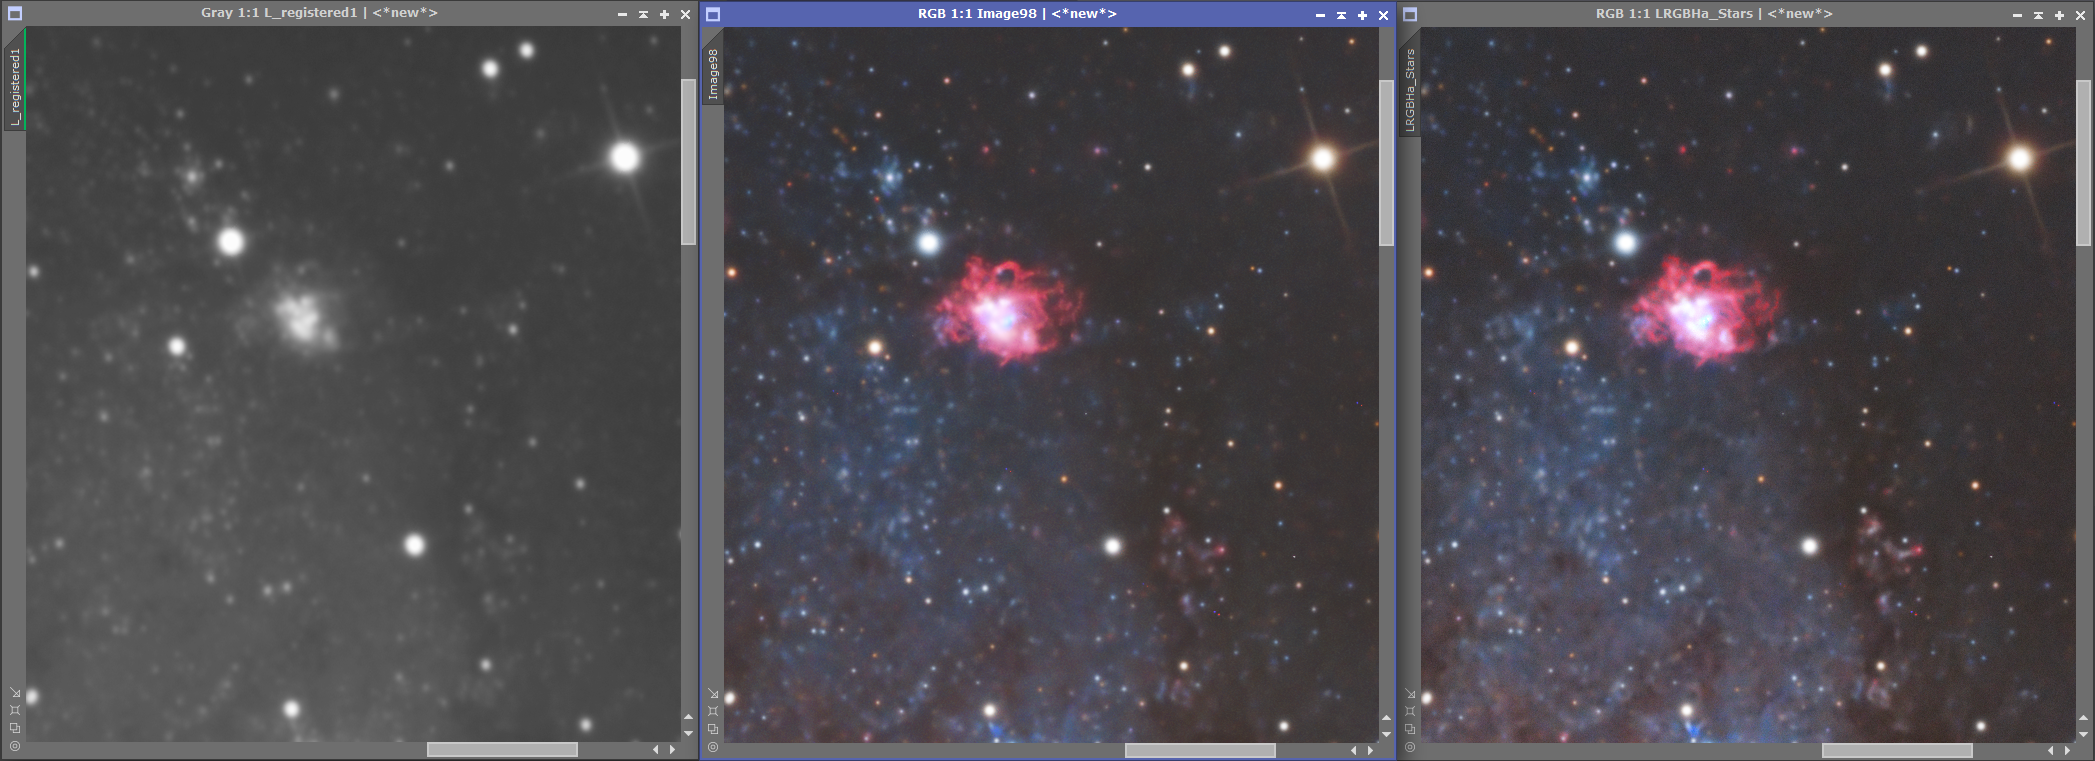
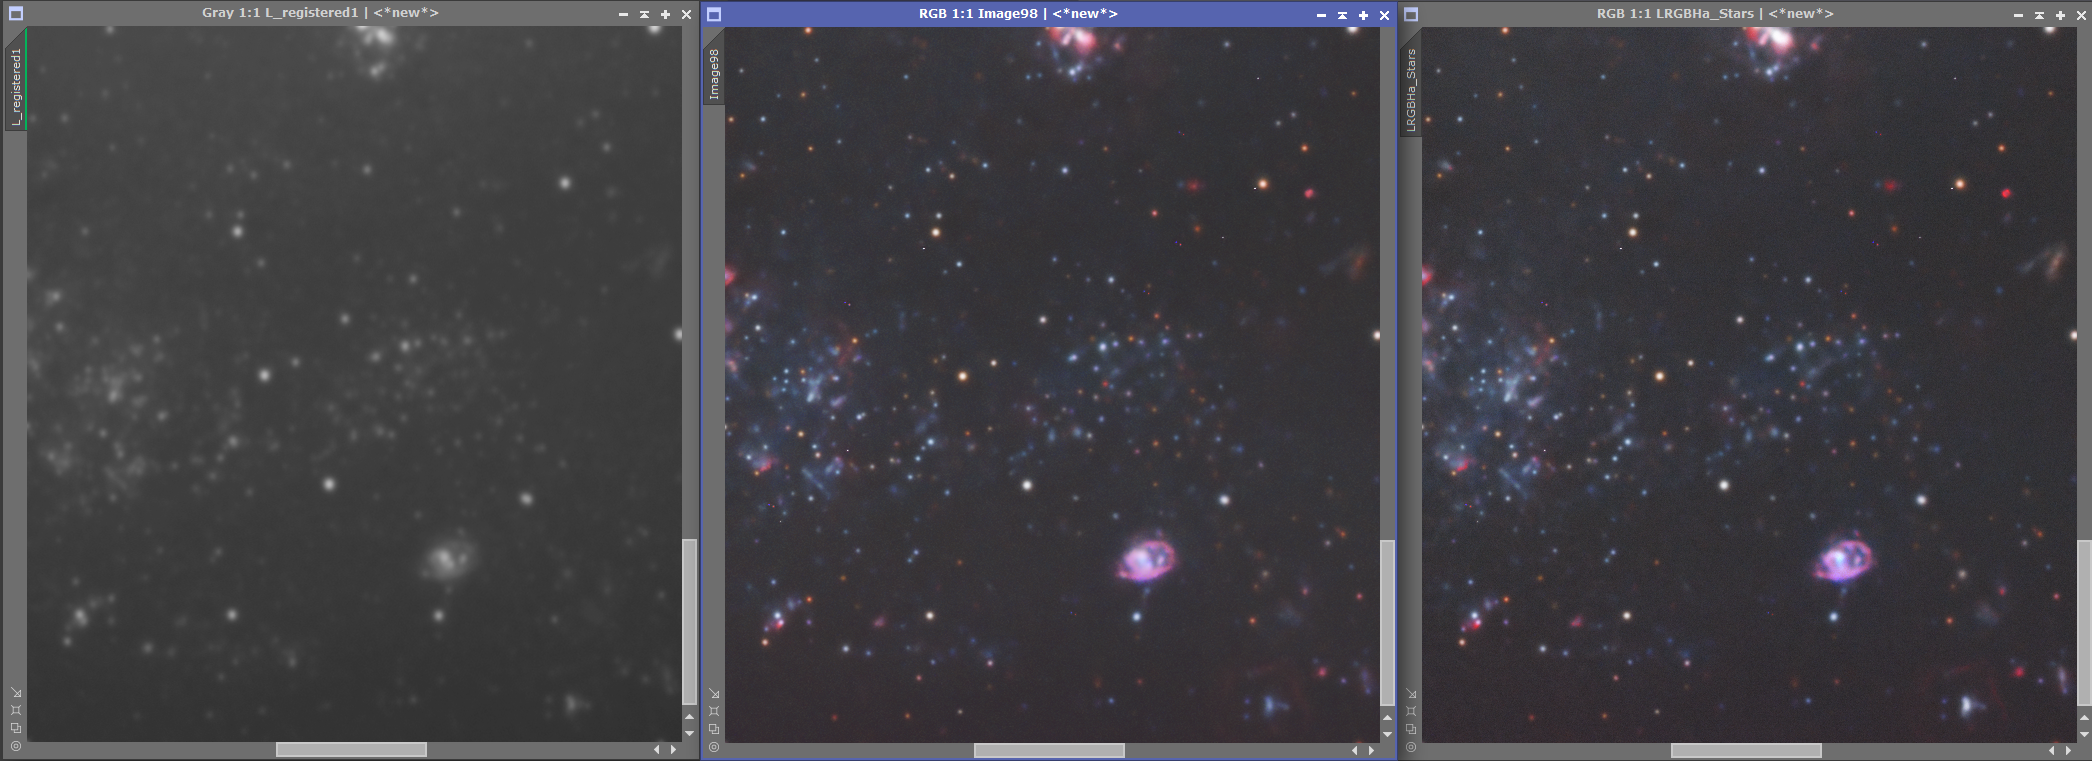
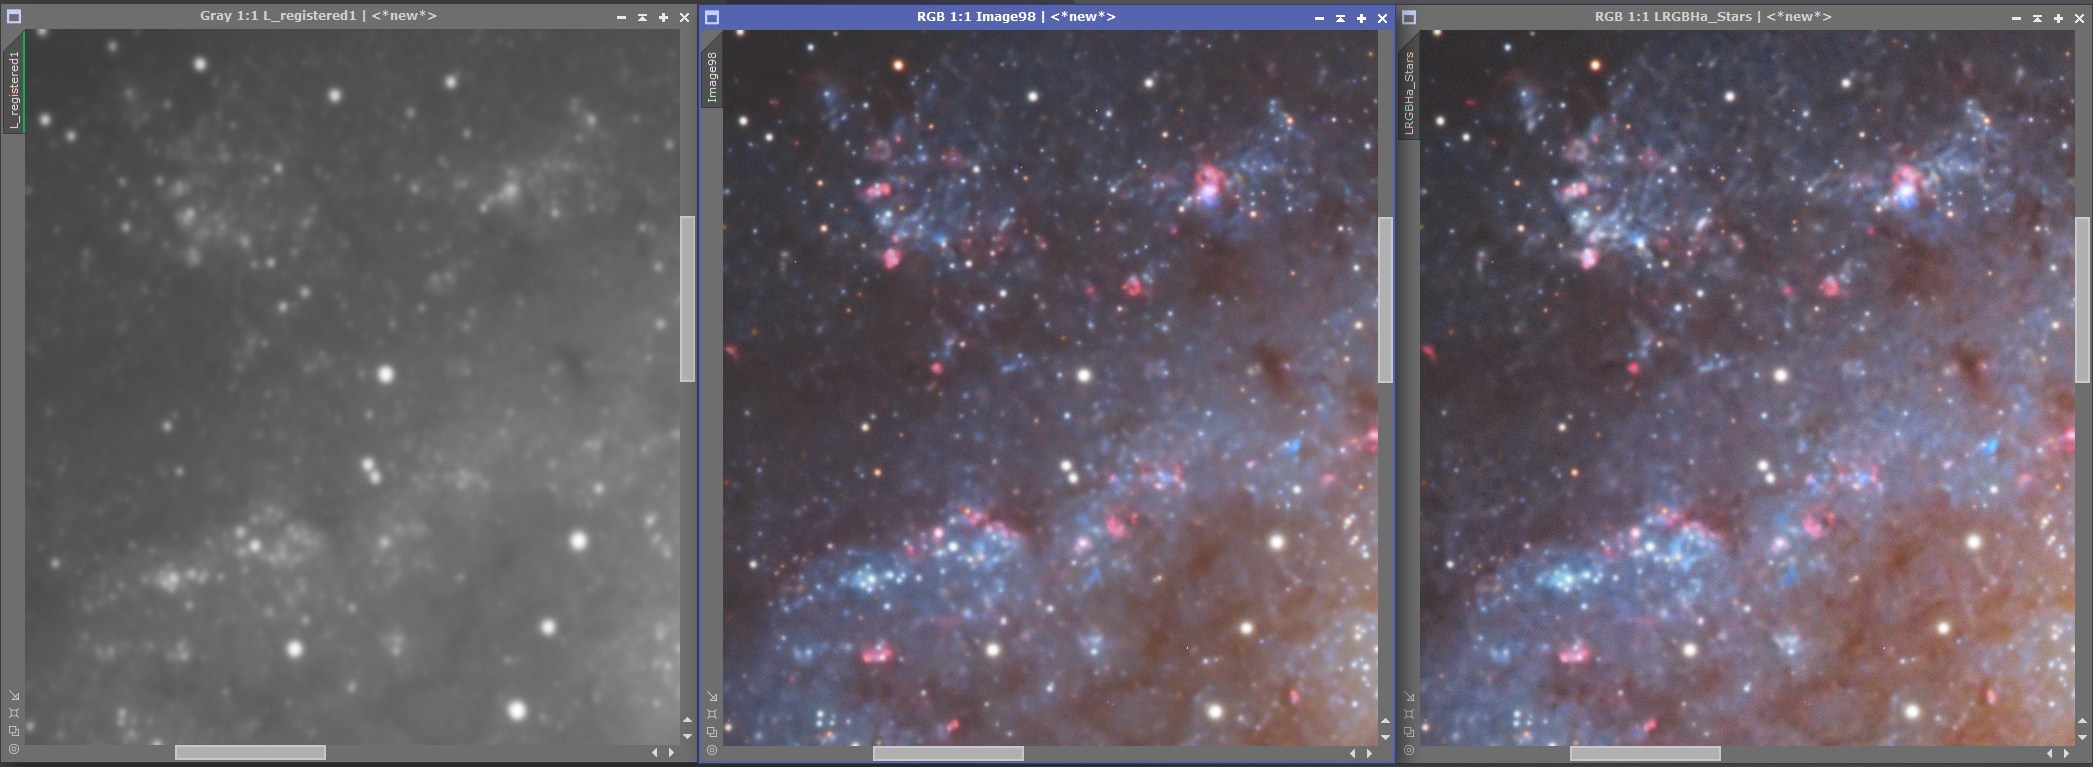
Just a quick comparison between the original L channel (unprocessed) vs the processed HaLRGB and LRGBHa:

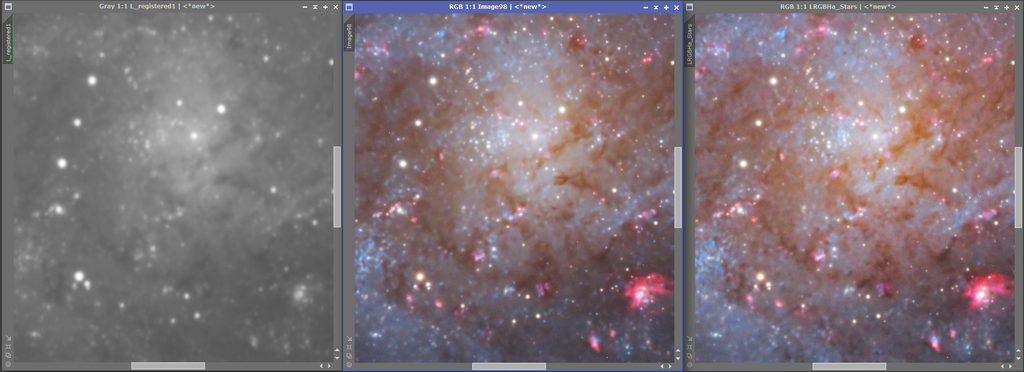

Maybe I'm missing something obvious, but I don't see where there is any loss of information? If you mean that these images have obvious defects due to excessive use of star removal it would be more helpful if you pointed out where.
I didn't include a detailed description of the workflow, but I can if OP finds it useful and see something that he can work on further.
|
You cannot like this item. Reason: "ANONYMOUS".
You cannot remove your like from this item.
Editing a post is only allowed within 24 hours after creating it.
You cannot Like this post because the topic is closed.
I was speaking on a general level:
when running star x terminator it is very possible that some details are removed because the software sees them as stars.
by working separately between the stars and the galaxy, it is possible that later during the fusion the details of the galaxy are reintroduced but with a different stretch
|
You cannot like this item. Reason: "ANONYMOUS".
You cannot remove your like from this item.
Editing a post is only allowed within 24 hours after creating it.
You cannot Like this post because the topic is closed.
I didn't include a detailed description of the workflow, but I can if OP finds it useful and see something that he can work on further.
That'd be great to have a look at if you have the time...
cs,
Matija
|
You cannot like this item. Reason: "ANONYMOUS".
You cannot remove your like from this item.
Editing a post is only allowed within 24 hours after creating it.
You cannot Like this post because the topic is closed.
Matija Jakičević:
I didn't include a detailed description of the workflow, but I can if OP finds it useful and see something that he can work on further.
That'd be great to have a look at if you have the time...
cs,
Matija
I'll do my best as far as I can remember!
Lum:
GraXpert (simply because it looked like a strong gradient, and you had problems with calibration on certain channels)
BXT (Correct only)
BXT ( Sharpen stars 0.35 and non stellar 0.9 - auto PSF)
SXT (Always with the StarXterminator.11.pb not lite or lite.nonoise, also large overlap as it helps with the tile pattern some people are getting)
Stretched with GHS
NXT (not sure of the exact settings, but minor adjustments to details and adjusting denoise to taste on preview) > I intended to try NXT both before and after the next step but I forgot it along the way.
Copied the lum image and clipped the black point, applied MLT to blur the mask:
Applied the mask to two new copies of the image and sharpened one with UnsharpMask and the other with MLT. Then combined them with the original image. 30% original lum, 35% each of the other. This isn't in any way exact science, so it's just trial and error really.
(If it's stretched so far that some highlights are clipped you could use HDRMT to recover those areas, I didn't pull it that far though. I would then make additional copies and apply HDRMT to each of them with a different number of layers (5 layers is a good starting point) and then combining them in the end, again with a percentage per image)
I applied LocalHistogramEqualization to the sharpened lum (using the same mask as above, clipped black point):
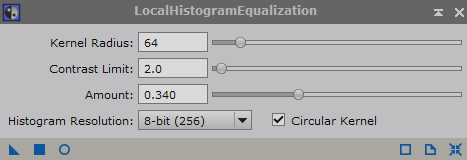
This can be very powerful, so it's a matter of holding back in order to not make the image pretty weird.
RGB
GraXpert (Same reason as above)
BXT (Correct only)
SPCC
BackgroundNeutralization on some remaining discolored background
SCNR (for some reason there were still some green hues left, normally I don't really apply this too often to color calibrated images)
BXT (Probably same settings as above)
SXT
ColorSaturation (selectively adjusted certain colors f.ex: yellow, orange, red and maybe blue)
Stretched with GHS
NXT
RGB Stars
Stretched with HistogramTransformation, approximately to the STF level, at least to a certain degree.
ColorSaturation - To selectively adjust some colors, trying not to go overboard.
Ha
Performed the following for both Ha and R:
GraXpert
BXT (Correct only)
BXT (with non stellar sharpening)
SXT
Continuum Subtraction with pixelmath
Stretching and adjusted black level
NXT/ACDNR
LRGB
Combined with the LRGB tool
Then some adjustments to noise and chrominance with both NXT and ACDNR (masked).
Some curves adjustments to color/saturation - Play with masks here, or you could also do it in PS with masks there and work in layers. I do both from time to time.
Final overall adjustments with curves to adjust contrast.
LRGBHa
Added Ha into the image with Pixelmath.
LRGBHa + Stars
Added stars back with Pixelmath by screening them into the image.
Slight cropping was done before starting anything. That is vital if you are going to use GraXpert. I should have cropped more but didn't really pay enough attention to it beforehand.
PS: I started with the RGB images and didn't realize till later that all the images weren't aligned. So that should have been the first step, but it was fine as I simply aligned them with the "stars only" image. There might be some steps for you to experiment with here, though I have to admit that I tried different approaches to the image. It's not necessarily a adviced workflow for general processing, just my attempt to sharpen up the details a bit.
I abandoned the superlum idea, I made a mistake but it was too late to try to go back without repeating too many processes. You could try to solve, align and use ImageIntegration on all your images and use this as a superlum. The one I made didn't work out as intended due to said mistake, so I chose this way in stead.
|
You cannot like this item. Reason: "ANONYMOUS".
You cannot remove your like from this item.
Editing a post is only allowed within 24 hours after creating it.
You cannot Like this post because the topic is closed.
BXT ( Sharpen stars 0.35 and non stellar 0.9 - auto PSF)..... this is wrong... you must use psf value, never auto psf. The auto PSF only when doing correct only parameter without sharpening
NXT before the stretching |
You cannot like this item. Reason: "ANONYMOUS".
You cannot remove your like from this item.
Editing a post is only allowed within 24 hours after creating it.
You cannot Like this post because the topic is closed.
Riccardo Civati:
BXT ( Sharpen stars 0.35 and non stellar 0.9 - auto PSF)..... this is wrong... you must use psf value, never auto psf. The auto PSF only when doing correct only parameter without sharpening
NXT before the stretching
Auto PSF is not wrong at all, with the new update (AI4) there's barely any difference at all. Also when you use correct only PSF will change. So which PSF would you then apply? With AI2 I always used manual PSF, but now I've not seen any good reason to do so myself (yet), but old habits die hard so I usually do both to compare. Even Adam Block uses automatic PSF in his recent video on YT where Russell Croman participated, is he wrong as well?
FYI: When you apply correct only there is no option to turn on/off automatic PSF anymore.
As far as NXT goes I disagree, I've not used it prior to stretching for a year. When it got released it was adviced to run it before stretching after BXT but things changed:
After this the "linear mode" option was removed and now with AI2 I can't find any kind of suggestion from Russell Himself that NXT must be run before stretching an image. My personal experience in early 2023 was that it created a whole lot of mess when doing so, but not when applying it after stretching.
I'm happy to be proven wrong though, if you can provide any kind of statement from Russell himself that NXT should be done in linear mode. The application itself can be used several times to different degrees (also a statement from Russell which can be found on Cloudynights f.ex). In my opinion flattening the image and performing noise reduction without knowing how the noise will look in the stretched image doesn't make sense. Surely it has improved with V2, but worst case scenario is that it alters things that it shouldn't.
|
You cannot like this item. Reason: "ANONYMOUS".
You cannot remove your like from this item.
Editing a post is only allowed within 24 hours after creating it.
You cannot Like this post because the topic is closed.
Hi Jan Erik,
there are no right or wrong things, in my opinion it always depends on the type of object being processed.
For the known problem with the old version of noise x terminator, I don't consider it a problem because in my opinion it is good practice to run it with a mask that protects the areas with high signal.
In fact, the defects were created on saturated pixels.
however, as you do it is still correct!, I also sometimes apply noise x terminator both linearly and non-linearly
clear skies  |
You cannot like this item. Reason: "ANONYMOUS".
You cannot remove your like from this item.
Editing a post is only allowed within 24 hours after creating it.
You cannot Like this post because the topic is closed.
I recently began use of the weighted batch pre processing script. This takes care of calibrating, evaluating images, stacking and cropping and produces finished masters suitable for stretching or combining.
Peter
|
You cannot like this item. Reason: "ANONYMOUS".
You cannot remove your like from this item.
Editing a post is only allowed within 24 hours after creating it.
You cannot Like this post because the topic is closed.
to create to post a reply.