Good-day,
My name is Brian and my journey into astrophotography began four years ago. I have spent a great deal of time studying Adam Block's videos along with other resources on image processing. It wasn't until recenlty I discovered Astrobin has a Forum section for requesting feedback. As I am always looking to learn and improve my skills I was wondering if I could obtain critical feedback from others on my latest project- M31. The entire image was processed using PI.
Please don't worry about being too blunt in your feedback. As a former doctorate student, I grew accustomed to receiving critical feedback from having my research reviewed by multiple professors. I consider open and honest critical feedback is the best way to learn and improve one's skills.
Kind regards,
Brian
Link to M31- https://astrob.in/p31xn5/0/ |
You cannot like this item. Reason: "ANONYMOUS".
You cannot remove your like from this item.
Editing a post is only allowed within 24 hours after creating it.
You cannot Like this post because the topic is closed.
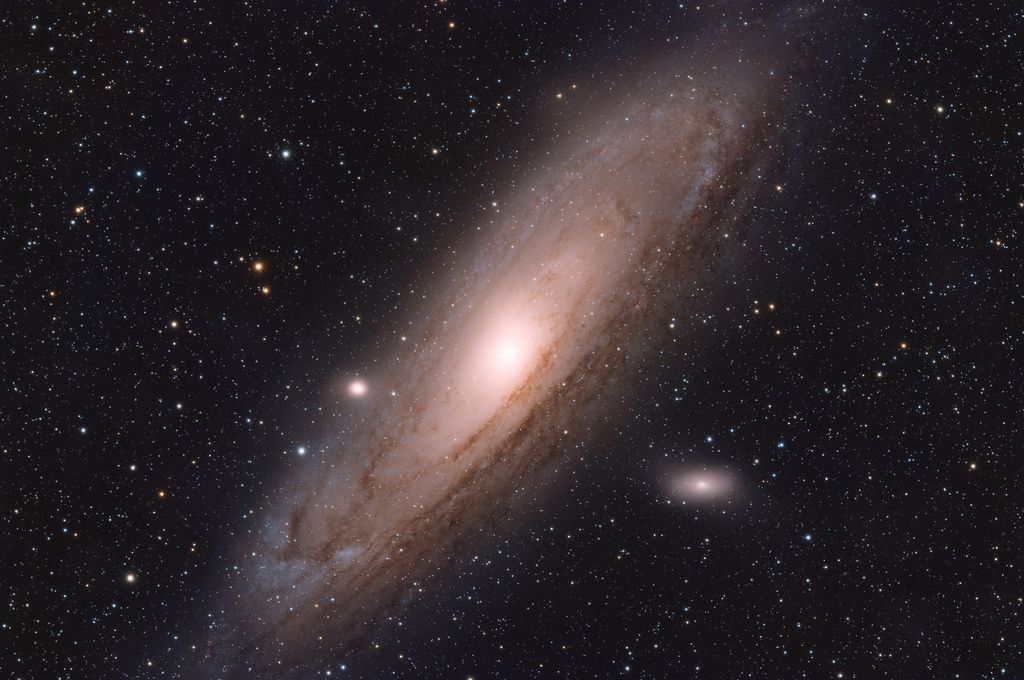
Unfortunately, there are quite a few things wrong with this. The biggest glaring issue is the data has been stretched too far. The background is black, and most of the galaxy is blown. We call this clipping. It's not uncommon to find folks who clip their blacks, but you clipped the blacks and most of the whites as well. If you were to tone that down a bit better, we could move forward with better constructive criticism.
Since you said you were using pixinsight, you could honestly start with simply an auto-STF function and achieve better results. Since you're using an IMX571 and this is 6 hours of data, I imagine this image should have pretty good potential. Let's just start with the basics of stretching. To keep it utterly simple, you can do this utilizing the 'nuke' button of the auto-STF (make sure it's unlinked), and drag the blue arrow from the STF window to the bottom of the histogram trasnformation window. From there you hit the apply button in histogram. I may get some flack for this suggestion, but you are going to have better results.
|
You cannot like this item. Reason: "ANONYMOUS".
You cannot remove your like from this item.
Editing a post is only allowed within 24 hours after creating it.
You cannot Like this post because the topic is closed.
You cannot like this item. Reason: "ANONYMOUS".
You cannot remove your like from this item.
Editing a post is only allowed within 24 hours after creating it.
You cannot Like this post because the topic is closed.
Thank you for your feedback! The following outlines the basic process I took with this image.
Also this is a drizzled image. I set the sequence to dither after every capture.
1. Enable an unlinked STF.2. Dynamic Crop3. Image Solver4. Linear Stage:a. DBEb. SPCC1. Unlink the channels and do an auto-stretch.2. Generate a Preview Background.3. Set SPCC parameters based on data.4. Apply SPCC.5. After running SPCC, link the channels and Auto-stretch to achieve the correct white-balance- per PixInsight video from PI.c. PSFImage calculationd. BlurXTerminatorA. Manually enter the PSFImageB. Select: CORRECT First OptionC. Run BlurXTerminatore. NoiseXTerminatorf. StarXTerminator
Processing Starless image-1. Apply that STF to HistogramTransformation.2. Appy HistogramTransformation to make the stretch permanent.Note-select STF disable after stretch1. Move the black and white points of HistogramTransformation inward until the first pixels are clipped> make range mask to prevent oversaturation of bright areas before applying S-Curve2. Apply a gentle S-curve with CurvesTransformation.3. Apply LocalHistogramEquilization to enhance details. I used settings of 130, 2.0, and 0.22, 4. CurvesTransformation to enhance saturation a bit.5. 'Gamma stretch' with HistogramTransformation using the midpoint slider.
Process to use to manage bright cores (Galaxies)The tool to use to fade or reduce bright areas is HDRMT.Process1. Rename image ori2. Clone ori and rename it to HDRMT3. Apply HDRMT to image HDRMT- note do not check off boxes. Use default settings4. Use pixel math to combine ori and HDRMT pixels 0.5*ori+0.5*HDRMT
|
You cannot like this item. Reason: "ANONYMOUS".
You cannot remove your like from this item.
Editing a post is only allowed within 24 hours after creating it.
You cannot Like this post because the topic is closed.
Brian Boerma:
Thank you for your feedback! The following outlines the basic process I took with this image.
Also this is a drizzled image. I set the sequence to dither after every capture.
1. Enable an unlinked STF.2. Dynamic Crop3. Image Solver4. Linear Stage:a. DBEb. SPCC1. Unlink the channels and do an auto-stretch.2. Generate a Preview Background.3. Set SPCC parameters based on data.4. Apply SPCC.5. After running SPCC, link the channels and Auto-stretch to achieve the correct white-balance- per PixInsight video from PI.c. PSFImage calculationd. BlurXTerminatorA. Manually enter the PSFImageB. Select: CORRECT First OptionC. Run BlurXTerminatore. NoiseXTerminatorf. StarXTerminator
Processing Starless image-1. Apply that STF to HistogramTransformation.2. Appy HistogramTransformation to make the stretch permanent.Note-select STF disable after stretch1. Move the black and white points of HistogramTransformation inward until the first pixels are clipped> make range mask to prevent oversaturation of bright areas before applying S-Curve2. Apply a gentle S-curve with CurvesTransformation.3. Apply LocalHistogramEquilization to enhance details. I used settings of 130, 2.0, and 0.22, 4. CurvesTransformation to enhance saturation a bit.5. 'Gamma stretch' with HistogramTransformation using the midpoint slider.
Process to use to manage bright cores (Galaxies)The tool to use to fade or reduce bright areas is HDRMT.Process1. Rename image ori2. Clone ori and rename it to HDRMT3. Apply HDRMT to image HDRMT- note do not check off boxes. Use default settings4. Use pixel math to combine ori and HDRMT pixels 0.5*ori+0.5*HDRMT
So honestly the basics seem fine here, maybe not exactly how I do it, but they're acceptable. Where it starts to fall apart is HDRMT and histo. Personally I don't see any reason to use HDRMT on galaxies. Where I think you really went wrong is setting your black point to clip, and then using the midpoint slider on the Histogram. Following that up with HDRMT just smells like a recipe for failure. LHE also probably didn't help the matter, but I suspect it didn't do much damage with your settings.
I don't touch midpoint on the histo ever. I use curves to manipulate the details. At the end of my process I use histo to adjust black point slightly, usually only to ensure the background doesn't have any color cast to it.
Feel free to share your data on drive if you want. Plenty of folks in here willing to walk you through their process.
|
You cannot like this item. Reason: "ANONYMOUS".
You cannot remove your like from this item.
Editing a post is only allowed within 24 hours after creating it.
You cannot Like this post because the topic is closed.
A basic workflow that I can imagine involves only the following steps:
- Gradient removal via DBE
- Color calibration via SPCC (keeping in mind that you are using a LP suppression filter)
- Stretch from linear to non-linear by using the default (auto) STF
- Color saturation with a luminance mask applied
Nothing more. Thanks to several YT influencers, we are forgetting what the basics are.
Can you follow this rudimentary workflow? Can you post your result here, or as a revision to your original image?
|
You cannot like this item. Reason: "ANONYMOUS".
You cannot remove your like from this item.
Editing a post is only allowed within 24 hours after creating it.
You cannot Like this post because the topic is closed.
Brian Puhl:
Unfortunately, there are quite a few things wrong with this. The biggest glaring issue is the data has been stretched too far. The background is black, and most of the galaxy is blown. We call this clipping. It's not uncommon to find folks who clip their blacks, but you clipped the blacks and most of the whites as well. If you were to tone that down a bit better, we could move forward with better constructive criticism.
Since you said you were using pixinsight, you could honestly start with simply an auto-STF function and achieve better results. Since you're using an IMX571 and this is 6 hours of data, I imagine this image should have pretty good potential. Let's just start with the basics of stretching. To keep it utterly simple, you can do this utilizing the 'nuke' button of the auto-STF (make sure it's unlinked), and drag the blue arrow from the STF window to the bottom of the histogram trasnformation window. From there you hit the apply button in histogram. I may get some flack for this suggestion, but you are going to have better results.
*** Up to this day I use nothing else than this method STF to histogram window method, thats it.
***
|
You cannot like this item. Reason: "ANONYMOUS".
You cannot remove your like from this item.
Editing a post is only allowed within 24 hours after creating it.
You cannot Like this post because the topic is closed.
Wolfgang Promper:
*** Up to this day I use nothing else than this method STF to histogram window method, thats it.
***
To be honest, I do the same, however I move my black points until any visible noise disappears, and white point to where the brightest part of the image sits roughly in the middle of the histo, then histo transfer. Enhancements and further stretching completed in curves. It works well for me.
|
You cannot like this item. Reason: "ANONYMOUS".
You cannot remove your like from this item.
Editing a post is only allowed within 24 hours after creating it.
You cannot Like this post because the topic is closed.
Brian Puhl:
Wolfgang Promper:
*** Up to this day I use nothing else than this method STF to histogram window method, thats it.
***
To be honest, I do the same, however I move my black points until any visible noise disappears, and white point to where the brightest part of the image sits roughly in the middle of the histo, then histo transfer. Enhancements and further stretching completed in curves. It works well for me.
What I do is keep the background pretty bright and the brightest parts rather dull till the end just to avoid clipping during the whole process.
I know there are a lot of "sophisticated"stretching methods theese days, but I really keep it simple and only use the histogramm or levels in Photoshop which is the same, no curves.
|
You cannot like this item. Reason: "ANONYMOUS".
You cannot remove your like from this item.
Editing a post is only allowed within 24 hours after creating it.
You cannot Like this post because the topic is closed.
Wolfgang Promper:
Brian Puhl:
Wolfgang Promper:
*** Up to this day I use nothing else than this method STF to histogram window method, thats it.
***
To be honest, I do the same, however I move my black points until any visible noise disappears, and white point to where the brightest part of the image sits roughly in the middle of the histo, then histo transfer. Enhancements and further stretching completed in curves. It works well for me.
What I do is keep the background pretty bright and the brightest parts rather dull till the end just to avoid clipping during the whole process.
I know there are a lot of "sophisticated"stretching methods theese days, but I really keep it simple and only use the histogramm or levels in Photoshop which is the same, no curves.
100% agree.
|
You cannot like this item. Reason: "ANONYMOUS".
You cannot remove your like from this item.
Editing a post is only allowed within 24 hours after creating it.
You cannot Like this post because the topic is closed.
Wolfgang Promper:
What I do is keep the background pretty bright and the brightest parts rather dull till the end just to avoid clipping during the whole process.
I know there are a lot of "sophisticated"stretching methods theese days, but I really keep it simple and only use the histogramm or levels in Photoshop which is the same, no curves.
Similar. I have never found much use for sophisticated stretching methods. The fact that you can get such great images using fairly simple processing speaks to the fact that good data gets you 90% of the way there. The way I look at this - if you are playing around with fine parameters of various stretching or noise reduction algorithms to make an otherwise unacceptable image acceptable, you have lost the war and are merely negotiating the terms of surrender.
|
You cannot like this item. Reason: "ANONYMOUS".
You cannot remove your like from this item.
Editing a post is only allowed within 24 hours after creating it.
You cannot Like this post because the topic is closed.
Die Launische Diva:
A basic workflow that I can imagine involves only the following steps:
- Stretch from linear to non-linear by using the default (auto) STF
- Color saturation with a luminance mask applied
Isn't that what Maskedstretch does for you only gradually in 100 iterations?
|
You cannot like this item. Reason: "ANONYMOUS".
You cannot remove your like from this item.
Editing a post is only allowed within 24 hours after creating it.
You cannot Like this post because the topic is closed.
Good evening everyone-
Thank you for all the wonderful feedback and assistance. Since posting this, due to work, I have not had the time to respond and implement the suggested postings.
Brian
|
You cannot like this item. Reason: "ANONYMOUS".
You cannot remove your like from this item.
Editing a post is only allowed within 24 hours after creating it.
You cannot Like this post because the topic is closed.
Die Launische Diva:
A basic workflow that I can imagine involves only the following steps:
- Stretch from linear to non-linear by using the default (auto) STF
- Color saturation with a luminance mask applied
Isn't that what Maskedstretch does for you only gradually in 100 iterations?
Hi Dimitris,
Sorry for not being more clear.
For stretching, the procedure I was suggesting is to copy the linked auto STF computed on the (gradient-free and color-calibrated) linear image to HistogramTransform. This can be done by dragging the triangle from the bottom left of the ScreenTransferFunction window to the bottom line of the IntensityTransformation window.
MaskedStretch is what you have described, but since it takes some time to compute, and more importantly, it usually needs some additional effort to better reveal the midtones, I didn't consider it for this workflow.
The luminance mask is for the color saturation step with the CurvesTransformation process. I would apply a luminance mask to the stretched image in order to avoid accentuating the color noise on the dark background.
|
You cannot like this item. Reason: "ANONYMOUS".
You cannot remove your like from this item.
Editing a post is only allowed within 24 hours after creating it.
You cannot Like this post because the topic is closed.
With regards to the original image, I actually quite like it. I think it is an unusual (but good looking) interpretation of M31 with the main emphasis put on the dust spirals by setting the black point too high (with everything else that comes with that).
Sometimes I just have the stretched image loaded on PI, maybe with a mask, and just play with CurvesTransform or HDRMT, not actually saving anything, just marveling at the layers upon layers of structures that are revealed as you change various parameters. It's fun.
Cheers,
D.
|
You cannot like this item. Reason: "ANONYMOUS".
You cannot remove your like from this item.
Editing a post is only allowed within 24 hours after creating it.
You cannot Like this post because the topic is closed.
Brian Puhl:
Brian Boerma:
Thank you for your feedback! The following outlines the basic process I took with this image.
Also this is a drizzled image. I set the sequence to dither after every capture.
1. Enable an unlinked STF.2. Dynamic Crop3. Image Solver4. Linear Stage:a. DBEb. SPCC1. Unlink the channels and do an auto-stretch.2. Generate a Preview Background.3. Set SPCC parameters based on data.4. Apply SPCC.5. After running SPCC, link the channels and Auto-stretch to achieve the correct white-balance- per PixInsight video from PI.c. PSFImage calculationd. BlurXTerminatorA. Manually enter the PSFImageB. Select: CORRECT First OptionC. Run BlurXTerminatore. NoiseXTerminatorf. StarXTerminator
Processing Starless image-1. Apply that STF to HistogramTransformation.2. Appy HistogramTransformation to make the stretch permanent.Note-select STF disable after stretch1. Move the black and white points of HistogramTransformation inward until the first pixels are clipped> make range mask to prevent oversaturation of bright areas before applying S-Curve2. Apply a gentle S-curve with CurvesTransformation.3. Apply LocalHistogramEquilization to enhance details. I used settings of 130, 2.0, and 0.22, 4. CurvesTransformation to enhance saturation a bit.5. 'Gamma stretch' with HistogramTransformation using the midpoint slider.
Process to use to manage bright cores (Galaxies)The tool to use to fade or reduce bright areas is HDRMT.Process1. Rename image ori2. Clone ori and rename it to HDRMT3. Apply HDRMT to image HDRMT- note do not check off boxes. Use default settings4. Use pixel math to combine ori and HDRMT pixels 0.5*ori+0.5*HDRMT
So honestly the basics seem fine here, maybe not exactly how I do it, but they're acceptable. Where it starts to fall apart is HDRMT and histo. Personally I don't see any reason to use HDRMT on galaxies. Where I think you really went wrong is setting your black point to clip, and then using the midpoint slider on the Histogram. Following that up with HDRMT just smells like a recipe for failure. LHE also probably didn't help the matter, but I suspect it didn't do much damage with your settings.
I don't touch midpoint on the histo ever. I use curves to manipulate the details. At the end of my process I use histo to adjust black point slightly, usually only to ensure the background doesn't have any color cast to it.
Feel free to share your data on drive if you want. Plenty of folks in here willing to walk you through their process.
I’d suggest providing your integrated master for us to play with. We could very easily process it with the results and our personal workflow.
I personally agree with @Brian Puhl comments, your clipping the data on both ends of the histogram which means your loosing data.
I’d love to play with your master for the simple fact I have clouds for the next week and I’d like to see what I could do with it.
As mentioned above with almost 7hrs of data I’d think you have a lot of potential with your integrated image.
Hope this helps!
Dale
|
You cannot like this item. Reason: "ANONYMOUS".
You cannot remove your like from this item.
Editing a post is only allowed within 24 hours after creating it.
You cannot Like this post because the topic is closed.
|
I completed a second edit using people's advice. I will upload soon.
|
You cannot like this item. Reason: "ANONYMOUS".
You cannot remove your like from this item.
Editing a post is only allowed within 24 hours after creating it.
You cannot Like this post because the topic is closed.
|
I commented on your astrobin image. Please contact me if you would like me to look at your data. I am just up the road from you.
|
You cannot like this item. Reason: "ANONYMOUS".
You cannot remove your like from this item.
Editing a post is only allowed within 24 hours after creating it.
You cannot Like this post because the topic is closed.
Spent about 10 minutes on this.
BlurX 0.3, DBE, SPCC (which really didn't work very well), Auto-STF to histogram (relaxing the midpoint just a tad).
From non-linear on:
StarXexterminator (to preserve background galaxies)
DeepSNR
Tried tweaking the colors a bit more since they were not properly calibrated, failed pretty miserably, I'll explain below.
Boosted saturation
re-added stars back into the image
You have some flat issues, you might want to consider taking new flats if the option is still there. There's some wierd splotchiness all over the background of the image, which is part of why I gave up tweaking the background to a proper 'black' instead of the red/blue cast it has now.
I saw your second rendition of this process in the shared files, and you did much much better. The only real critique was bringing in a bit more color to the image. There's quite a few background galaxies in this data too. Pretty neat. Your stars are a tad wonky, maybe tilt/collimation just a tad off?
Anyways, hope this helps a little bit. 10 minutes, all it took. Don't overthink it 
 |
You cannot like this item. Reason: "ANONYMOUS".
You cannot remove your like from this item.
Editing a post is only allowed within 24 hours after creating it.
You cannot Like this post because the topic is closed.
Brian Puhl:
Spent about 10 minutes on this.
BlurX 0.3, DBE, SPCC (which really didn't work very well), Auto-STF to histogram (relaxing the midpoint just a tad).
From non-linear on:
StarXexterminator (to preserve background galaxies)
DeepSNR
Tried tweaking the colors a bit more since they were not properly calibrated, failed pretty miserably, I'll explain below.
Boosted saturation
re-added stars back into the image
You have some flat issues, you might want to consider taking new flats if the option is still there. There's some wierd splotchiness all over the background of the image, which is part of why I gave up tweaking the background to a proper 'black' instead of the red/blue cast it has now.
I saw your second rendition of this process in the shared files, and you did much much better. The only real critique was bringing in a bit more color to the image. There's quite a few background galaxies in this data too. Pretty neat. Your stars are a tad wonky, maybe tilt/collimation just a tad off?
Anyways, hope this helps a little bit. 10 minutes, all it took. Don't overthink it
This looks much better then the original image Brian!
|
You cannot like this item. Reason: "ANONYMOUS".
You cannot remove your like from this item.
Editing a post is only allowed within 24 hours after creating it.
You cannot Like this post because the topic is closed.
Brian Puhl:
Spent about 10 minutes on this.
BlurX 0.3, DBE, SPCC (which really didn't work very well), Auto-STF to histogram (relaxing the midpoint just a tad).
From non-linear on:
StarXexterminator (to preserve background galaxies)
DeepSNR
Tried tweaking the colors a bit more since they were not properly calibrated, failed pretty miserably, I'll explain below.
Boosted saturation
re-added stars back into the image
You have some flat issues, you might want to consider taking new flats if the option is still there. There's some wierd splotches all over the background of the image, which is part of why I gave up tweaking the background to a proper 'black' instead of the red/blue cast it has now.
I saw your second rendition of this process in the shared files, and you did much much better. The only real critique was bringing in a bit more color to the image. There's quite a few background galaxies in this data too. Pretty neat. Your stars are a tad wonky, maybe tilt/collimation just a tad off?
Anyways, hope this helps a little bit. 10 minutes, all it took. Don't overthink it
*Thank you Brian, I can't believe what a difference this is. I was aware of the splotches during the processing and was unsure if taking new flats would correct for this. I am concerned you felt the stars were a bit "wonky". My scope is a refractor and everything is threaded so I am not sure how to correct for this. it was a very expensive scope and I waited nearly 8 months for it to arrive because they test each scope before shipping.
How did you "tame the core"? The core looks fantastic.
Last question- how does an imager know when they have achieved the best image possible?
Thanks
Again Brian
|
You cannot like this item. Reason: "ANONYMOUS".
You cannot remove your like from this item.
Editing a post is only allowed within 24 hours after creating it.
You cannot Like this post because the topic is closed.
Brian Boerma:
*Thank you Brian, I can't believe what a difference this is. I was aware of the splotches during the processing and was unsure if taking new flats would correct for this. I am concerned you felt the stars were a bit "wonky". My scope is a refractor and everything is threaded so I am not sure how to correct for this. it was a very expensive scope and I waited nearly 8 months for it to arrive because they test each scope before shipping.
How did you "tame the core"? The core looks fantastic.
Last question- how does an imager know when they have achieved the best image possible?
Thanks
Again Brian
Every telescope has proper backspacing... often times for 'most' telescopes this is 55mm. Problem is some folks don't realize that 55mm is merely a suggestion. Proper backspacing is achieved when the image provides the flattest possible image across the full field of view. Often times this is closer to 56 or 57mm. This is due to the addition of filters in your imaging train, but I wont go into detail there. Solutions for this degree of accuracy come in the form of shims that can be found on sites like Agena. Things like tilt are a little more difficult to fix, and often can be caused by the camera itself. You can research on your own how to fix these things. Also, it really doesn't matter how much you spend on your telescope, everyone has to go through this and learn how to properly align their optics at some point.
Here is what your corner stars look like on your stacked image:

Left side looks pretty substantially out of focus and somewhat streaking away. This tells me your sensor is likely too close on that side. The right side of the image is still just a tad out of focus, but the stars look more concentric towards the center of frame. This indicates the sensor is too far away on that side. These adjustments can be as subtle as 0.2mm to correct. I encourage you to google this stuff , it's not difficult, but you must identify if the tilt is in your camera or in your telescope first before you make corrections, unless you plan on never rotating your camera. You can purchase things like the Gerd Nuemann plate to correct tilt either way.
How did I tame the core? Well, I didn't really do much other than an Auto-STF, relaxing the midpoint and blackpoint slightly before dropping it into the histogram window. Honestly, nothing Keep it simple.
As for your last question... How do you know when you've achieved the best image possible? Well, I could say with some confidence it's when you've exhausted your wallet, all your free time, and all your energy. Otherwise, you're never done, and it can always be better. More integration time, more money, those two things will always make it better.
Realistically though. I'm done with an image when my OCD kicks in and I'm tired of it. Last project was 45 hours, the one I'm working on right now will probably be closer to 100 by the time I'm done.
|
You cannot like this item. Reason: "ANONYMOUS".
You cannot remove your like from this item.
Editing a post is only allowed within 24 hours after creating it.
You cannot Like this post because the topic is closed.
to create to post a reply.


